You can’t directly upload GPX files to your Apple Watch using Apple’s built-in apps — the functionality simply isn’t supported in watchOS. But if you’re a hiker, trail runner, or cyclist who relies on pre-planned routes from AllTrails, Komoot, or Strava, you’re not out of luck. With the right third-party app, you can import and follow GPX routes directly from your wrist, even in remote backcountry areas.
The key? WorkOutDoors, the most trusted app for bringing full route navigation to Apple Watch. While Apple focuses its Fitness app on recording activities, WorkOutDoors fills the gap by letting you import GPX files, follow turn-by-turn directions, and receive waypoint alerts — all without needing to glance at your iPhone once you’re on the trail.
This guide walks you through the complete process of uploading GPX to Apple Watch using WorkOutDoors, troubleshoots common issues, and shares real-world tips tested by outdoor enthusiasts using Apple Watch Ultra on events like the Aravaipa Trail Run. By the end, you’ll know how to get any route onto your watch, navigate it confidently, and even export your own recorded hikes as GPX files for sharing or archiving.
Install WorkOutDoors on iPhone and Apple Watch
Before you can upload a GPX file, you need the right tool installed and synced.
WorkOutDoors is available free on the App Store with optional premium features. It’s compatible with Apple Watch Series 3 and later, including the Ultra models, and requires iOS 13+ and watchOS 6+.
Steps to Install:
- Download WorkOutDoors from the App Store on your iPhone
- Open the Apple Watch app on your iPhone
- Scroll down and tap WorkOutDoors
- Toggle on “Show App on Apple Watch”
- Wait for the app to install and sync
✅ Pro Tip: Ensure your Apple Watch has at least 50MB of free storage — routes and cached maps take up space, especially for long trails.
Once installed, you’ll see the WorkOutDoors icon on your Watch home screen. The app is now ready to receive GPX routes via your iPhone.
Import GPX File Using the Share Sheet

You can’t drag-and-drop GPX files to your Apple Watch, but WorkOutDoors uses iOS’s powerful share sheet system to make importing seamless.
Download Your GPX Route
Start by getting the GPX file from your preferred platform:
- AllTrails: Tap “Export” → “Download GPX”
- Komoot: Go to your tour → “Export” → “GPX”
- Strava: Open a route → “Export GPX”
- Or transfer via email, iCloud Drive, or Dropbox
Share GPX to WorkOutDoors
- Tap the GPX file in Mail, Files, or Safari
- When it opens in preview, tap the Share icon (square with upward arrow)
- Scroll through the share sheet and select WorkOutDoors
- Wait a few seconds — the app will process the route
🔍 What Happens Next?
The route appears under “Saved Tracks” in the WorkOutDoors iPhone app and automatically syncs to your Apple Watch within moments.
If the route doesn’t appear immediately, open WorkOutDoors on your iPhone and pull down to refresh.
Start Navigating on Apple Watch
Now that your GPX file is loaded, it’s time to follow the route in real time.
On Your Apple Watch:
- Open WorkOutDoors
- Tap “Navigate”
- Select your imported GPX route
- Tap “Start”
You’ll see:
– A compass-style navigation display
– Distance to next turn or waypoint
– Real-time elevation profile
– Progress bar showing how far you’ve traveled
As you move, the app guides you turn-by-turn, just like a car GPS — but designed for footpaths and dirt trails.
🚴♂️ Pro Tip: For cycling or long hikes, mount your iPhone in a backpack or handlebar holder. WorkOutDoors uses your phone for detailed map data and GPS correction, but navigation runs independently on the Watch.
Enable Waypoint Alerts for Trail Junctions and Landmarks
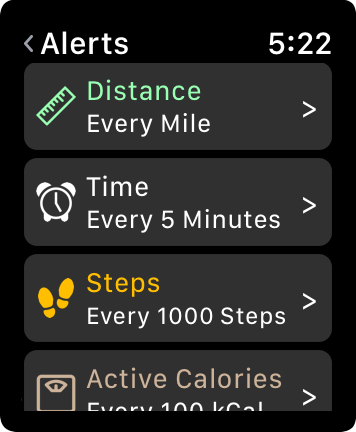
One of the biggest advantages of GPX files is custom waypoints — points of interest like trailheads, water sources, or campsites embedded directly into the route.
WorkOutDoors reads <wpt> tags from your GPX file and triggers haptic alerts and on-screen notifications when you approach or pass these points.
Add Waypoints Before Export
To maximize this feature:
- In Komoot, add “Via Points” or “Markers” before exporting
- In AllTrails, insert stops using the route planner
- In CalTopo or GPS Visualizer, manually define waypoints with names like “River Crossing” or “Summit Trail Split”
When exported as GPX, these become actionable alerts.
Receive Alerts on Your Wrist
As you near a waypoint:
– Your Apple Watch vibrates
– Screen shows: “Approaching: Trail Junction – 30m ahead”
– After passing: “Passed: Campsite”
⚠️ Critical Note: These alerts only work if waypoints are included in the GPX file. Routes with only
<trk>(track) or<rte>(route) data won’t trigger notifications.
Fix Common GPX Import Problems
Even when following the steps, users sometimes encounter issues. Here’s how to fix them fast.
GPX File Won’t Open in WorkOutDoors?
Try these solutions:
- Re-download the file — some downloads get corrupted
- Open in Files app first, then share
- Rename the file to remove spaces or special characters (e.g.,
mt_tam_loop.gpx) - Ensure it follows GPX 1.1 standard with valid
<trk>or<rte>sections
❌ Avoid KML or TCX files — WorkOutDoors only supports GPX.
Route Shows Up on iPhone But Not Watch?
Check sync status:
- Open WorkOutDoors on iPhone
- Go to Settings → Sync Status
- Tap “Force Sync”
If still missing:
– Restart both iPhone and Apple Watch
– Reinstall WorkOutDoors
– Ensure both devices are connected via Bluetooth or Wi-Fi
Why Apple Watch Doesn’t Support GPX Natively
Apple’s ecosystem excels at recording workouts, not guiding pre-planned routes. The native Fitness app can log your GPS path during a hike, but cannot import external GPX files for navigation.
You can:
– Record a route with Apple Watch
– Export it as GPX using third-party tools
– But you cannot re-import it to follow
This frustrates many outdoor users who plan routes on platforms like Komoot or RideWithGPS.
📢 Growing Demand: A persistent user request (similar to GitHub #267) asks Apple to add: “Load pre-recorded tracks and follow them on the Watch like on the phone.”
Until Apple acts, WorkOutDoors remains the most reliable solution.
Compare Apple Watch + WorkOutDoors vs Garmin

| Feature | Apple Watch + WorkOutDoors | Garmin Devices |
|---|---|---|
| GPX Import | ✅ Yes (via app) | ✅ Native support |
| Turn-by-Turn Navigation | ✅ Yes | ✅ Yes |
| Waypoint Alerts | ✅ Yes | ✅ Yes |
| Always-On Display (AOD) | ❌ Not supported | ✅ Full route view |
| Offline Maps | ⚠️ Limited (requires iPhone) | ✅ Built-in |
| Battery Life (Navigation) | Up to 36 hrs (Ultra) | Up to 100+ hrs |
| Ease of Import | Manual share sheet | Drag-and-drop or Connect IQ |
Garmin wins on battery and always-on visibility, but Apple Watch Ultra + WorkOutDoors is a strong alternative — especially for iPhone users who want seamless integration.
Maximize Battery Life During Long Rides or Hikes
Navigation uses more power than standard workouts. Here’s how to extend runtime.
Enable Power Saving in WorkOutDoors
In the iPhone app:
1. Go to Settings
2. Turn on “Low Power Mode”
3. Disable elevation smoothing and reduce map refresh rate
Adjust Apple Watch Settings
Before heading out:
– Enable Theatre Mode to prevent accidental taps
– Turn off Wi-Fi if using cellular
– Lower screen brightness
– Use Power Saving Mode (Ultra models)
🔋 Battery Estimates:
– Standard Series 7–9: ~18 hours
– Apple Watch Ultra: ~30–36 hours
– With Power Saving: +20–30% extra
Export Your Apple Watch Workouts as GPX Files
Want to save or share your hikes? Apple doesn’t allow native export — but third-party apps can extract the data.
Use Health Export CSV (Best Option)
This $2.99 one-time app is the most reliable.
Steps:
1. Install Health Export CSV
2. Open → tap “Export”
3. Select workouts
4. Choose “Export as GPX”
5. Save to Files, iCloud, or email
✅ Files are auto-named:
2025-04-05 08-30-12 Hiking.gpx
Supports batch export and ZIP compression — perfect for archiving.
Alternatives
- GPX Route Exporter: Free, basic
- GPX Export: Free, includes activity type
- RunGap: Syncs to Strava and exports GPX
⚠️ No app supports automatic export — manual action required after each workout.
Prepare for Trail Events Like Aravaipa Run
For organized ultras or backcountry runs, preparation is critical.
Night Before:
- Download official GPX route
- Import into WorkOutDoors
- Test navigation on a short section
- Fully charge both devices
- Download offline maps in WorkOutDoors
On Race Day:
- Wear watch snugly for GPS accuracy
- Keep iPhone in pack for map sync
- Watch for waypoint alerts at junctions
- Use haptics to avoid looking at screen
🥾 Real-World Proof: Multiple users have successfully used Apple Watch Ultra + WorkOutDoors for the Aravaipa Trail Run — proving reliability in remote areas.
Final Tips for Reliable GPX Navigation
- ✅ Always use WorkOutDoors — it’s the only app with full GPX support
- ✅ Download GPX from trusted sources
- ✅ Share via iOS Share Sheet — never try manual sync
- ✅ Test routes before race day
- ✅ Enable power saving for long adventures
- ✅ Keep iPhone nearby for GPS and map data
- ✅ Use Health Export CSV to archive your routes
🛠️ Pro Organization Tip: Create a “Watch Routes” folder in Files app for quick access.
While Apple Watch doesn’t support GPX uploads out of the box, WorkOutDoors makes it possible to import, navigate, and follow GPX routes reliably. Whether you’re hiking remote trails, biking mountain paths, or training for an ultra, your Apple Watch — especially the Ultra — can be a powerful GPS companion.
Yes, the process is a bit clunky compared to Garmin, and Always-On Display isn’t supported yet — but for iPhone users who want ecosystem integration, this solution works well.
So go ahead: upload that GPX file, hit the trail, and let your Apple Watch guide the way.