If you’re wearing an Apple Watch but only using it to check notifications or glance at the time, you’re missing out on one of its most powerful capabilities—exercise tracking. The Apple Watch isn’t just a step counter; it’s a full-featured fitness companion capable of guiding everything from a high-intensity interval session to a heavy strength training workout. But to unlock its true potential, you need to go beyond passive tracking and start using the Workout app intentionally.
While automatic movement detection is helpful, manually starting a workout gives you richer data, better insights, and more accurate progress toward your Activity rings. Whether you’re running, lifting, swimming, cycling, or doing yoga, the Apple Watch adapts—if you use it correctly. In this guide, you’ll learn how to choose the right workout type, track meaningful metrics, sync with gym equipment, and enhance functionality with third-party apps. You’ll also discover little-known best practices—like why you should never restart your workout between sets—that most users overlook.
By the end, you’ll know exactly how to turn your Apple Watch into a precision fitness tool that tracks effort, recovery, and long-term progress—not just steps.
Start the Right Workout Type for Accurate Tracking
Choosing the correct workout mode is essential for accurate calorie burn estimates, heart rate zone analysis, and meaningful post-workout summaries. The Apple Watch offers over 20 dedicated activity types—each optimized for different forms of exercise.
Match Your Activity to the Best Preset
Each workout type tailors the metrics displayed and how your effort is calculated. Use these guidelines to pick the right one:
- Outdoor Run / Indoor Run: Ideal for jogging on a treadmill or outside. Uses GPS for pace and distance.
- Cycling (Outdoor/Indoor): Tracks speed, cadence, and route (outdoor), or syncs with spin bikes.
- Swimming (Pool/Open Water): Automatically detects strokes, lap count, and rest periods. Water Lock activates automatically.
- HIIT: Best for interval circuits. Tracks intense bursts and recovery phases.
- Weight Lifting: Logs reps, sets, and rest intervals using motion and heart rate.
- Yoga / Core Training: Great for low-intensity sessions and still credits Exercise ring minutes.
- Elliptical / Rowing Machine: Use when on cardio machines without GymKit support.
- Sports Modes (Tennis, Golf, Soccer): Sport-specific data like swings, distance covered, or stroke type.
✅ Pro Tip: If your activity doesn’t match any preset, select “Other”—it still records heart rate, duration, and calories.
Why the Workout Type Actually Matters
Apple uses different algorithms depending on the selected mode:
- In Weight Lifting, the watch learns your lifting rhythm and estimates reps and sets.
- In Running, it combines GPS, stride length, and cadence to calculate pace.
- In Swimming, it detects stroke changes and lap turns using motion sensors.
Using “Other” for everything skips these smart optimizations, reducing the quality of insights.
Fix: Exercise Ring Not Filling After Strength Training
Many users report doing a full 90-minute lifting session yet seeing minimal progress on their Exercise ring. This happens because Apple only counts minutes when your heart rate stays above the threshold of a brisk walk for a sustained period.
❗ Problem: Strength training involves short bursts of effort followed by rest, so your heart rate may not stay elevated long enough.
✅ Solution: Start a Functional Strength Training or HIIT workout instead. These modes are more likely to register moderate effort and credit Exercise minutes.
Track Real-Time Metrics That Matter
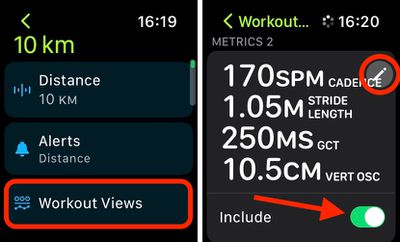
During your workout, your Apple Watch displays live performance data. Knowing what each metric means—and how to customize it—helps you train smarter.
Key Metrics to Monitor
Raise your wrist or tap the screen to cycle through metric panels. Standard data includes:
- Active Calories: Energy burned above resting level.
- Total Time: Includes rest—useful for tracking overall session length.
- Heart Rate (BPM): Color-coded zones:
- Green (50–70%): Fat-burning zone.
- Orange (70–85%): Cardio improvement.
- Red (>85%): Peak effort.
- Distance & Pace: For runners and cyclists (requires GPS).
- Elevation (Climb): Tracks floors ascended or hill climbs.
- Cadence: Steps per minute (running) or pedal RPM (cycling).
- Stroke Type & Lap Count: Automatically detected in pool swim mode.
🔍 Visual Cue: A red heart icon pulses during spikes. A flashing pace number means you’re off target.
Customize Your Metric Display
You can reorder or hide metrics during workouts:
- On iPhone, open Watch app > Workout > Workout View.
- Choose Custom and drag to prioritize key stats (e.g., heart rate first).
- Save and sync to your watch.
✅ Best Setup: Place Heart Rate and Pace at the top for cardio; Duration and Calories for strength.
Use Heart Rate Zones to Train Smarter
Train with purpose by targeting specific intensity zones:
- Fat Burn (50–70%): Ideal for endurance or recovery days.
- Cardio (70–85%): Builds stamina—aim for 20+ minutes here.
- Peak (>85%): For sprints or heavy intervals; not sustainable long-term.
✅ Pro Insight: After your workout, check Heart Rate Zone Minutes in the Fitness app to see how much time you spent in each zone.
Build Custom Interval Workouts
For structured training—like interval runs or gym circuits—create Custom Workouts to set goals and track progress.
How to Create a Custom Workout
- Open Workout app on Apple Watch.
- Swipe to Outdoor Run, Indoor Cycle, or another type.
- Tap More (⋯) > Custom.
- Set goals:
– Time (e.g., 5-min warm-up, 20-min run, 5-min cool-down).
– Distance (e.g., run 3 miles).
– Calories (e.g., burn 300 kcal). - Tap Start when ready.
✅ Use Case: Perfect for 5K training, Tabata, or timed gym circuits.
Example: HIIT Running Workout
- Warm-up: 5 minutes (heart rate <70% max)
- Intervals: 8 rounds of 1 min sprint / 2 min walk
- Cool-down: 5 minutes walking
Set this as a Custom Outdoor Run. Your watch will notify you at each transition.
⚠️ Note: Custom workouts don’t auto-pause. Pause manually during breaks.
Sync with Gym Equipment Using GymKit
Skip GPS and manual logging by pairing your Apple Watch directly with gym machines.
Connect to GymKit-Enabled Machines
- Approach a GymKit-compatible treadmill, elliptical, or bike.
- Hold your Apple Watch screen-down within 2 inches of the NFC reader.
- Wait for the connection animation and tap Start.
- The machine shows your heart rate; your watch receives speed, incline, and resistance.
✅ Supported Brands: Life Fitness, Technogym, Matrix Fitness, and newer Peloton models.
Benefits of GymKit Sync
- More accurate calorie burn (uses machine power output + heart rate).
- Precise distance and pace indoors (no GPS drift).
- Seamless data flow to Apple Health and Fitness app.
💡 Pro Tip: Always end the workout on the Apple Watch, not the machine, to ensure full data sync.
Optimize Weight Training Sessions
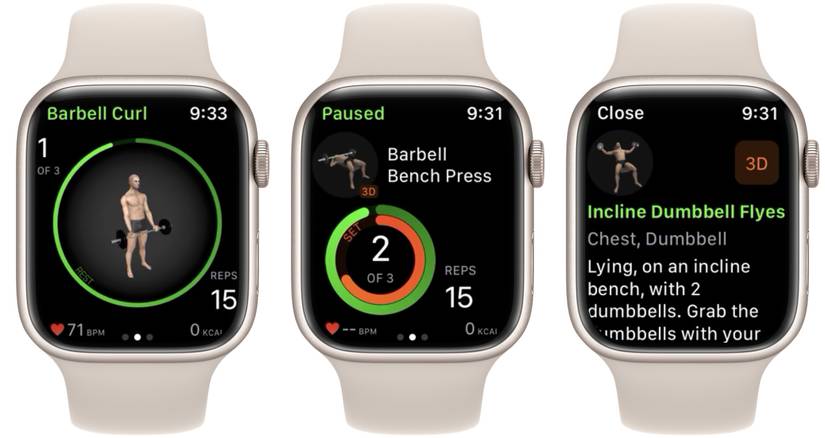
Strength training is tricky on wearables—but with the right method, your Apple Watch delivers valuable insights.
Use One Continuous Workout
Do this:
1. Start Weight Lifting mode at the beginning.
2. Keep it running through warm-up, sets, and rest.
3. End manually after your final set.
Don’t do this:
– Pausing or restarting between sets.
– Starting a new workout per exercise.
✅ Why It Works: The watch uses heart rate trends and arm motion to distinguish active lifting from rest periods. Continuous tracking improves accuracy.
Understand Rep & Set Detection
The Apple Watch uses motion sensors to:
– Detect when you pick up weights.
– Estimate number of reps per set.
– Measure rest intervals between sets.
⚠️ Limitation: Accuracy depends on consistent arm movement. Avoid resting the watch arm on a bench.
✅ Tip: Lift with both arms (e.g., alternate dumbbell curls) for better detection.
Fix: Exercise Ring Doesn’t Reflect Real Effort
Many users report doing hard lifting or yard work—but the Exercise ring barely moves. That’s because Apple only credits minutes when heart rate stays elevated.
Workarounds
- Start a Yoga or HIIT session during strength training—it’s more likely to register effort.
- Use Athlytic to measure exertion on a 0–10 scale based on HRV and heart rate.
- Rely on Active Calories (Move ring) as a better indicator of total effort.
✅ Mindset Shift: The rings are guidelines, not gospel. Use them to encourage movement—but don’t obsess.
Use Third-Party Apps for Better Tracking
The native Workout app is solid, but third-party apps unlock advanced features—especially for lifting and recovery.
Strong: Advanced Lifting Log
- Track sets, reps, weight, rest time, and PRs.
- Log reps directly from the wrist.
- Syncs with Apple Health.
- Subscription: $4.99/month.
StrongLifts 5×5: Beginner-Friendly Program
- 3-day split with progressive overload.
- View exercises and rest timers on watch.
- Auto-syncs to Apple Health.
- Pro Version: $4.99/month.
🔗 Must-Do: Enable Live Sync and grant Apple Health permissions.
Monitor Recovery & Nutrition
Fitness isn’t just about effort—it’s about recovery and fueling.
Athlytic: Daily Readiness Score
- Tracks Recovery, Exertion, and Energy.
- Watch complication shows daily readiness.
AutoSleep: Sleep Quality Tracker
- Tracks sleep stages, HRV, and respiratory rate.
- No setup needed—just wear your watch.
Cronometer: Nutrition Tracking
- Logs macros and 30+ micronutrients.
- Syncs with Apple Health to compare calories in vs. out.
✅ Best Practice: Combine activity, recovery, and nutrition data for a complete fitness picture.
Final Tips for Maximum Fitness Value
- Always start a workout manually.
- Pick the most specific workout type.
- Keep one workout running throughout.
- Use GymKit on compatible machines.
- Install StrongLifts or Strong for detailed logs.
- Sync all apps with Apple Health.
- Customize a fitness watch face.
- Add Athlytic or AutoSleep for recovery.
- Use Cronometer for nutrition.
- Focus on trends, not daily numbers.
The Apple Watch is already one of the most advanced fitness trackers available. While its Exercise ring underestimates non-cardio effort, these gaps can be filled. By combining manual workouts, third-party apps, and smart data interpretation, you can transform your Apple Watch into a complete fitness ecosystem.