If you’ve just finished a hard 5K run, a long weekend ride, or a challenging swim tracked on your Apple Watch, you probably want to share it on Strava—where every stride, stroke, and pedal stroke gets the recognition it deserves. But too often, athletes hit a frustrating wall: the workout doesn’t show up, key metrics like heart rate go missing, or multisport sessions appear as one jumbled activity. The good news? Uploading Apple Watch workouts to Strava is not only possible—it’s reliable when done correctly.
The catch? Strava doesn’t pull data directly from your Apple Watch. Instead, it uses Apple Health as a bridge. Only workouts recorded in the native Workout app on your Apple Watch can be uploaded—whether automatically or manually. Third-party apps like Zwift, MySwimPro, or Tenniskeeper may save to Health, but Strava often ignores them. In this guide, you’ll learn how to set up seamless syncing, troubleshoot missing uploads, split triathlons into individual segments, and preserve critical metrics—all without losing GPS routes or timing data.
Let’s get your hard work where it belongs: on the Strava leaderboard.
Connect Strava to Apple Health Properly
Before any workout can sync, Strava must have permission to access your Apple Watch data through Apple Health.
Grant Strava Access to Workouts
- Open the Strava app on your iPhone.
- Tap your profile icon in the bottom-right corner.
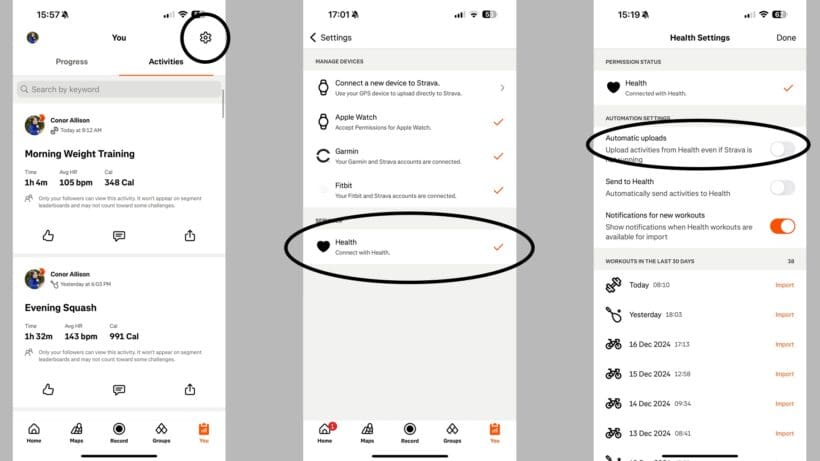
- Tap the Settings gear (top-right).
- Go to Manage Apps and Devices.
- Under “Services,” tap Health.
- Tap the + (plus) icon to link Strava with Apple Health.
- On the permissions screen:
– Turn on “Workouts”—this is mandatory.
– Optionally enable Heart Rate, Distance, Calories, and Motion & Fitness. - Tap Allow.
✅ Pro Tip: If “Workouts” isn’t enabled, no Apple Watch activity will ever appear in Strava—double-check this setting.
Enable Automatic Uploads
Once connected:
- Return to Settings > Manage Apps and Devices > Health.
- Toggle Automatic Uploads ON.
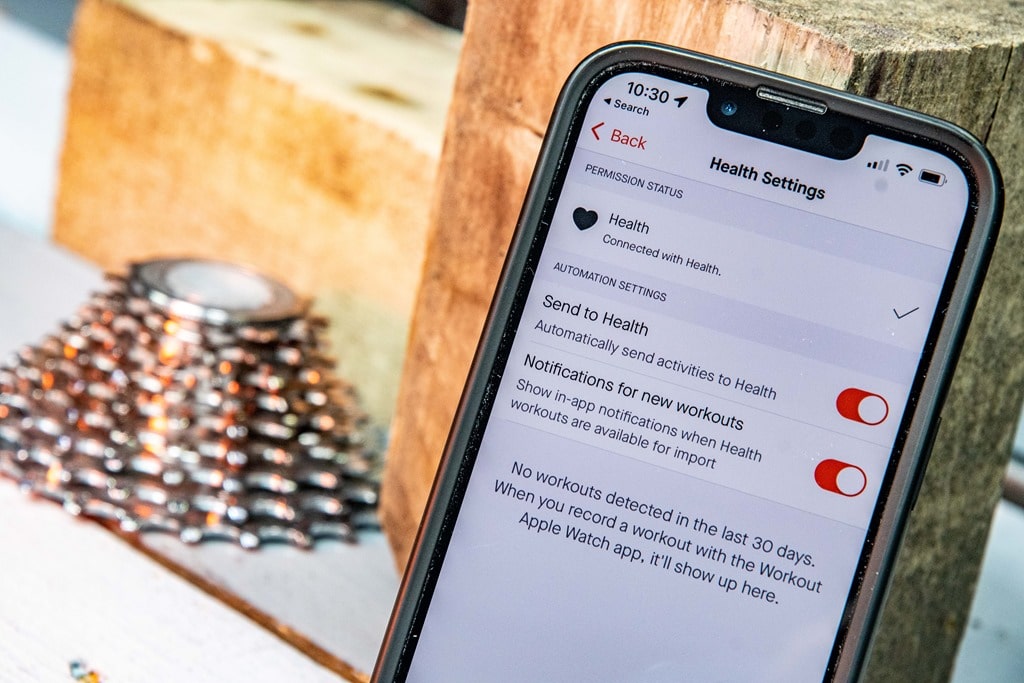
- (Optional) Turn on Send to Health if you want Strava activities to flow back into Apple Health.
⚠️ Note: After enabling, new workouts should appear in Strava within minutes of ending and syncing with your iPhone—no manual action needed.
Manually Import Missing Apple Watch Workouts
Even with auto-sync enabled, some workouts fail to upload. Use manual import for those sessions.
How to Find and Import Past Workouts
- In Strava, go to Profile > Settings > Manage Apps and Devices > Health.
- A list of eligible workouts (up to 90 days old) appears.
- Scroll to find your missing session.
- Tap Import next to the activity.
- Wait for the checkmark confirmation.
✅ Key Advantage: Manual import supports workouts up to 90 days old—30 days longer than auto-sync allows.
Why Manual Import Might Fail
- Workout not in Apple Health: Confirm it was recorded in the native Workout app and synced.
- Third-party app used: Strava only imports native Apple Watch workouts—even if they’re saved in Health.
- Blank import list: Often fixed by reinstalling Strava or restarting your iPhone.
Troubleshoot Common Sync Problems
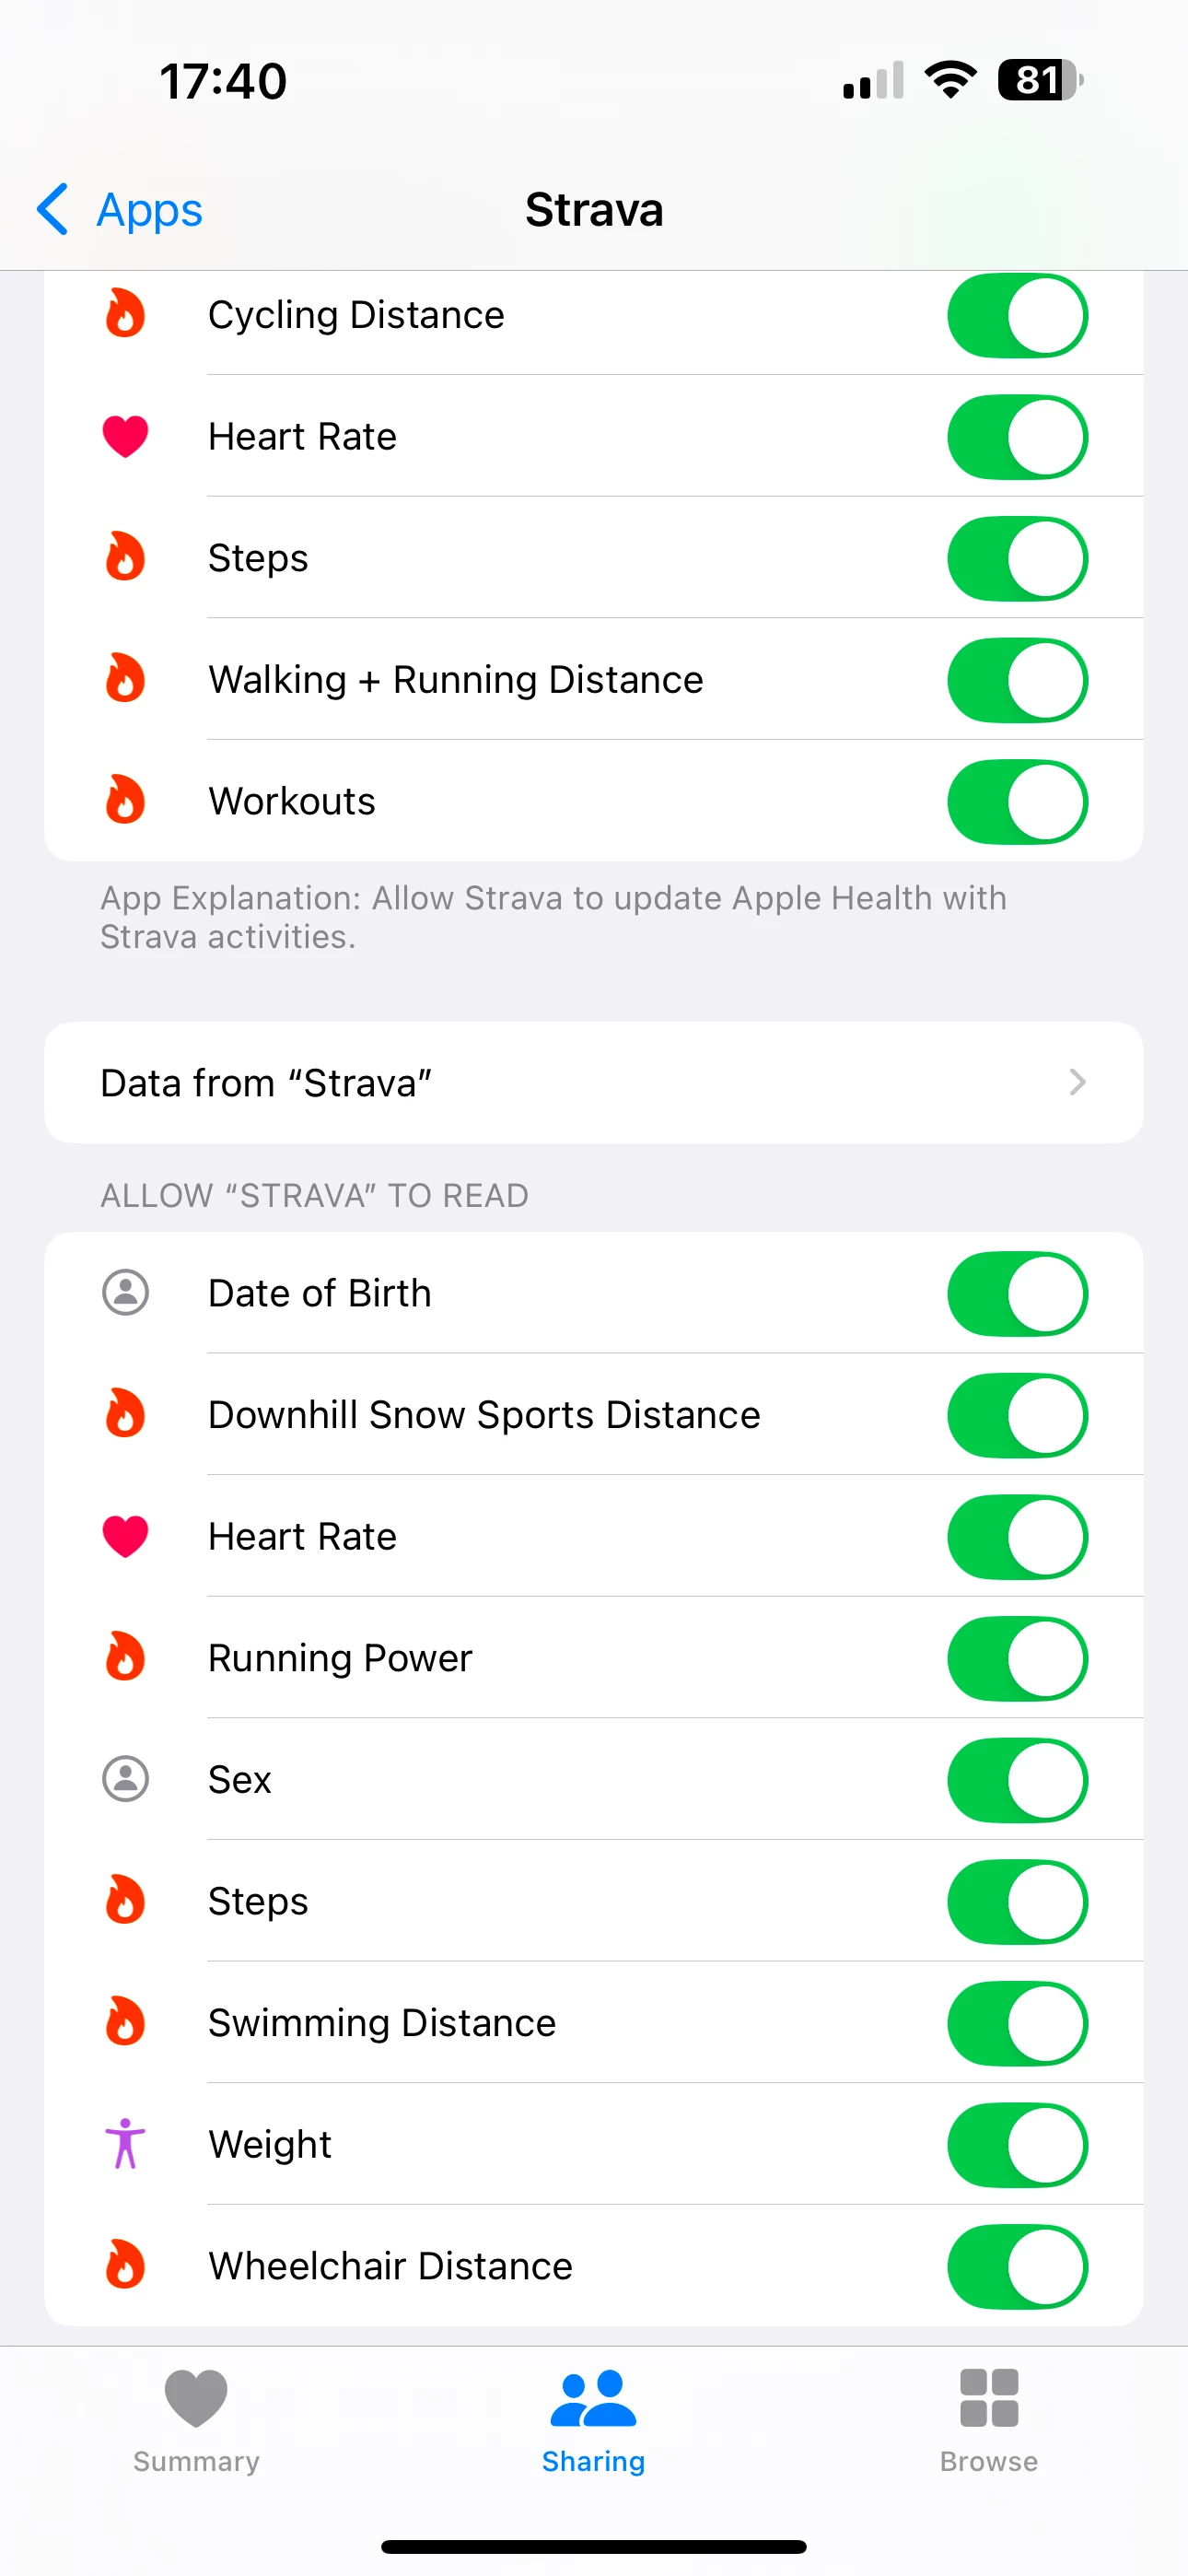
Even with perfect setup, issues happen. Here’s how to fix the most frequent upload failures.
Workout Missing from Import List
Cause: Sync lag, app cache glitch, or iOS background refresh disabled.
Fix:
– Force close both Strava and Health apps.
– Restart your iPhone.
– Reopen Strava and check the import list again.
✅ User Verified: Multiple users (progressiveoverload, DiaSquidz) confirm this resolves delays caused by caching issues.
No “Import” Button Appears
Cause: Corrupted Health connection or outdated app version.
Solution:
1. Delete the Strava app.
2. Reboot your iPhone.
3. Reinstall Strava from the App Store.
4. Log in and reconnect Apple Health.
5. Check the import list again.
✅ Success Rate: High—especially after iOS or watchOS updates break existing integrations.
Heart Rate or Cadence Not Showing in Strava
Cause: Permission issues or incomplete data export.
Diagnose:
1. Open Health app > Browse > Heart > Heart Rate.
2. Verify data exists for the workout time.
3. In Strava Settings > Health, ensure Heart Rate is enabled.
⚠️ Known Issue: Cadence often fails to transfer—even when visible in Apple Fitness. No official fix yet, as reported by users like keci-cz.
Split Triathlon Workouts into Individual Activities
Apple Watch lets you record multisport workouts (e.g., swim → bike → run), but Strava sees them as one “Other” activity—unless you split them manually.
Why Auto-Split Doesn’t Work
- Imported multisport sessions appear as a single long activity.
- Segments aren’t separated.
- Route data is merged, making analysis useless.
Step-by-Step: Export GPX Files and Upload Separately
Step 1: Export Health Data from iPhone
- Open Health app.
- Tap your profile icon (top right).
- Tap Export All Health Data.
- Save to iCloud Drive, Google Drive, or email.
✅ Warning: This export includes all your health data—can be large. Allow time to process.
Step 2: Extract and Identify GPX Files
On your computer:
1. Download and unzip export.zip.
2. Navigate to:
applehealthexport/workout-routes/
3. Look for .gpx files named by UTC timestamp (e.g., 20240405-143022.gpx).
4. Identify files per discipline:
– One each for swim, bike, run, and transitions.
– Total: 5 files for a full triathlon.
✅ Pro Tip: Match file creation time to your workout log to identify segments.
Step 3: Upload to Strava Web
- Go to Strava.com.
- Click + (plus) > Upload activity.
- Select File.
- Click Choose Files, pick the bike GPX, set type to Ride, add title, save.
- Repeat for swim (type: Swim) and run (type: Run).
✅ Result: Three clean, segmented activities with full GPS maps and elevation.
Know What Data Transfers—and What Doesn’t
Not all Apple Watch metrics make it to Strava, even with perfect sync.
Metrics That Transfer via Apple Health
| Metric | Transfers? | Notes |
|---|---|---|
| Workout Type | ✅ Yes | Running, Cycling, etc. |
| Duration | ✅ Yes | Moving time preserved |
| Distance | ✅ Yes | GPS or calibrated |
| Route | ✅ Yes | Full map trace |
| Calories | ✅ Yes | Total energy burned |
| Heart Rate | ✅ Yes | If enabled and recorded |
| Elevation | ✅ Yes | From barometer/GPS |
Common Limitations
| Metric | Issue | Workaround |
|---|---|---|
| Cadence | ⚠️ Often missing | Check Health permissions; no guaranteed fix |
| Power (Cycling) | ⚠️ Limited | Only from compatible sensors; verify in Health first |
| Laps | ⚠️ May not sync | Use Strava app instead for lap tracking |
| VO2 Max, Recovery | ❌ Not supported | Not exposed via Health to Strava |
| Third-Party Workouts | ❌ Blocked | Use native Workout app only for Strava-bound sessions |
⚠️ Critical Rule: If you used Peloton, Zwift, or Tenniskeeper, Strava likely won’t import it—even if saved in Health.
Optimize for Reliable Syncing
Avoid future upload failures with these best practices.
Use Only the Native Workout App
Always start workouts from the Workout app on your Apple Watch.
✅ Why: Third-party apps don’t format data in a way Strava recognizes—even if they save to Health.
Keep Background Refresh Enabled
Ensure Strava can sync in the background:
- Go to iPhone Settings > Strava.
- Enable Background App Refresh.
- Allow Location Access (while using and always).
✅ Pro Tip: Without background access, delayed or failed syncs are common.
Recheck Settings After iOS or watchOS Updates
New updates (e.g., iOS 17, watchOS 10) can break Health connections.
After any update:
– Open Strava.
– Go to Settings > Manage Apps and Devices > Health.
– Confirm Automatic Uploads is still ON.
– Test with a short walk or run.
✅ User Feedback: Original-Ad9054 noted UI changes post-update hid the import option—rechecking settings fixed it.
Get Alerts When Uploads Fail
Stay ahead of sync issues with Strava’s notification system.
Enable Workout Notifications
- In Strava, go to Settings > Manage Apps and Devices > Health.
- Toggle Notifications for new workouts ON.
Now:
– You’ll get a push notification when a workout syncs.
– If it fails, you’re prompted to manually import.
– A bell icon appears in Strava when pending imports exist.
✅ Benefit: Catches issues early—before you forget about the workout.
Use Third-Party Tools for Better Data (Advanced)
For athletes who need full metric preservation, consider paid tools.
Recommended Apps
| App | Function | Cost |
|---|---|---|
| SyncMySports | Exports Apple Health workouts with HR, cadence, power to Strava | $6.99/month |
| HealthFit | Pulls richer data from Health exports; auto-uploads to Strava | $4.99/month |
✅ Advantage: These tools extract heart rate and cadence from multisport sessions—something GPX alone cannot do.
⚠️ Limitation: Paid services, but ideal for competitive triathletes or data-driven runners.
Summary: Key Steps at a Glance
| Task | How to Do It |
|---|---|
| Connect Strava to Health | Profile > Settings > Manage Apps > Health > + > Enable Workouts |
| Enable Auto Upload | Settings > Manage Apps > Health > Toggle “Automatic Uploads” ON |
| Manually Import | Settings > Manage Apps > Health > Find workout > Tap “Import” |
| Fix Blank Import List | Reinstall Strava, reconnect Health |
| Split Multisport Workout | Export Health data > Extract GPX > Upload each segment to Strava.com |
| Preserve All Metrics | Use SyncMySports or HealthFit (paid) |
Uploading Apple Watch workouts to Strava works smoothly when you follow the native path: Workout app → Apple Health → Strava. Avoid third-party apps for Strava-bound sessions, check permissions after updates, and use GPX export for triathlons. With these steps, every mile, watt, and heartbeat you earn will show up exactly where it belongs: on the Strava feed.