If your Apple Watch tells you you’re in Zone 2 while speedwalking uphill feels like an all-out effort, it’s not your imagination—your heart rate zones are likely miscalibrated. The default settings on Apple Watch estimate your maximum heart rate using the outdated formula of 220 minus your age. But this average-based guess can be off by 10, 20, or even 30 beats per minute—making your workout feedback misleading at best.
The good news? You can fix this. By manually adjusting your heart rate zones, you align your Apple Watch with your actual physiology, so the data reflects real effort, not assumptions. Whether you’re training for endurance, rebuilding fitness, or just trying to understand your body better, customizing your zones turns generic tracking into a powerful training tool. In this guide, you’ll learn exactly how to change heart rate zones on Apple Watch, how to safely determine your true max heart rate, and how to validate your settings for long-term accuracy.
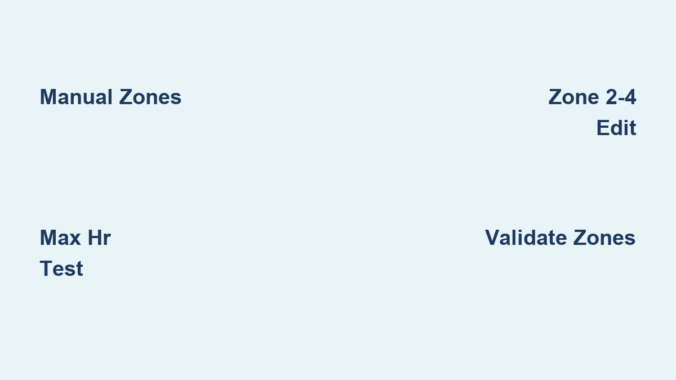
Switch to Manual Heart Rate Zones
To personalize your zones, you must first switch from automatic to manual mode. This unlocks the ability to set custom BPM ranges for Zones 2, 3, and 4—the only ones you can edit directly.
Edit Zones from iPhone or Apple Watch
You can make changes from either device. Both methods are fast and straightforward.
On iPhone:
- Open the Apple Watch app.
- Tap My Watch, then go to Workout > Heart Rate Zones.
- Tap Manual.
- Select a zone—Zone 2, 3, or 4—and enter the lower and upper beats per minute (BPM) values.
On Apple Watch:
- Open the Settings app.
- Go to Workout > Heart Rate Zones.
- Tap Manual.
- Tap each zone to adjust its BPM range.
Note: Zone 1 (50–60% of max HR) starts at your resting heart rate and ends where Zone 2 begins. Zone 5 (90–100%) starts where Zone 4 ends and goes up to your max HR. These two zones auto-adjust based on your manual inputs.
Once saved, your custom zones apply to all supported workouts—running, cycling, elliptical, and more—giving you accurate feedback across activities.
Understand What Each Heart Rate Zone Means
Before setting numbers, know what each zone represents in terms of effort and training benefit.
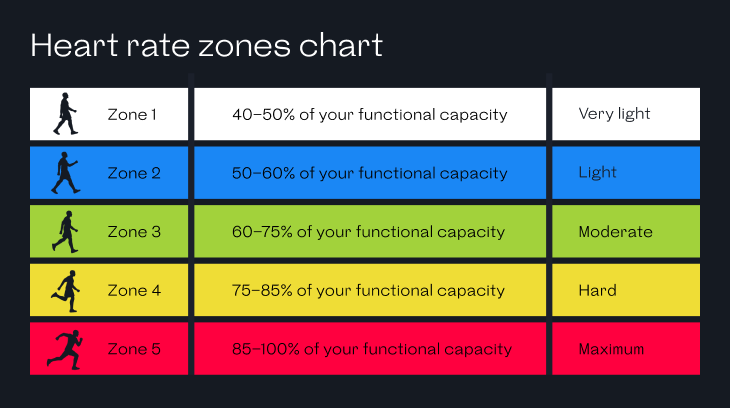
Zone 1: Recovery (50–60% Max HR)
Very light effort. Ideal for cooldowns or active recovery days. You should be able to talk freely and breathe easily.
Zone 2: Aerobic Base (60–70% Max HR)
Light to moderate intensity. Builds endurance, improves fat metabolism, and strengthens your cardiovascular system. Commonly used in long, steady-state workouts.
Zone 3: Tempo (70–80% Max HR)
Moderate to hard effort. Improves lactate threshold and aerobic capacity. Breathing becomes deeper; you can speak in short phrases but not full sentences.
Zone 4: Threshold (80–90% Max HR)
Hard effort. Develops anaerobic fitness and power. Sustainable for 10–30 minutes depending on fitness level.
Zone 5: Max Output (90–100% Max HR)
All-out effort. Used for short sprints or high-intensity intervals. Not sustainable for long—only for peak performance bursts.
Pro Tip: If Zone 2 feels like a hard effort during walking, your max HR estimate is probably too high. If Zone 5 never appears during sprints, it’s likely too low.
Find Your True Max Heart Rate with a Field Test
The 220-minus-age formula is a rough estimate. To get accurate zones, you need your real max heart rate (HRmax). Here’s how to test it safely.
Warm Up Thoroughly (10–15 Minutes)
Never jump into max effort cold. Prepare your body:
– 5–10 minutes of light cardio (brisk walk, slow jog)
– 3–4 short strides (15–20 seconds) at increasing intensity
– Full recovery between efforts
– Dynamic stretches to activate muscles
This primes your heart, lungs, and nervous system while reducing injury risk.
Choose the Right Max HR Test Method
Pick the test that matches your fitness level and environment.
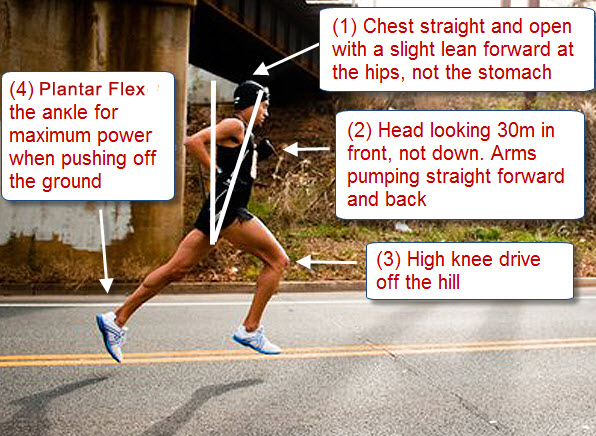
Option 1: 3-Stage Hill Repeats (Best for Experienced Athletes)
Ideal if you’re comfortable with high-intensity running.
Steps:
- Find a hill with a 4–6% incline, taking 1–2 minutes to climb.
- First rep: Run uphill at ~90% effort. Walk down to recover.
- Second rep: Push to ~95% effort. Walk back down.
- Third rep: Sprint all-out until you can’t maintain pace.
- Check your peak heart rate during the final 30 seconds—it’s likely your HRmax.
Look for: The highest BPM reading in the last sprint. That’s your true max.
This method delivers quick, reliable results for runners with solid fitness.
Option 2: 20-Minute Time Trial (Safer for Beginners)
Better if you want to avoid explosive efforts.
Steps:
- Run or bike for 20 minutes at your highest sustainable pace.
- First 15 minutes: Hard but controlled—don’t burn out early.
- Final 5 minutes: Gradually increase to max effort.
- Record your peak BPM in the last 3–5 minutes.
Success cue: You should feel completely exhausted—unable to continue at that pace.
Use a treadmill, track, or quiet trail. Avoid traffic-heavy roads.
Adapt Testing for Non-Runners or Health Conditions
You don’t need to run to find your max HR. Alternative activities work just as well.
Safe Alternatives:
- Incline walking on a treadmill
- Stationary cycling with high resistance
- Elliptical trainer with arm engagement
- Arm ergometer (arm bike) for upper-body focus
One user shared: “I’m 30, obese, and recovering from illness. Speedwalking uphill hits 160s. Light jogging spikes me into 190s.”
For people in similar situations:
– Use perceived exertion: “How hard does this feel?”
– Aim for maximum safe effort, not injury-inducing strain.
– Stop immediately if you feel dizzy, chest pain, or lightheaded.
Always consult your doctor before max testing if you have heart conditions, obesity, or recent illness.
Calculate Your Custom Zone Thresholds
Once you have your true HRmax, calculate zone boundaries using percentage ranges.
| Zone | % of Max HR | Example (HRmax = 190 BPM) |
|---|---|---|
| Zone 1 | 50–60% | 95–114 BPM |
| Zone 2 | 60–70% | 114–133 BPM |
| Zone 3 | 70–80% | 133–152 BPM |
| Zone 4 | 80–90% | 152–171 BPM |
| Zone 5 | 90–100% | 171–190 BPM |
How to Apply:
- Set Zone 2 from 114 to 133
- Set Zone 3 from 133 to 152
- Set Zone 4 from 152 to 171
Enter these values in Manual mode under Heart Rate Zones.
Tool Suggestion: Use CalculatorSoup’s Target Heart Rate Calculator to auto-generate zones.
Avoid Common Setup Mistakes
Even small errors can ruin your data.
❌ Using Estimated Max HR Without Testing
220 minus age doesn’t account for fitness level. A 40-year-old could have a real max of 185, 195, or even 205.
❌ Creating Gaps or Overlaps Between Zones
Ensure zones connect:
– Zone 2 ends at the same number Zone 3 starts
– Zone 3 upper = Zone 4 lower
– No missing or duplicated BPM ranges
❌ Ignoring How It Feels
If Zone 3 feels like max effort, your max HR is probably too low—or your zones are misconfigured.
Rule of thumb: Your breathing and perceived effort should match the zone label.
❌ Not Reassessing Over Time
Fitness changes. Retest every 3–6 months, especially after major improvements or long breaks.
Validate Your Zones with Real Workouts
Don’t just set and forget. Test your zones in action.
Try a Validation Workout:
- 10 min easy walk/jog (should stay in Zone 2)
- 5 min tempo (push into Zone 3)
- 3 x 1 min hard intervals (get into Zone 4–5), 2 min recovery
Watch for:
– Does Zone 2 feel truly easy?
– Does Zone 4 require serious effort?
– Does Zone 5 only appear during sprints?
If not, tweak thresholds slightly and retest.
One user said: “I’ve always wondered if I’m truly in Zone 2 when I speedwalk, or if my watch is just telling me I am.”
Now you can verify—manually.
When to Update Your Heart Rate Zones
Your body adapts. So should your data.
Update zones after:
– Major fitness gains (e.g., faster runs, longer endurance)
– Weight loss or gain affecting cardiovascular load
– Recovery from illness or injury
– Aging past a decade mark (e.g., turning 40, 50)
– Any new max HR test
Return to Manual mode and input updated BPM ranges.
Reminder: Switching back to Automatic erases all manual settings.
Final Tips for Accuracy and Safety
Get the most from your Apple Watch—without risking injury.
🔹 Prioritize Safety
- Never test alone if possible.
- Carry your phone.
- Stop immediately for chest pain, dizziness, or irregular heartbeat.
🔹 Test Under Consistent Conditions
Be well-rested, hydrated, and avoid testing when stressed or sick.
🔹 Wear Your Watch Properly
Snug fit, about one finger’s width above the wrist bone. A loose watch misreads heart rate.
🔹 Trust Data + Feel
Heart rate is a guide—not gospel. Combine it with breathing, effort, and recovery cues.
🔹 Share Data with Coaches or Doctors
Export Health app data to optimize training or manage health conditions.
Summary: Change Heart Rate Zones in 6 Steps
| Step | Action |
|---|---|
| 1 | Warm up with 10–15 min light cardio + strides |
| 2 | Perform max HR test (hill repeats or 20-min trial) |
| 3 | Record your peak BPM—this is your HRmax |
| 4 | Calculate zones using 10% increments (60–70%, etc.) |
| 5 | Open Apple Watch app > Workout > Heart Rate Zones > Manual |
| 6 | Enter custom BPM for Zones 2, 3, and 4 |
Only Zones 2–4 are editable. Zones 1 and 5 auto-adjust based on your inputs.
By personalizing your heart rate zones, you turn your Apple Watch into a precise training partner. No more mismatched feedback. No more guessing. Just accurate, actionable insights tailored to your body. Whether you’re walking uphill, cycling hard, or training for a race, your watch now reflects real effort—not just a population average. Take control, test safely, and train smarter.
Leave a Reply