Connecting your Apple Watch to your iPhone 14 Pro Max unlocks a seamless, powerful experience—real-time health tracking, instant notifications, Apple Pay, and independent cellular connectivity all work in harmony. If you’ve just unboxed your Apple Watch Series 11, Apple Watch Ultra 3, or Apple Watch SE 3, you’re moments away from full integration. The pairing process is intuitive and fast, but knowing the correct steps ensures a smooth setup without hiccups.
Your iPhone 14 Pro Max, running iOS 17 or later (with support for iOS 26+), is fully optimized for all current Apple Watch models. Before you begin, make sure your iPhone is charged, Bluetooth is enabled, and it’s connected to Wi-Fi or cellular. Keep both devices within close range—proximity is essential for successful pairing. This guide walks you through every step, from powering on the watch to final syncing, so you can get up and running quickly.
Power On Your Apple Watch and Wear It
Press and Hold the Side Button Until the Apple Logo Appears
Start by charging your Apple Watch for at least 10 minutes if it’s not already powered. Then, press and hold the side button (the one below the Digital Crown) until the glowing Apple logo appears on the screen. This boot-up process typically takes 10–15 seconds. Once you see the logo, release the button—the watch is now starting up.
Place the Watch on Your Wrist for Setup Readiness
After the Apple logo disappears, place the watch on your wrist. This helps activate sensors like the heart rate monitor and prepares the device for calibration during setup. Wear it snugly but comfortably; a secure fit ensures accurate sensor readings and smoother pairing.
Unlock iPhone and Initiate Pairing
Ensure iPhone Is Unlocked, Updated, and Connected
Your iPhone 14 Pro Max must be unlocked and running the latest version of iOS. Go to Settings > General > Software Update to confirm. Also, verify that Bluetooth is on and your iPhone is connected to Wi-Fi or cellular data—both are required for pairing and syncing.
Wait for the Automatic Setup Prompt to Appear
With your iPhone unlocked, hold it near your powered-on Apple Watch. Within seconds, a full-screen message should appear: “Use your iPhone to set up this Apple Watch.” Tap Continue to proceed.
If no prompt appears:
– Open the Apple Watch app on your iPhone
– Tap All Watches > Add Watch
– Choose Set Up for Myself (or Set Up for a Family Member if applicable)
Keep both devices close throughout this process to maintain a strong Bluetooth connection.
Align iPhone Camera with Watch Animation
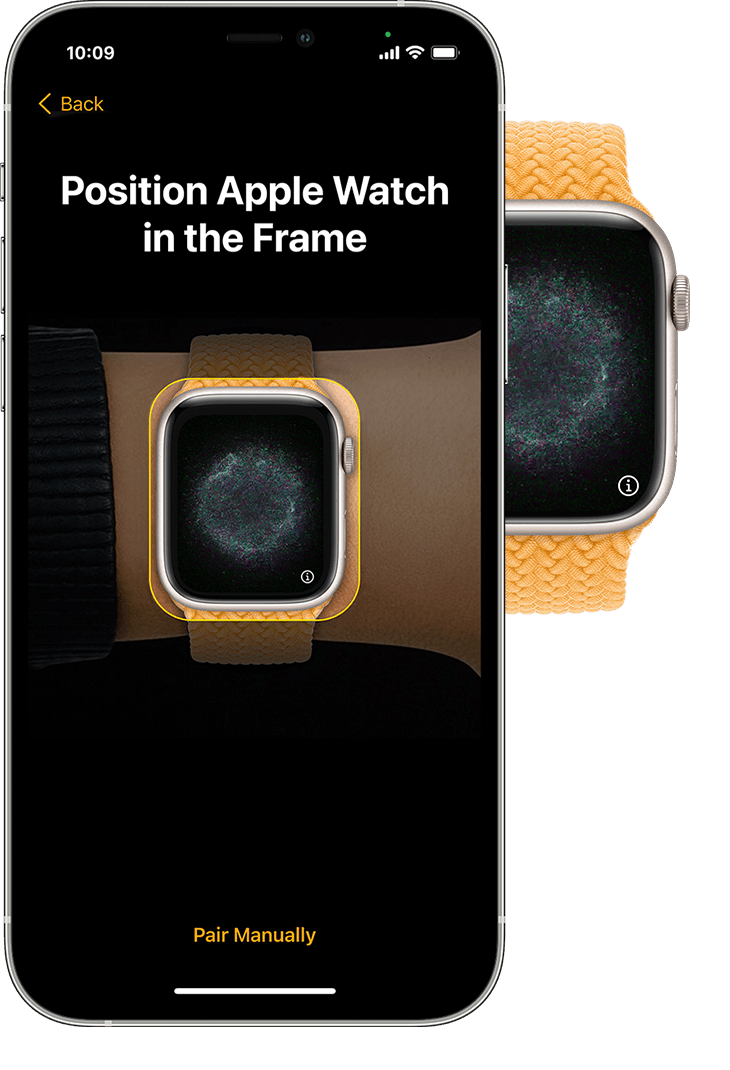
Center the Watch Face in the iPhone’s Viewfinder
Hold your iPhone so the Apple Watch screen is centered in the camera viewfinder. The watch displays a swirling animation—your iPhone reads this visual code to securely pair the devices. Keep your hand steady; movement can delay recognition.
Confirm Successful Pairing or Switch to Manual Mode
When the connection is established, your iPhone will display: “Your Apple Watch is paired.” Tap Next to continue.
If the camera can’t read the animation:
– Tap Pair Apple Watch Manually
– Enter the 6-digit code shown on your Apple Watch screen using your iPhone
This fallback method ensures pairing even in low-light conditions or with screen protectors that interfere with camera detection.
Choose Your Setup Method
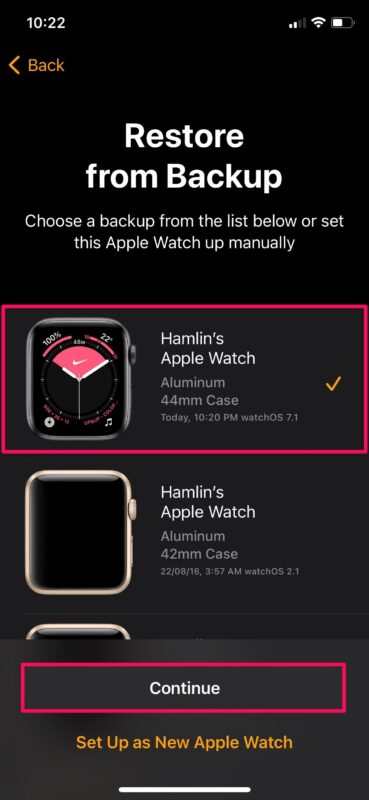
Set Up as New or Restore from Backup
You now have three options:
- Set Up as New Apple Watch: Ideal for first-time users or those starting fresh
- Make This Your New Apple Watch: Automatically transfers apps, settings, and preferences from a previous watch linked to this iPhone
- Customize Settings: Manually select which data to restore, including specific apps or health history
Choose based on your needs. If you’re upgrading, Express Setup (via “Make This Your New Apple Watch”) can transfer your configuration in minutes.
Complete Required Updates Before Proceeding
Your iPhone may prompt for an iOS or watchOS update at this stage. Tap Update Now and wait—updates can take 10–20 minutes. Do not interrupt the process. Both devices should be plugged in during updates to prevent power loss.
Once updated, select your wrist preference (left or right), agree to Apple’s Terms and Conditions, and proceed.
Sign In to Your Apple ID
Enter Your Apple Account Credentials for Full Access
You’ll be prompted to sign in with your Apple ID. Enter your password. This step activates iCloud sync, Apple Pay, and Activation Lock for security.
Pro Tip: Skipping this step disables key features. Always sign in during setup for full functionality.
Resolve Activation Lock If It Appears
If you see an Activation Lock screen, the watch is still linked to another Apple ID. You must enter the email and password of the original account.
Warning: For secondhand watches, ensure the previous owner removes the device from their iCloud account via iCloud.com/find before purchase.
Create a Secure Passcode
Set a 4-Digit or Custom-Length Passcode
A passcode is required for Apple Pay, wrist detection, and auto-unlock. On your iPhone, choose:
– Create a Passcode (4 digits)
– Or Add a Long Passcode for enhanced security
Switch to your Apple Watch to input the digits shown on its screen—tap to enter each number.
Skipping the Passcode (Not Recommended)
You can tap Don’t Add Passcode, but you’ll be prompted again when enabling Apple Pay or cellular features.
Expert Note: A passcode enables Auto Unlock (your watch unlocks your iPhone) and protects personal data if your watch is lost.
Customize Display and Sync iPhone Settings
Adjust Text Size and Enable Bold Text
Under Accessibility, choose your preferred text size using the slider. Toggle Bold Text on for better readability—especially helpful for users with visual impairments.
These settings sync with your iPhone but can be adjusted independently later in Watch > Accessibility.
Sync Key iPhone Features Automatically
If you have Find My, Location Services, Wi-Fi Calling, or Diagnostics enabled on your iPhone, they’ll automatically activate on your Apple Watch. You can review or disable them later in the Apple Watch app > My Watch tab.
Enter Health and Fitness Information
Add Accurate Personal Data for Better Tracking
Input your:
– Date of birth
– Height
– Weight
– Biological sex (for menstrual cycle tracking, if applicable)
This ensures your Activity rings, calorie burn estimates, and fitness goals are personalized and accurate.
Enable Important Health Notifications
Turn on alerts for:
– High noise exposure
– Irregular heart rhythm (ECG)
– Low cardio fitness
– Fall Detection and Emergency SOS
Each feature comes with a brief explanation—tap to enable or skip. These can be life-saving tools, especially for active or elderly users.
Configure Cellular, Gestures, and Apple Pay
Activate Cellular Service (Cellular Models Only)
If you have a cellular Apple Watch, tap Set Up Cellular. Follow prompts to:
– Select your carrier
– Confirm plan details
– Assign a phone number (shared with iPhone)
Once active, your watch can make calls, send messages, and stream music without your iPhone nearby.
Learn and Enable Watch Gestures
On supported models, you’ll see animations for:
– Wrist flick to answer calls
– Double-tap (pinch fingers together) to interact hands-free
These can be toggled later in Settings > Gestures on the watch.
Customize the Apple Watch Ultra Action Button
If using Apple Watch Ultra 3, assign a shortcut to the Action button, such as:
– Start a workout
– Activate flashlight
– Launch dive logger
Tap to save—this button is perfect for quick access during outdoor adventures.
Add a Card to Apple Pay
Tap Set Up Apple Pay:
– Scan your card using the iPhone’s camera
– Or enter details manually
– Accept terms and verify with your bank
Now, double-click the side button on your watch to pay—no phone needed.
Final Sync and Confirm Connection

Keep Devices Close During Background Sync
After setup, your Apple Watch shows the watch face, but syncing continues. Keep both devices within 3 feet for 10–30 minutes while:
– Apps install
– Watch faces apply
– Health data transfers
– Notifications sync
Note: Large backups or slow Wi-Fi may extend sync time.
Verify Connection in the Apple Watch App
Open the Apple Watch app on your iPhone:
– Go to My Watch
– Confirm your watch appears under Paired Watches
– Check Bluetooth and Wi-Fi icons are active
If all indicators are green, your devices are fully connected.
Troubleshoot Common Issues
Apple Watch Won’t Turn On
Charge it for 15+ minutes using the magnetic charger. A red lightning bolt means low battery; a green bolt means charging.
Forgotten Passcode
If stuck at the passcode screen:
– Erase the watch via Apple Watch app > All Watches > Info > Unpair
– Restart setup
No Setup Prompt on iPhone
Ensure:
– Bluetooth is on
– Do Not Disturb/Airplane Mode is off
– Restart both devices
– Open Apple Watch app > Add Watch manually
Setup Errors or Update Failures
- Update iPhone to latest iOS
- Reset network settings: Settings > General > Transfer or Reset iPhone > Reset Network Settings
- Contact Apple Support if issues persist
Optimize Your Connected Experience
Install Key Apps and Customize Watch Faces
Browse the App Store on iPhone or watch to install:
– Strava, MyFitnessPal (fitness)
– Spotify, Apple Music (audio)
– Todoist, Fantastical (productivity)
Press Digital Crown > long-press face > Edit to add complications like heart rate, weather, or calendar.
Enable Auto-Unlock for iPhone 14 Pro Max
With a passcode set:
– Go to iPhone Settings > Face ID & Passcode
– Toggle on Unlock with Apple Watch
Now, your iPhone unlocks automatically when you’re wearing your watch—even with a mask.
Final Note: Connecting your Apple Watch to your iPhone 14 Pro Max takes just minutes when you follow the right steps. From powering on to final syncing, each phase ensures a secure, personalized experience. Keep both devices updated, sign in to iCloud, and enable key features like Apple Pay and cellular. Once paired, your Apple Watch becomes an essential extension of your iPhone—tracking health, delivering alerts, and keeping you connected on the go. For best performance, keep them charged and within range whenever possible.
Leave a Reply