If your Apple Watch won’t turn on, won’t charge, or has a cracked screen, you’re not alone. Millions of users face common issues like frozen displays, rapid battery drain, and connectivity failures. The good news? Many of these problems can be fixed—often without replacing the entire device. Whether you’re troubleshooting a frozen Series 9, reviving a dead battery in an older model, or dealing with a water-damaged Ultra, this comprehensive guide delivers step-by-step solutions. You’ll learn how to diagnose the root cause, choose between DIY fixes and professional repair, and avoid costly mistakes. By the end, you’ll know exactly how to fix your Apple Watch and extend its lifespan—saving time, money, and frustration.
Force Restart Your Apple Watch
When your Apple Watch freezes or becomes unresponsive, a force restart is the fastest and safest first step.
How to Force Restart Any Model
Press and hold the side button and the Digital Crown at the same time. Keep holding for 10 seconds or until the white Apple logo appears on the black screen. This works on every Apple Watch model from Series 0 to Series 10 and Ultra 2. The process forces the processor to reboot without deleting any data—similar to restarting a frozen computer.
Pro Tip: If the screen is completely black but the watch might still be on (e.g., you feel a tap or haptic feedback), a force restart often brings it back to life. Always try this before assuming hardware failure.
When to Use This Fix
Use a force restart if:
– The screen is frozen or unresponsive
– Apps crash repeatedly or won’t open
– A watchOS update failed mid-installation
– The watch won’t power off normally
This simple reset clears temporary software glitches and refreshes the system. It takes less than 30 seconds and resolves about 80% of software-related issues. If the Apple logo appears and the watch boots normally, the problem was likely temporary. If not, move on to deeper diagnostics.
Update or Restore watchOS
Outdated or corrupted software can cause crashes, syncing problems, and poor battery life. Updating or restoring the operating system often fixes these issues without any hardware work.
Check for Software Updates
Open the Watch app on your iPhone, go to General > Software Update, and wait for your Apple Watch to be detected. If an update is available, make sure your watch is:
– Charged to at least 50%
– On its magnetic charger
– Within Bluetooth range of your iPhone
The update can take 15–30 minutes. Do not disconnect the watch during installation, as this can corrupt the system.
Restore from Backup if Needed
If the watch won’t update or sync properly, unpair and re-pair it:
1. In the Watch app, tap My Watch > All Watches
2. Tap the (i) next to your watch
3. Select Unpair Apple Watch
4. Confirm—you’ll be prompted to back up automatically
After unpairing, set up the watch again and restore from the backup if offered. This clears corrupted settings, resets network configurations, and re-establishes iCloud and Apple ID connections.
Warning: Unpairing erases all data on the watch. Always ensure your iPhone has a recent backup before proceeding.
Fix Black Screen and No Power
A black, unresponsive screen is one of the most alarming Apple Watch issues—but it doesn’t always mean the device is dead.
Charge for at Least 30 Minutes
Plug your watch into the original magnetic charger. Let it charge for 30 minutes, even if no light appears. Look for:
– A red battery icon (low charge)
– A green fill (charging)
– A white Apple logo (booting)
Some users report success after overnight charging, especially if the battery drained completely and entered deep sleep mode.
Test with a Different Charger
Try a second Apple Watch charger or cable. A faulty charger is a common culprit. If the new charger shows an amber light (charging) or green (fully charged), the original was likely defective.
Try a Force Restart While Charging
Plug in the watch, then force restart it by pressing the side button and Digital Crown for 10 seconds. Sometimes a software crash prevents booting, but charging provides enough power for the restart to succeed.
Expert Note: If there’s still no response after these steps, the battery may be dead or the logic board damaged—especially after drops or water exposure. In such cases, professional repair or replacement is likely needed.
Diagnose Charging Problems

If your Apple Watch won’t charge, the issue could be the battery, charger, or internal hardware.
Clean the Charging Port
Use a dry, lint-free cloth to wipe the back of the watch and the charger. Dust, lint, or metal debris can block contact. Never use liquids or compressed air, which can push debris deeper or damage sensors.
Check for Magnetic Interference
Ensure no metal objects—like magnetic phone mounts or magnetic cases—are near the charging area. These can disrupt the magnetic alignment needed for charging.
Inspect the Back Glass
Cracks or warping on the back can misalign the charging coils. Even minor damage can prevent charging. If the glass is cracked, consider a back cover replacement to restore functionality.
Common DIY Issue: After battery replacement, users often report charging failure due to misaligned connectors or damaged charging coil. Double-check internal connections and ensure the back is properly seated.
Replace the Battery Yourself
Battery degradation is the #1 reason older Apple Watches fail. If your watch dies within hours or won’t hold a charge, a battery swap may be the solution.
Tools You’ll Need
- P2 pentalobe screwdriver
- Spudger
- Tweezers
- Heat source (hairdryer or iOpener)
- Suction cup
- Replacement battery with adhesive
Step-by-Step Replacement
- Power off the watch.
- Apply heat to the back for 90 seconds to soften adhesive.
- Place a suction cup on the back and gently lift.
- Insert an opening tool and run it around the edge to break the seal.
- Remove the back cover.
- Disconnect the battery connector with a spudger.
- Remove screws (if any) and lift out the old battery.
- Install the new battery, reconnect, and reseal with fresh adhesive.
- Clamp and let cure for 2+ hours.
Critical Warning: Never puncture the battery. Swollen or damaged batteries can leak or ignite. Handle with care and dispose of properly.
Replace a Cracked Screen
A cracked display affects touch response, visibility, and water resistance. Apple fuses the screen and digitizer, so full display assembly replacement is required.
Why DIY Screen Repair Is Risky
- OLED panels are fragile and easily damaged
- Front sensors (heart rate, ambient light) can be disrupted
- Misalignment causes inaccurate readings
- Water resistance is lost without proper sealing
Steps for Safe Replacement
- Apply heat and use a suction cup to open the case.
- Disconnect two ZIF cables connecting the display.
- Remove any securing screws.
- Lift the display carefully.
- Install the new assembly and reconnect cables.
- Seal with Tesa 61395 or iFixit adhesive strips.
Post-Repair Check: After reassembly, test heart rate, touch response, and charging. If sensors fail, the front module may need realignment.
Unstick a Jammed Watch Band
Third-party bands sometimes get stuck due to non-standard lug designs or debris.
How to Remove a Stuck Band
- Power off the watch.
- Use a plastic opening tool or tweezers to press the band release tab.
- While pressing, pull the band straight out.
- If resistance persists, apply slight twisting pressure while holding the release.
Never use metal tools—they can scratch aluminum or stainless steel cases.
Prevent Future Issues
Stick to Apple-designed bands or high-quality third-party options with proper lug clearance. Clean the band slots monthly with a dry brush to prevent debris buildup.
Identify Your Apple Watch Model
Using the wrong parts can ruin a repair. Always confirm your model before ordering.
Check the Back of the Watch
Flip it over. The engraved model number (e.g., A2677) tells you the exact version. Match this to Apple’s official list.
Use the iPhone Watch App
Open the Watch app, go to My Watch > General > About. Note:
– Model Number (e.g., N142b)
– Serial Number
– Hardware Version
Then visit checkcoverage.apple.com to get full details.
Pro Tip: Series 4 and later have stronger adhesives. Ultra models require specialized tools. Know your model to avoid surprises.
Decide: DIY, Apple, or Third-Party Repair?
Not every fix should be done at home. Here’s how to choose.
When to Try DIY
- Battery replacement on older models (Series 3–6)
- Stuck band removal
- Simple resets and updates
DIY is cost-effective and doable with intermediate skills. Kits from iFixit include tools and guides.
When to Go to Apple
- Water damage
- Logic board failure
- Cracked screen (with AppleCare+)
- Warranty or AppleCare+ coverage active
Apple uses genuine parts, restores water resistance, and honors warranties.
When a Third-Party Shop Works
- Out-of-warranty screen or battery repairs
- Lower cost than Apple
- Quick turnaround
But beware: non-genuine parts may trigger alerts like “Unable to Verify This Display” on Series 8 and later.
User Feedback: Many report success with third-party battery swaps, but charging issues sometimes follow due to poor calibration.
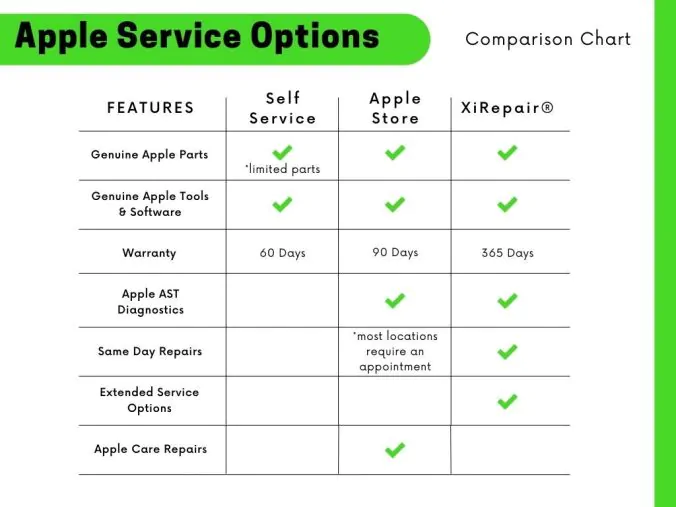
Use Apple’s Official Repair Services
Apple offers fast, reliable service with multiple options.
Get a Repair Estimate
Visit support.apple.com, select Apple Watch > Get Service and Support, and answer the prompts. You’ll see estimated costs based on your model and issue.
Common Repair Prices (Out of Warranty)
| Repair | Cost (USD) |
|---|---|
| Screen Replacement | $199–$399 |
| Battery Replacement | $69–$89 |
| Other Damage | $449–$899 |
| Apple Watch Ultra | Higher due to complexity |
Note: Taxes and shipping may apply. Final cost is confirmed after inspection.
Service Options
- In-Person (Apple Store): Fast, same-day repairs for screens and batteries
- Mail-In: Apple sends a prepaid box; repair takes 3–7 days
- Express Replacement (with AppleCare+): Get a replacement immediately, return the old one later
Extend Your Apple Watch’s Life
Keep your device running longer with simple maintenance.
Maximize Battery Health
- Avoid full discharges
- Don’t leave on charger 24/7
- Enable Optimized Battery Charging in Settings > Battery
Apple batteries last ~3 years or 1,000 charge cycles before dropping below 80% capacity.
Maintain Water Resistance
All Apple Watches (except original) are water-resistant to 50 meters (WR50). After any repair:
– Use proper adhesive seals
– Clamp and cure for 2+ hours
– Avoid submersion until fully sealed
Warning: Apple does not recommend submerging third-party repaired watches.
Clean Safely
Use a soft, lint-free cloth. For sweat or dirt, dampen the cloth with fresh water, wipe, then dry. Never use cleaners, alcohol, or solvents.
Final Note: Knowing how to fix your Apple Watch saves time, money, and frustration. Start with software fixes—force restart, update, reset. Then move to hardware only if needed. For battery and screen issues, DIY is viable with care. For water damage or logic board problems, trust Apple. Always back up first, use quality parts, and preserve the seal. With the right approach, your Apple Watch can last years longer.
Leave a Reply