You can’t take photos directly with your Apple Watch—it doesn’t have a built-in camera. But you can use it to remotely control your iPhone’s camera and snap pictures from your wrist. With Apple’s native Camera Remote app, you get real-time preview, shutter control, zoom, and even video recording—all without touching your iPhone. Whether you’re setting up a group photo, shooting from a tripod, or just want hands-free control, this feature turns your Apple Watch into a powerful photography tool.
In this guide, you’ll learn exactly how to take a picture with your Apple Watch, including step-by-step instructions, settings adjustments, troubleshooting tips, and workarounds for common limitations like the lack of physical shutter buttons.
Launch Camera Remote App
To start taking pictures, you must first open the Camera Remote app on your Apple Watch.
Open via Smart Stack Hint
When your iPhone’s Camera app is active, a small Camera Remote hint appears at the bottom of your watch face. Tap it to open the Smart Stack, then tap the Camera Remote module to launch the app.
This shortcut saves time and appears automatically when your iPhone detects camera use—no need to search through apps.
Find App in Grid or List
If the hint isn’t visible:
1. Press the Digital Crown to go to the app grid.
2. Look for the Camera Remote icon (a camera with a watch face).
3. Tap to open it.
Note: The app only works when your iPhone’s Camera app is open and both devices are connected via Bluetooth.
Without the iPhone camera running, the Apple Watch will show a connection error or fail to display the live feed. Always start on your iPhone first.
Frame and Take a Photo
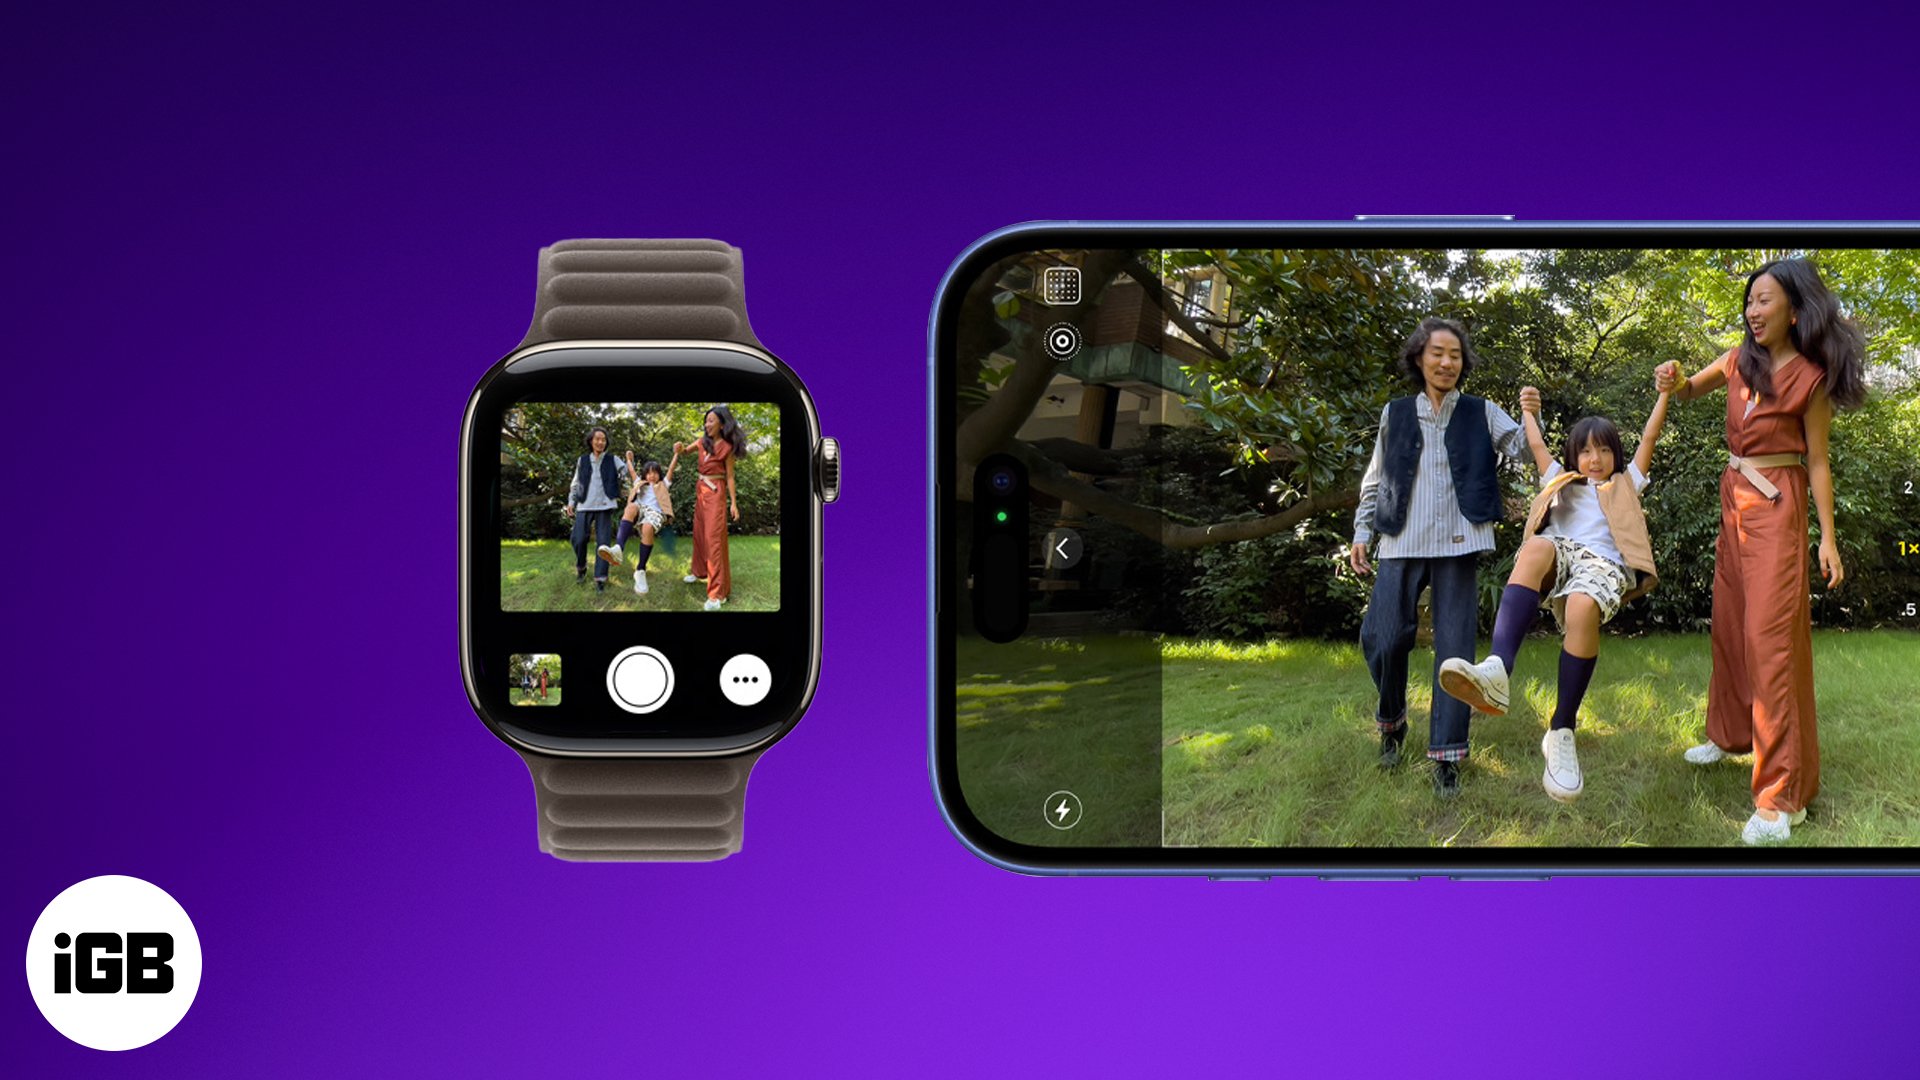
Once the Camera Remote app is running, your Apple Watch becomes a live viewfinder for your iPhone’s camera.
Use Live Viewfinder to Frame Shot
The screen displays a real-time feed from your iPhone’s camera. Position your iPhone where you want it—on a table, tripod, or held by someone else—then use the watch screen to confirm framing. Make sure lighting is adequate—the small display can make details hard to see in low light.
For best results, hold your wrist steady and at eye level to mimic traditional camera positioning.
Tap to Capture Image
- Tap the circular Shutter button (white circle) to take a photo.
- By default, a 3-second timer may be active—tap the timer icon to change it to 0s, 3s, or 10s.
- After capture, a thumbnail appears in the lower-left corner.
Pro Tip: Hold your wrist steady when tapping to avoid shaking the view.
Even a slight tap can cause movement, especially if you’re using a long exposure or timer. For sharper shots, rest your arm or use a stable surface.
Record Video Remotely
The Apple Watch also lets you control video recording from your iPhone.
Start and Stop Recording
- Open Camera Remote on your watch.
- Frame the shot using the live preview.
- Press and hold the Shutter button to begin recording.
- Release the button to stop.
The recorded video saves automatically to your iPhone’s Photos app. You’ll see the thumbnail appear instantly after stopping.
Zoom While Recording
Rotate the Digital Crown to zoom in or out during video setup:
– Clockwise = Zoom in
– Counterclockwise = Zoom out
Warning: Digital zoom reduces quality. For best results, move closer or use an iPhone with optical zoom.
While the Digital Crown doesn’t control zoom during active recording, you can adjust it before starting—giving you precise framing without reaching for your phone.
Adjust Camera Settings Remotely
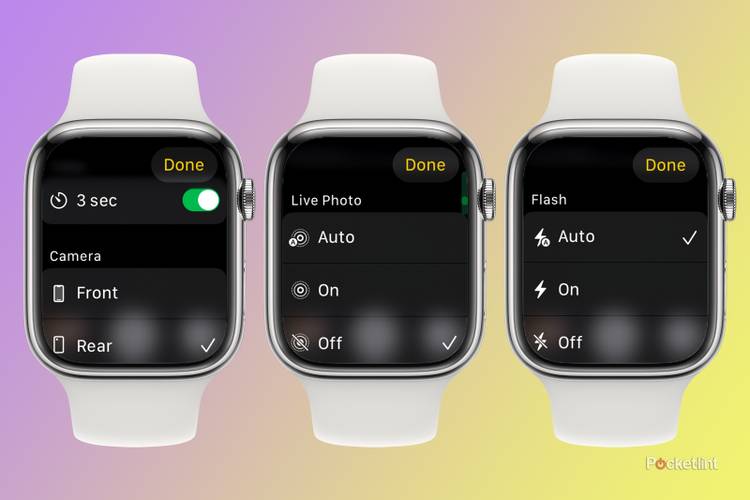
Fine-tune your shot before capturing by changing key settings directly from your wrist.
Switch Front or Rear Camera
- Tap the gear icon in the Camera Remote app.
- Under Camera, choose:
– Front (for selfies)
– Back (for higher-quality shots)
The live preview updates instantly, so you can switch perspectives on the fly—perfect for quick transitions between group shots and self-portraits.
Control Flash and Timer
From the same Settings menu:
– Flash: Set to On, Off, or Auto
– Timer: Choose 0s (instant), 3s, or 10s delay
– Live Photos: Toggle on/off (available on iPhone 6s and later)
Note: Live Photos captures 1.5 seconds before and after the shot—great for motion but uses more storage.
This is especially useful for capturing expressions that happen just before you tap the shutter, like a child’s laugh or a pet jumping.
Review and Delete Photos
After taking photos or videos, review them and clean up unwanted shots—all from your Apple Watch.
View Recently Taken Media
- Tap the thumbnail in the lower-left corner of the Camera Remote screen.
- Swipe up or down to browse your latest captures.
- Tap any image or video to view full screen.
This gallery only shows recent media—older photos aren’t accessible here. But for quick checks, it’s perfect.
Delete Unwanted Shots
- In the gallery, swipe up on the photo or video.
- Tap Delete.
- Confirm deletion.
Important: Deletion removes the file from your iPhone’s Photos app permanently.
There’s no undo, so double-check before confirming. This feature helps keep your gallery clean during photo sessions.
Troubleshoot Common Issues
Even with a solid setup, problems can occur. Here’s how to fix them fast.
No Live Preview on Watch
Check these first:
– Is the iPhone’s Camera app open? (Required for Remote to work)
– Are both devices within 33 feet (10 meters)?
– Is Bluetooth enabled on both iPhone and Watch?
Restart the Camera app on your iPhone and relaunch Camera Remote.
Sometimes toggling Airplane Mode on and off (then re-enabling Bluetooth) resolves stubborn connection issues.
Shutter Not Responding
- Ensure the Shutter button is tapped firmly.
- Avoid accidental swipes near the button.
- Re-pair devices if connection issues persist.
Fix: Restart both devices and re-open the Camera app.
A simple reboot often clears glitches caused by background processes or temporary Bluetooth drops.
Delay or Lag in Preview
This usually happens due to:
– Weak Bluetooth signal
– Obstructions between devices
– High interference (crowded Wi-Fi areas)
Solution: Move closer to your iPhone and ensure a clear line of sight.
Walls, metal objects, or being too far apart can disrupt the signal. Staying within 10 meters with a direct path improves responsiveness.
Can You Use Physical Buttons to Take Photos?
Many users ask:
“Can I use the Digital Crown or Side Button to take a picture instead of tapping the screen?”
No Native Button Support
Apple does not support using the Digital Crown or Side Button as a shutter trigger in the Camera Remote app. You must tap the screen to capture.
Despite years of user feedback, Apple hasn’t added button-based shutter control—making rapid-fire shots or gloved operation difficult.
Workarounds and Alternatives
While no official fix exists, try these options:
Use Accessibility Shortcut
- On iPhone: Go to Settings > Accessibility > Apple Watch.
- Enable Mirror iPhone or set a custom gesture.
- Use Back Tap (iPhone only) to trigger camera via motion.
Limitation: These don’t fully replace button-based shutter control.
Back Tap (set to double or triple tap the back of your iPhone) can launch the camera, but it won’t help once you’re already in remote mode.
Try Third-Party Apps (With Caution)
Some third-party remote apps on the App Store claim enhanced controls, but:
– They may require subscriptions
– Often lack reliability
– Not endorsed by Apple
Stick with Camera Remote for best integration and performance.
Best Practices for Remote Shooting
Get the most out of your Apple Watch camera control with these pro tips.
Stabilize Your iPhone
Use a:
– Tripod
– Phone stand
– Flat, steady surface
This prevents blur, especially with timer delays.
Keep Devices Close
Stay within 10 meters (33 feet) of your iPhone. Walls or obstacles can reduce range.
Check Battery Levels
Ensure both devices have at least 20% battery before long photo sessions. A dead watch or phone kills the connection.
Use in Good Lighting
The Apple Watch screen is small and dim. Bright environments help you frame accurately.
Hold Watch at Eye Level
For better framing, hold your wrist up like a viewfinder. This mimics traditional camera use and improves composition.
Compatible Devices and Requirements
Not all setups work. Verify your gear supports Camera Remote.
Supported Apple Watches
All models running watchOS support the app, including:
– Apple Watch Series 1 through Series 9
– Apple Watch SE
– Apple Watch Ultra
Required iPhone Models
- iPhone 5s or later
- Running iOS 8.2 or later
- Camera must be functional
Live Photos Support
Available only on:
– iPhone 6s and newer
– Devices with Live Photos enabled in Settings
As long as your iPhone and Apple Watch are paired and updated, the Camera Remote app should work seamlessly.
Final Thoughts: Maximize Your Apple Watch Camera Control
While you can’t take a picture with the Apple Watch itself, using it to take pictures from your iPhone is a game-changer for self-portraits, family photos, and stable long-exposure shots. The Camera Remote app delivers seamless, real-time control with minimal setup.
Just remember:
– iPhone Camera app must be open
– Devices must stay close
– Tap—not press—to capture
– No physical button shutter (yet)
For most users, this remote functionality is more than enough. And as Apple continues to refine watchOS, we may finally see Digital Crown shutter support in a future update.
Until then, use the tips in this guide to take sharp, well-framed photos—right from your wrist.
Final Note: The Camera Remote app is free, pre-installed, and fully integrated with your Apple ecosystem. No downloads, no subscriptions—just tap, frame, and shoot.