
Getting your new Apple Watch up and running is a seamless, intuitive process designed to take less than 15 minutes—provided you follow the right steps. Whether you’re upgrading from an older model or using your first smartwatch, the setup experience is fully integrated with your iPhone, leveraging secure optical pairing, automatic syncing, and guided prompts to get you wrist-ready in record time.
Your Apple Watch becomes an instant extension of your daily life: tracking workouts, delivering timely notifications, enabling contactless payments, and even monitoring your health. But before you dive into all that, a proper new Apple Watch setup is essential. This guide walks you through every step—from powering on your device to customizing your watch face and activating key features like Apple Pay, Emergency SOS, and cellular connectivity (if applicable). We’ll also cover troubleshooting tips and post-setup optimizations so you can avoid common pitfalls and enjoy a smooth, frustration-free experience.
Power On and Prepare Devices
Before pairing begins, ensure both your iPhone and Apple Watch are properly prepared. Skipping prep steps can lead to failed connections, delays, or interrupted syncs.
Charge Apple Watch Fully
Plug your Apple Watch into the magnetic charging cable and let it charge to at least 50%. A low battery may cause the device to shut down during setup.
- The charging indicator appears as a red (charging) or green (fully charged) battery icon.
- For fastest results, use the included USB-C power adapter.
- Allow 20–30 minutes of charging if starting from empty.
Pro Tip: Never skip this step—starting with a full charge prevents mid-setup failures and ensures stable performance.
Enable iPhone Connectivity
Your iPhone must have Bluetooth and Wi-Fi enabled to detect and pair with the Apple Watch.
Go to:
– Settings > Bluetooth: Ensure it’s turned on
– Settings > Wi-Fi: Connected to a known network
– Settings > Cellular > Cellular Data: On (required for cellular Apple Watch activation)
Also:
– Turn off Low Power Mode on both devices.
– Make sure your iPhone is updated to the latest iOS version compatible with your Apple Watch (e.g., iOS 17+ for Series 9).
Keep Devices Close Together
Place your iPhone and Apple Watch within inches of each other during setup. This ensures strong Bluetooth and optical signal strength, especially during visual pairing.
Avoid:
– Thick iPhone cases that block the camera
– Direct sunlight that washes out the Apple Watch screen
– Other nearby Apple Watches that could interfere with detection
Start Pairing With iPhone

The pairing process begins automatically when your iPhone detects your powered-on Apple Watch. You’ll use either visual detection or manual code entry via the Apple Watch app.
Open Apple Watch App
Locate the Apple Watch app on your iPhone (gray watch icon). Tap to open it.
If your Apple Watch is powered on and nearby, you may see a “Set Up New Apple Watch” prompt on your iPhone’s screen. Tap Continue to begin.
If no prompt appears:
– Tap “Start Pairing” in the Apple Watch app.
– Or hold your iPhone near the Apple Watch to trigger proximity detection.
Use Visual Pairing (Recommended)
Hold your iPhone so the camera can see the swirling animation on the Apple Watch screen.
- The iPhone will scan the pattern using encrypted light signals—this method is faster and more secure.
- Alignment takes 10–30 seconds; keep your hand steady and avoid glare.
- Once detected, a confirmation appears on both screens.
If scanning fails:
– Clean the Apple Watch screen and iPhone camera lens.
– Move to a dimmer room.
– Try again with the watch lying flat on a table.
Enter Pairing Code Manually (Fallback)
If visual pairing doesn’t work, select “Enter Code Manually” in the Apple Watch app.
- Note the 6-digit code displayed on the Apple Watch.
- Type it into your iPhone when prompted.
- Connection establishes once verified.
Troubleshooting Tip: If the code doesn’t appear, force restart the Apple Watch by pressing and holding the side button and Digital Crown for 10 seconds.
Complete Initial Configuration
After successful pairing, follow the on-screen steps to configure core settings and sign in to your Apple ecosystem.
Choose Setup Method
You’ll be asked whether to:
- Set Up as New: Clean install with default settings (ideal for first-time users).
- Restore from Backup: Reapply layout, apps, and preferences from a previous Apple Watch.
Restoring may take 10–30 minutes, depending on data size. Health data syncs in the background after setup.
Sign In With Apple ID
Enter your Apple ID and password to enable iCloud sync, App Store access, and personalized services.
If you don’t have an Apple ID:
– Tap “Create Apple ID” and follow prompts using your email or phone number.
– Two-Factor Authentication will verify your identity automatically if enabled.
Accept Terms and Conditions
Review and accept Apple’s Software License Agreement and Privacy Policy.
Tap Agree, then confirm your location on the map when prompted.
Enable Key Features and Services
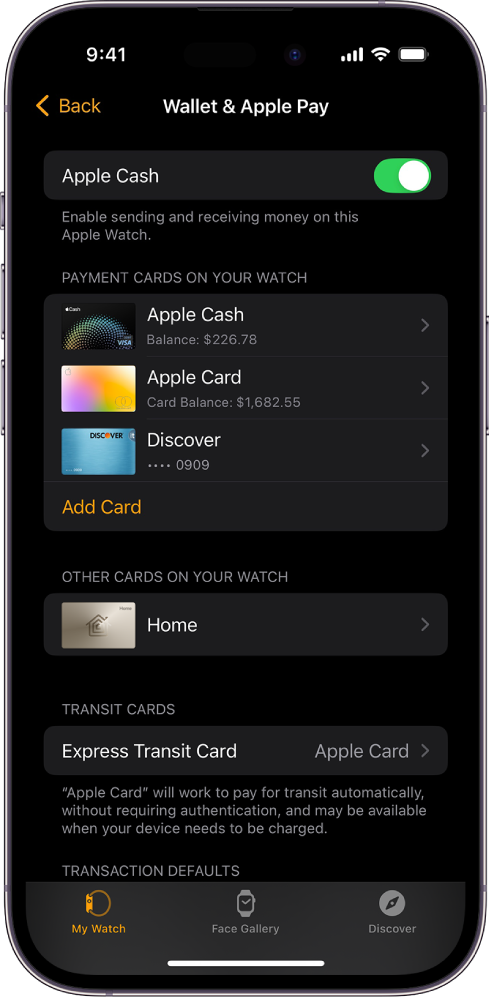
During setup, you’ll be guided through enabling essential functions that enhance safety, convenience, and connectivity.
Activate Apple Pay
Add a credit or debit card for contactless payments:
- Tap “Add Card” and scan your card using the iPhone camera.
- Verify with your bank (may require SMS or app confirmation).
- Set as default payment method if desired.
Once added, double-click the side button to pay in stores, apps, or websites.
Turn On Siri
Enable voice control by selecting “Enable Siri”.
- Use voice commands like “Start a workout” or “Call Mom.”
- Choose feedback options: “Always,” “Only When Silent Mode Is Off,” or “Never.”
Siri learns your habits over time, offering smarter suggestions.
Set Up Emergency SOS and Fall Detection
For safety, enable:
- Emergency SOS: Hold the side button to call emergency services.
- Fall Detection (Series 4 and later): Automatically alerts emergency contacts after a hard fall.
You’ll be prompted to add Emergency Contacts—choose trusted people who can be notified if needed.
Configure Medical ID
Store critical health info accessible from the lock screen:
- Include allergies, medications, medical conditions, and blood type.
- Accessed by anyone who presses “Emergency” > “Medical ID” on a locked watch.
Go to Health app > Medical ID > Create Medical ID post-setup.
Personalize Your Watch Face
Your watch face is your daily interface. Choose and customize it now for immediate usability.
Pick a Default Watch Face
Select from styles like:
- Modular: Big complications for activity, weather, calendar
- Infograph: Detailed data rings and subdials
- Simple: Minimalist design with time and date
- Activity Analog: Shows all three fitness rings around the dial
Preview each by swiping left or right.
Customize Complications
Tap “Customize” to edit what each module displays:
- Tap a complication to change its function (e.g., Calendar, Timer, Heart Rate).
- Drag to reposition or resize (on supported faces).
- Use color picker to match your band or mood.
Changes appear instantly on the watch.
Pro Tip: Press the Digital Crown to save and exit. Long-press the screen later to switch faces anytime.
Finalize Setup and Sync Data
Once basic configuration is done, the Apple Watch begins syncing apps, settings, and system data.
Wait for Sync Completion
After setup, the watch installs apps and pulls data from your iPhone. You’ll see a progress ring on the watch face.
- New setup: Sync completes in 5–10 minutes.
- Restore from backup: May take up to 30 minutes, especially with many third-party apps or health data.
Keep both devices close and charged during this phase.
Install watchOS Updates
Check for the latest software:
- Open Apple Watch app > General > Software Update
- Download and install any available updates
- The watch will restart automatically
Updating ensures security patches, bug fixes, and new features.
Note: Your iPhone must remain nearby during update installation.
Troubleshoot Common Setup Issues
Even with smooth design, some users encounter hiccups. Here’s how to resolve them quickly.
iPhone Won’t Detect Apple Watch
If no pairing prompt appears:
- Restart both devices.
- Ensure Bluetooth is on and Airplane Mode is off.
- Update iPhone to latest iOS version.
- Open Apple Watch app manually and tap “Start Pairing.”
Try resetting network settings:
Settings > General > Reset > Reset Network Settings
Pairing Fails or Drops Midway
Common causes and fixes:
| Issue | Solution |
|---|---|
| Weak signal | Move devices closer; remove barriers |
| Low battery | Charge both devices to 50%+ |
| Interference | Turn off other Bluetooth devices nearby |
| Software conflict | Restart both devices and retry |
Avoid using Wi-Fi-only networks; connect to a stable cellular or dual-band Wi-Fi.
Apple Watch Stuck on Apple Logo
Force restart the device:
- Press and hold the side button and Digital Crown together
- Keep holding for at least 10 seconds
- Release when the Apple logo reappears
Wait 30 seconds, then retry pairing.
If unresponsive, leave it charging for 30 minutes before attempting again.
Post-Setup Customization Tips
Now that your Apple Watch is active, fine-tune it for your lifestyle.
Manage Notifications
Control which apps alert your wrist:
- Open Apple Watch app > Notifications
- Choose: Mirror iPhone Alerts, Custom, or None
- For custom: Toggle individual apps on/off
Enable Do Not Disturb, Sleep Mode, or Theater Mode to reduce distractions.
Install and Organize Apps
Download new apps:
- Open App Store on iPhone or Apple Watch
- Search and install compatible apps
- Automatically syncs to watch
Rearrange home screen:
- Press firmly on watch face (Force Touch)
- Tap “Edit Apps”
- Drag apps to reorder or delete
Switch between Grid View (default) and List View in Apple Watch app > My Watch > App View.
Set Fitness and Activity Goals
Open the Activity app on the watch:
- Review daily rings: Move, Exercise, Stand
- Swipe up to adjust Move goal based on past performance
- Tap to start workouts: Outdoor Walk, HIIT, Yoga, etc.
Syncs automatically with Fitness+ and Health app on iPhone.
Cellular Setup (For LTE/5G Models)
If you own a cellular Apple Watch, activate service to use it without your iPhone nearby.
Activate Cellular Plan
During setup or afterward:
- Open Apple Watch app > My Watch > Cellular
- Tap “Set Up Cellular”
- Follow carrier prompts (requires account login or QR code scan)
Most carriers support eSIM activation directly from the watch.
Confirm Activation
Once complete:
– Look for green dot or “Cellular” label near battery icon
– Make a call or send a message without your iPhone present
Note: Carrier fees apply. Check data limits and international roaming options.
Tip: Use “Automatic” mode to let the watch switch between Wi-Fi and cellular seamlessly.
Maximize Long-Term Use
A successful setup is just the beginning. Maintain performance and extend longevity with these habits.
Update Software Regularly
Check for updates monthly:
- Apple Watch: Settings > General > Software Update
- iPhone: Settings > General > Software Update
New watchOS versions often include battery optimizations and health feature upgrades.
Maintain Battery Health
Apple Watch lasts up to 18 hours per charge. Extend lifespan by:
- Charging nightly or after heavy use
- Avoiding full discharges
- Using Optimized Battery Charging (enabled in Battery settings)
Don’t leave it in extreme heat or cold.
Use Apple Support Resources
Need help later?
- Visit Apple Store for free setup assistance
- Use Apple Support app for remote troubleshooting
- Extend coverage with AppleCare+ (includes accidental damage protection)
All setup guides and videos are available at support.apple.com.
Final Note: Your new Apple Watch setup is now complete. From effortless pairing to personalized features, you’ve unlocked a powerful tool for fitness, safety, and connectivity. Take time to explore watch faces, apps, and health tracking—it’s designed to adapt to your life, not the other way around. Keep your devices updated, backed up, and close during future setups, and enjoy everything your Apple Watch has to offer.