Your Apple Watch won’t charge. The screen is dark. No green lightning bolt. No response. You plug it in, wait, unplug—still dead. It’s frustrating, especially when you rely on it for health tracking, notifications, or workouts. But before you assume it’s broken, know this: most Apple Watch charging issues are fixable—and often, the solution is simpler than you think.
The phrase “Apple Watch not charging” is one of the most common tech complaints, but it covers a wide range of scenarios: a red lightning bolt that won’t progress, a blank screen despite connection, or a watch that charges for a few minutes then stops. Each symptom points to a different cause—some as easy as a dirty charging port, others as serious as a failed battery.
This guide cuts through the noise. Based on Apple’s official guidance, real user reports, and professional repair insights, you’ll learn how to diagnose, troubleshoot, and fix every type of Apple Watch charging failure. Whether you own a Series 3 or the latest Series 10, we’ll walk you through proven steps—from cleaning contacts to advanced resets—so you can get your watch back up and running.
Decode Charging Light Symbols

Red Lightning Bolt Meaning
A red lightning bolt means your Apple Watch is critically low on power and in Power Reserve mode. It’s not turned off—it’s waiting to charge. If the bolt is solid, the watch hasn’t started charging yet. If it’s inside a ring, charging has begun. Don’t panic if it takes minutes (or even 30+) to show progress. Just keep it connected.
Some users report the red bolt appearing, flickering, then vanishing—this can happen due to unstable connections or software hiccups. The key is to leave it plugged in. Even if nothing seems to be happening, the watch may be slowly drawing power. Wait at least 30 minutes before troubleshooting further.
Green Charging Symbol Explained
A green lightning bolt or full circle means your watch is actively charging. You may see the battery percentage rise. This is normal and healthy. If it appears immediately, your charging system is working. If it flickers or disappears, there’s an interruption—likely a loose connection or faulty cable.
If the green symbol appears but charging stalls at a certain percentage (like 80%), check if Optimized Battery Charging is enabled. This feature pauses charging to preserve battery life and will resume when you typically use your watch. Disable it temporarily if you need a full charge fast.
Blank Screen While Plugged In
If the screen stays black even when on the charger, don’t assume it’s dead. A fully drained battery may take time to wake up. Apple recommends charging for at least 30 minutes before expecting feedback. Place it on a flat surface, ensure magnets click, and leave it undisturbed. If after 30 minutes nothing appears, move to cleaning or restart steps.
Some users report their watch showing no signs of life for hours, only to suddenly boot up with a low battery. Patience is key—especially with older models or watches left unused for days.
Clean Charging Contacts Properly
Remove Dirt and Debris
Dust, sweat, and lotion build up on the back of the watch and charging puck, blocking electrical contact. This is one of the top causes of charging failure. Turn off your watch if possible, then wipe both surfaces with a dry, lint-free cloth. Use a cotton swab or soft-bristled toothbrush to gently clean the metal rings. For stubborn grime, a dry toothpick can help—never use liquids or metal tools.
Avoid blowing into the port or using compressed air, which can push debris deeper. Clean both the watch and charger weekly if you wear it daily, especially after workouts.
Prevent Future Buildup
Make cleaning part of your routine. Every 3–6 months, inspect and clean the contacts. Avoid charging right after workouts—sweat accelerates corrosion. If you wear your watch daily, buildup happens faster. Clean regularly to avoid sudden charging drops.
Test and Replace Charging Gear
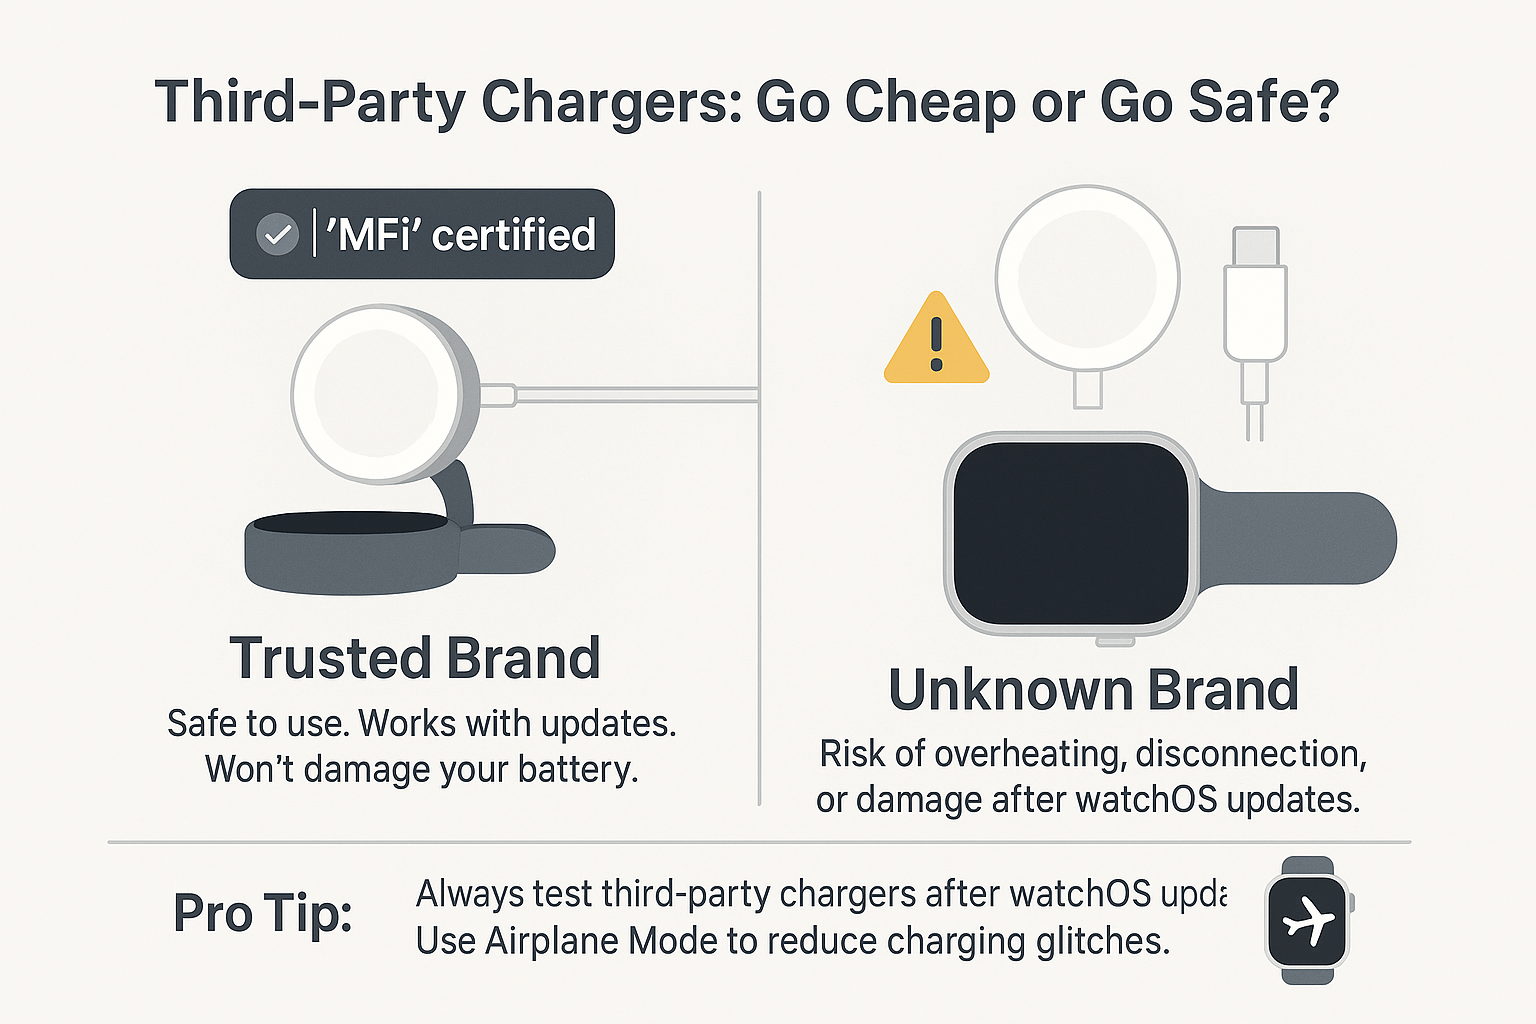
Use Genuine Apple Chargers
Third-party cables often deliver unstable power. Even MFi-certified ones can fail. Always test with an Apple-branded charger—preferably the original one that came with your watch. If you’re using a USB-C Magnetic Fast Charging Cable, ensure it’s paired with a 20W+ Apple adapter for best results.
Cheap cables may lack proper shielding or deliver incorrect voltage, damaging the charging coil over time. If you’re unsure, borrow a friend’s Apple charger to test.
Try Different Power Sources
Not all outlets or USB ports deliver enough power. Test your setup on:
– A wall adapter (5W, 12W, or 20W+)
– A Mac or PC USB port
– A powered USB hub
Some users report success only on laptop ports, suggesting certain power profiles help wake deeply drained batteries. If your watch charges on a laptop but not a wall plug, the issue is likely power delivery.
Swap Cables to Isolate the Problem
If you have access to a friend’s Apple Watch or charger, test both ways:
– Try your watch on their charger
– Try your charger on their watch
If your watch charges on their cable, your charger is bad. If their watch won’t charge on your cable, replace it immediately.
Realign Watch and Charger Correctly
Ensure Magnetic Snap Connection
Misalignment is a silent killer of charging. The magnetic puck must click securely to the back of the watch. If it feels loose or wobbly, realign it. Place the watch on a flat surface, center the charger, and press gently until it snaps. Listen for the magnetic click—that’s your confirmation.
A weak connection may allow charging to start but fail after a few minutes. Always ensure full contact.
Fix Alignment for Larger Models
Apple Watch Ultra, Series 7+, and 45mm/49mm models are harder to align on curved docks. Lay the charger flat instead of using the stand. Remove the band if magnets struggle to connect. Some users find that charging without the band ensures perfect contact.
Force Restart Your Apple Watch
How to Perform a Hard Reset
A frozen system can block charging. Fix it with a force restart:
1. Press and hold both the Side Button and Digital Crown
2. Keep holding for at least 10 seconds
3. Release when the Apple logo appears
Even if the screen flickers or goes black, hold it. This clears software glitches that may prevent the watch from recognizing the charger.
Why It Works
One user with a Series 10 fixed charging failure this way after trying multiple cables and outlets. Another with a Series 8 saw the red lightning bolt vanish and green symbol appear post-restart. If your watch shows any sign of life (like a flicker), a force restart could be the key.
Allow Extended Charging Time
Wait 8–10 Hours Undisturbed
If the battery is deeply drained, it may take hours to respond. Leave the watch on the charger for 8 to 10 hours straight. Don’t unplug it to “check” progress—this interrupts the charging handshake. Some users report waiting 45 minutes before seeing the Apple logo from a red bolt.
Don’t Panic Over No Feedback
A blank screen doesn’t mean nothing’s happening. The watch may be charging silently. Trust the process. If after 10 hours there’s still no sign of life, move to advanced steps.
Check Battery Health Status
Find Maximum Capacity
Once your watch powers on, check its battery health:
1. Open Settings > Battery > Battery Health
2. Look at Maximum Capacity
- Above 80%: Battery is healthy
- Below 80%: Battery is degraded and may need replacement
Degraded batteries charge slowly, die fast, or stop charging past a certain point.
Recognize Signs of Failure
Common signs of a bad battery:
– Needs charging multiple times a day
– Shuts down at 30% or higher
– Gets hot during charging
– Charges to 80% then stops
If Optimized Battery Charging is on, pausing at 80% is normal. Turn it off temporarily to test full charge.
Tap Buttons to Clear Stuck Mechanisms
Unjam Internal Components
Heat, moisture, or oxidation can make buttons sticky. Even if they seem fine, internal connections may be jammed. Remove the band, then press the Digital Crown and Side Button 25–30 times each. This “taps” internal circuits and can dislodge debris. Reattach the band and try charging again.
Why This Helps
Users report this fixes watches that show no response despite being plugged in. It’s especially useful after exposure to sweat, water, or drops.
Apply Pressure to Re-seat Internals

Press Screen and Back Firmly
Internal ribbon cables can loosen over time. To reseat them:
1. Place the watch face-down on a flat surface
2. Press firmly on the screen for 30 seconds
3. Flip it and press on the back for 30 seconds
4. Perform a force restart
5. Reconnect to charger
This method has helped users with watches that stopped charging after being dropped or exposed to temperature swings.
Try Advanced Fixes (Use Caution)
Freezer Method for Thermal Reset
Warning: Not for watches with moisture damage or swelling.
Some users revive dead watches with cold:
1. Keep band attached
2. Seal in a plastic bag
3. Place in freezer for 20 minutes
4. Remove and wait 5–10 minutes to acclimate
5. Perform force restart
6. Connect to charger
Theory: Cold may reset the battery management system or contract components to restore contact.
Refrigerator Cooling (Safer Option)
Less extreme than the freezer:
1. Place in fridge for 10–12 minutes
2. Wait 5 minutes at room temp
3. Try charging
Based on the same thermal reset idea but safer for delicate electronics.
Complete Battery Drain (Last Resort)
Recommended by a retired Apple QA engineer:
1. Let the watch sit until pressing the crown shows nothing
2. May take several days
3. Once fully dead, connect to charger—it should immediately show green bolt
4. Charge to 100%
To speed up drain: Perform 2–3 hard reboots daily.
Note: Some users report success; others say their watch never recovered. Use only if all else fails.
Avoid Region-Locked Charger Errors
Fix “Unable to Charge” Message
If you see:
“Unable to charge. This is a country-specific charger. It is incompatible with this Apple Watch.”
—You’re using a WPT-compliant charger from China or Indonesia.
These are region-locked. Use a standard Apple charger for global use. No workaround exists—replace the charger.
Know When to Seek Professional Help
Signs You Need Repair
Seek help if:
– No response after 10+ hours of charging
– Watch gets hot during charging
– Visible damage to back glass or port
– Battery health is below 80%
– Force restart does nothing
Your Service Options
Apple Store or Authorized Provider:
– Can run diagnostics
– May offer battery replacement (if available)
– For newer models (e.g., Series 7), Apple may only offer full device replacement
Apple Refurbished Store:
– Best for older models (Series 6, 7)
– Units are tested, repaired, and come with warranty
– Avoid third-party “new” old stock—batteries degrade in storage
Prevent Future Charging Issues
Use Genuine Accessories Only
Stick to Apple-branded or MFi-certified chargers. Cheap cables can deliver wrong voltage, damaging the charging coil over time.
Charge in Moderate Temperatures
Never charge in direct sunlight or freezing conditions. Heat kills lithium-ion batteries. Remove from charger once full to avoid overheating.
Enable Optimized Battery Charging
This feature learns your routine and slows charging overnight to reduce wear. It may pause at 80%—this is normal. Disable temporarily if you need a full charge fast.
Store Watch Properly
If not using for weeks:
– Charge to 50%
– Power off
– Store in a cool, dry place
Avoid long-term storage at 0% or 100%.
Final Troubleshooting Flowchart
- Red lightning? → Connect and wait 30+ minutes
- No symbol? → Clean contacts, re-align, test power source
- Still dead? → Force restart (hold crown + side button)
- No change? → Try different charger/cable
- Won’t charge? → Leave on charger 8–10 hours
- No progress? → Check battery health or try full drain
- All fails? → Visit Apple Support or consider refurbished unit
Final Note: Most Apple Watch not charging issues stem from dirty contacts, faulty cables, or software freezes—not hardware death. Start simple: clean, restart, swap cables. Be patient with dead batteries. Avoid DIY repairs—Apple Watches aren’t user-serviceable. If all else fails, Apple’s refurbished store is often the best value for older models. Your watch might not be dead—just waiting for the right fix.
Leave a Reply