Your Apple Watch Series 3 powers on sluggishly, the screen flickers, or worse—cracks from a fall. Maybe the battery dies before lunch. You’re not alone. Millions still rely on this durable but aging smartwatch, and when it breaks, the big question hits: Should you repair your Apple Watch Series 3 or just upgrade?
The answer isn’t simple. Apple charges $179.99 to replace your damaged unit with a refurbished model—more than the watch’s current resale value. Third-party fixes cost less but come with trade-offs: touch issues, poor color accuracy, and zero water resistance. And DIY repairs? They’re possible, but risky.
This guide cuts through the confusion with real costs, step-by-step repair instructions, common pitfalls, and expert advice so you can make a confident decision. Whether you’re considering an official Apple fix, a local repair shop, or a full upgrade, you’ll know exactly what to expect—down to the tools, adhesives, and long-term risks.
Apple’s Official Repair: Full Replacement, Not Repair
Apple doesn’t fix individual parts on the Apple Watch Series 3. If your screen is cracked or the battery fails, they replace your entire device with a refurbished unit of the same model and size.
Out-of-Warranty Pricing (2024)
| Repair Type | Cost |
|---|---|
| Screen Damage | $179.99 |
| Battery Replacement | $119.99 |
These are flat fees—no partial repairs, no component fixes. Apple uses genuine or refurbished Apple parts, and the replacement unit is fully tested before shipping.
AppleCare+ Benefit: If you had AppleCare+ active, screen damage would cost only $69. But since the Series 3 is discontinued and AppleCare+ must be purchased within 60 days of ownership, most users now pay full price.
What You Get (and Lose) with Apple Repair
- ✅ 90-day service warranty (or remainder of original warranty)
- ✅ IP67 water and dust resistance maintained
- ✅ Genuine Apple parts and full functionality
- ❌ All data erased—you must back up before sending it in
- ❌ No customization—you get what Apple sends
While reliable, spending $180 to fix a watch worth $100 used is hard to justify unless it has sentimental value or you’re mid-upgrade cycle.
Real Cost vs. Value: Is Repairing Worth It?
For most users, repairing an Apple Watch Series 3 isn’t worth it.
Market Reality Check
- Repair Cost (Screen): $179.99
- Used Apple Watch Series 3 Value:
- GPS Model: $75–$100
- LTE Model: $90–$120
You’re paying nearly double the resale value to fix a device that no longer receives major watchOS updates and has limited battery life.
Better Alternatives for $150 or Less
- Apple Watch SE (1st gen): $149 (refurbished) — faster processor, longer iOS support, fall detection
- Apple Watch Series 4: $100–$130 (used) — larger screen, ECG, better performance
- Apple Watch Series 6: $180–$220 — blood oxygen sensing, brighter display
User Reality: “I spent $80 fixing my Series 3—could’ve gotten a used Series 4 for $20 more. Not worth it.”
Unless you’re a DIY enthusiast or need a temporary backup, upgrading delivers better value and longevity.
DIY Screen Replacement: Step-by-Step Guide
If you’re determined to fix it yourself, here’s how to replace the screen safely.
Tools You’ll Need
- Heat source (hairdryer or heat mat)
- Plastic spudger or pry tool
- Fine tweezers
- Isopropyl alcohol (90%+)
- UV-curable LOCA adhesive
- UV curing lamp ($15–$25)
- Replacement OLED screen ($38–$50)
- E7000 or T7000 adhesive (for sealing)
Pro Tip: Buy a full kit on Amazon (~$30) for everything except the screen.
Step 1: Power Off and Soften Adhesive
- Turn off the watch completely
- Apply isopropyl alcohol along the bezel edge
- Wait 2–3 minutes—alcohol weakens factory adhesive
- Gently heat edges with a hairdryer (low setting) to loosen bond
This step prevents cracking the case during disassembly.
Step 2: Lift the Broken Screen
- Slide a plastic spudger between glass and case
- Work slowly around the perimeter
- Avoid the bottom edge—that’s where the Force Touch flex cable connects
If you tear this cable, the screen won’t respond to press or touch.
Step 3: Disconnect Display Cables
Once lifted:
– Locate the three ribbon cables on the logic board
– Use a spudger to lift retention clips
– Gently pull cables free
Warning: Never yank. These connectors are fragile.
Pro Tip: Take a photo before disconnecting—cables go back in specific slots.
Step 4: Clean the Display Bed

- Wipe away old adhesive with acetone and microfiber cloth
- Inspect the black polarizer layer—if damaged, contrast suffers
- Remove all glass fragments with sticky tape or tweezers
A clean surface ensures proper bonding and prevents bubbles.
Step 5: Install New Screen with LOCA

- Apply 3 small drops of UV LOCA adhesive around the edge
- Lower the new screen into place
- Press gently to spread adhesive and remove bubbles
Why LOCA? It flows better, allows micro-adjustments, and cures clear—unlike rigid OCA film.
Use a UV lamp for 3–5 minutes to harden the adhesive.
Step 6: Reconnect and Test
- Reattach double-sided tape to flex cables
- Plug in all three cables and close retention clips
- Power on and wait for Apple logo
Test:
– Touch response (drag power slider)
– Brightness and color
– Force Touch (press hard on home screen)
If nothing happens, reseating cables often fixes it.
Step 7: Final Seal and Cure
- Apply cold press adhesive around the edge
- Use 3M primer for stronger bond
- Wrap with rubber bands for even pressure
- Let cure for 24 hours before use
Pro Tip: Wipe excess adhesive immediately with an alcohol-soaked swab.
Battery Replacement: When It Makes Sense
Signs You Need a New Battery
- Dies within 6 hours
- Shuts down at 30%+
- Won’t charge past 80%
- Swollen or overheating
Battery degradation is common after 3–4 years.
Repair Options
| Option | Cost | Water Resistance? |
|---|---|---|
| Apple | $119.99 | Yes (new sealed unit) |
| DIY Kit | $15–$25 | ❌ Lost |
Even a DIY battery swap requires opening the case—killing water resistance.
Post-Repair Problems & Fixes

Even successful repairs can fail. Here’s how to troubleshoot.
No Touch Response
- Cause: Loose flex cable, damaged connector, or faulty screen
- Fix: Reseat cables, test with known-good screen
Watch Won’t Turn On
- Check battery connection
- Inspect for short circuits (metal debris)
- Try a force restart: Hold side button + Digital Crown for 10+ seconds
Stuck on Apple Logo
- Boot loop common after improper disconnection
- Fix: Force restart; if persistent, restore via iPhone
Overheating While Charging
- Could indicate damaged battery or charging coil
- Test with different charger
- Stop use immediately—swollen batteries pose fire risk
Water Resistance: Gone for Good
Factory vs. DIY Sealing
| Feature | Apple Repair | DIY Repair |
|---|---|---|
| IP67 Rating | ✅ Maintained | ❌ Lost |
| Adhesive Type | Laser-sealed, proprietary | T7000/E7000 (partial seal) |
| Safe for Swimming? | Yes | ❌ No |
After any screen or battery swap, your watch is no longer waterproof.
Expert Advice: Use a waterproof case ($10–$15) if you swim, shower, or garden. These restore splash and submersion protection.
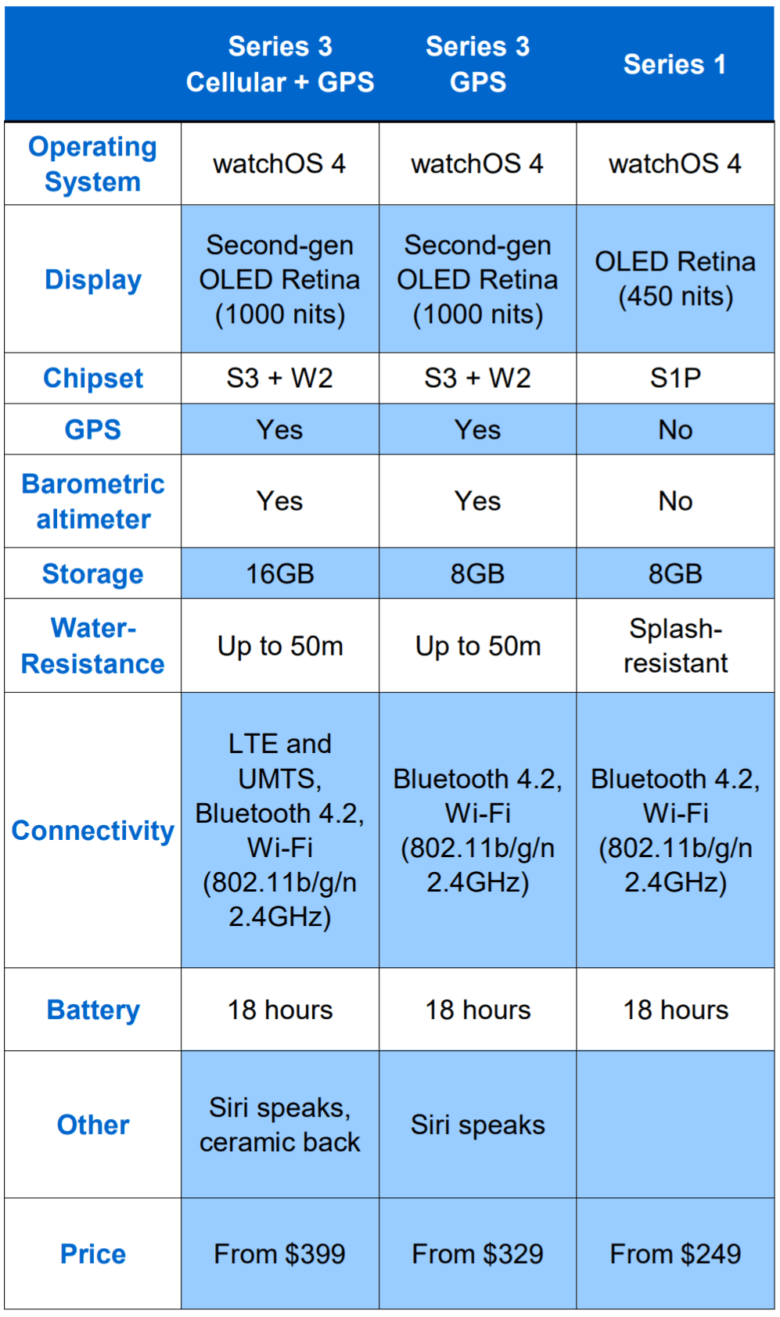
Compatibility: Don’t Mix Models
Can You Use Other Screens?
- Series 3 screens are model-specific
- 38mm and 42mm: Not interchangeable
- GPS vs. LTE: Same screen, different internals
Swapping parts between models won’t work—connectors and spacing differ.
Internal Swaps: Risky and Not Recommended
Some users move Series 3 internals into older cases (e.g., Series 1), but:
– Fit isn’t guaranteed
– Antennas and sensors may not align
– No water resistance
– Apple may reject it during future service
Stick to like-for-like replacements.
Third-Party Repair Shops: What to Expect
If DIY isn’t your thing, local shops offer screen and battery services.
Typical Pricing
| Service | Cost |
|---|---|
| Screen Replacement | $90–$130 |
| Battery Replacement | $60–$80 |
| Waterproofing Seal | Extra $15–$25 (not effective) |
Warranty and Support
- 1-year warranty on screen (some providers)
- 90-day on battery
- Covers defects, not accidental damage
Choose shops that use high-quality screens—cheap clones have poor touch response and color accuracy.
Final Verdict: Repair or Replace?
Repair Only If:
- You’re experienced in micro-repair
- The watch has emotional value
- You enjoy tinkering and accept the risks
- You need a backup watch temporarily
Upgrade Instead If:
- You want long-term reliability
- Need iOS support beyond 2024
- Desire faster performance, better battery, modern features
- Are paying more than $100 to fix it
Best Value Upgrade: Apple Watch SE (1st gen)—$149 refurbished, supports latest watchOS, includes fall detection.
Maintenance Tips to Extend Life
Even if you keep your Series 3:
– Avoid extreme temperatures (damages battery)
– Charge to 80–90%, not 100%
– Turn off Always-On Display
– Restart weekly to clear memory
– Use a case to prevent drops
Battery health degrades faster with heat and full discharges.
Summary: Apple Watch Series 3 Repair Overview
| Factor | Details |
|---|---|
| Official Screen Repair | $179.99 (refurbished unit) |
| DIY Screen Cost | $60–$85 (tools + screen) |
| Battery Replacement (Apple) | $119.99 |
| DIY Battery Cost | $15–$25 |
| Water Resistance After Repair | ❌ Lost permanently |
| Warranty on Repair | 90 days (Apple), 1 year (some third parties) |
| Screen Compatibility | Model-specific only |
| Recommended? | ❌ No—better value in used Series 4 or SE |
Bottom Line: Repairing an Apple Watch Series 3 is technically possible, but rarely economically smart. For most users, spending a little more to upgrade gets you a faster, supported, and more reliable device. But if you’re up for a challenge and love to fix things, a DIY repair can extend its life—just don’t expect it to survive the pool or rainstorm.
Leave a Reply