Switching your Apple Watch band is one of the quickest and most satisfying ways to refresh your look, match your outfit, or adapt to your activity—whether you’re hitting the gym, heading to a meeting, or diving into an outdoor adventure. The best part? You don’t need any tools. Thanks to Apple’s intuitive quick-release system, changing your Apple Watch band takes under a minute and works across all models, from the compact Series 9 to the rugged Apple Watch Ultra.
If you’ve ever hesitated because you weren’t sure how to remove the band safely or worried about damaging your watch, this guide is for you. We’ll walk you through every step of removing and installing bands, show you how different styles like Solo Loop, Milanese, and Ocean Band attach, and help you avoid common mistakes. You’ll also learn how to pick the right size, troubleshoot issues like loose fits or unresponsive sensors, and keep your bands looking new with simple care tips.
By the end, you’ll be confidently swapping bands like a pro—no guesswork, no damage, just seamless style and comfort.
Prepare Your Workspace
Before touching your Apple Watch, set up a clean, safe environment to protect your device and make the process smoother.
Work on a Soft, Clean Surface
Always place your Apple Watch face down on a soft, lint-free surface like a microfiber cloth or padded mat. This prevents scratches on the display and keeps dust or lint from getting into the band connectors. Avoid working on carpets, couches, or cluttered desks where small parts could be lost or the watch might roll off.
Power Off (Optional but Recommended)
While not required, powering off your Apple Watch eliminates the risk of accidental taps or unintended settings changes while handling it. Press and hold the side button until the power slider appears, then drag to turn it off. This is especially helpful if you’re switching bands frequently or in tight spaces where the screen might get pressed.
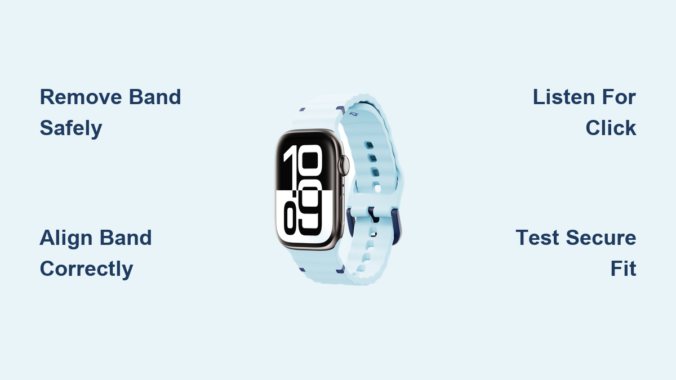
Remove Old Band Safely
Apple’s tool-free release system makes band removal simple—once you know the right technique.
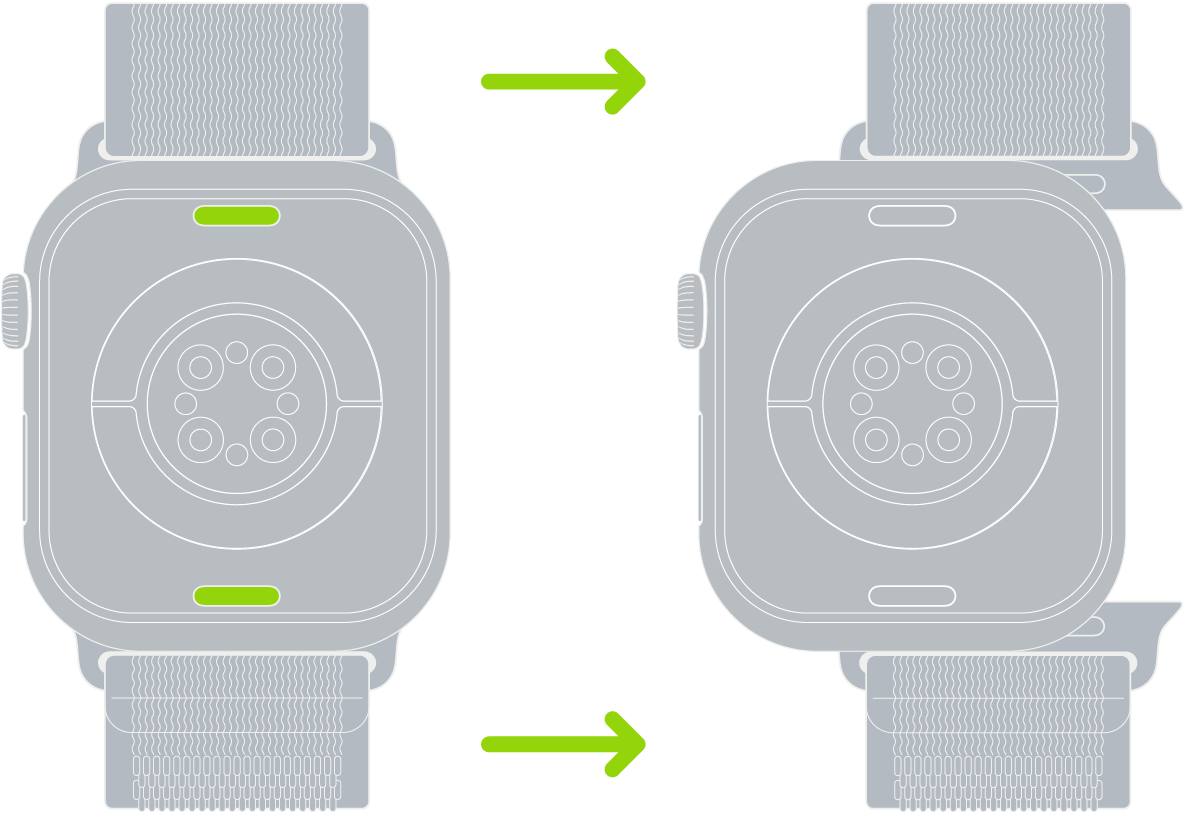
Locate the Release Button
On the back of your Apple Watch case, you’ll find a small band release button on each side. It’s flush with the casing and requires firm, steady pressure to activate. Don’t confuse it with the speaker or mic holes—this button is part of the band lug mechanism.
Slide Band Out Smoothly
Press and hold the release button firmly with your fingertip or fingernail. While holding it down, slide the band straight out from the slot. Do not pull upward or twist—this can damage the internal latch or scratch the case.
If the band doesn’t move:
– Ensure the button is fully depressed
– Gently wiggle the band side to side to loosen it
– Check for lint or debris blocking the mechanism
Repeat the process on the other side before setting the old band aside.
Warning: Never force the band. If it resists, the release button may not be fully engaged or could be clogged.
Install New Band Correctly

A secure, flush fit is essential for both safety and sensor accuracy.
Align Band with Grooves
Hold the new band so the text or logo faces you—this ensures correct orientation. Match the connector to the grooves on the watch case. If the text is upside down or facing away, it won’t seat properly.
Slide Until It Clicks
Insert the band smoothly into the slot. Push it in straight—no angling—until you hear and feel a distinct click. That click means the internal spring latch has engaged. Repeat for the other side.
Visual cue: The band should sit flush with the case. No gaps, no wobbling.
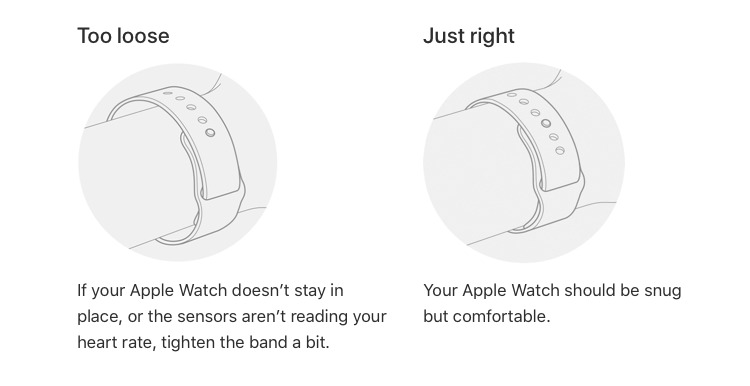
Verify Secure Attachment
Gently tug on both ends of the band. It should not slide out unless the release button is pressed. If it moves:
– Remove and reinsert
– Check for debris in the slot
– Ensure full alignment and pressure
Never wear your Apple Watch if the band feels loose or detaches easily. A secure fit prevents accidental drops and ensures heart rate and blood oxygen sensors function correctly.
Model-Specific Band Instructions
Not all bands attach the same way. Follow these steps based on your band type.
Solo Loop & Braided Solo Loop
These seamless, stretchable bands have no hardware—just slide them on and off.
Stretch and Slide On
To wear: Pull from the bottom to stretch the band over your wrist.
To remove: Gently stretch and slide off.
Sizing tip: If upgrading to Apple Watch Ultra (49mm), consider sizing down one size for a snug fit due to the larger case diameter. Solo Loops are not adjustable after purchase, so test fit carefully.
Milanese Loop
This magnetic mesh band offers a sleek, adjustable closure.
Open and Close the Clasp
- 2018 and newer models: Slide the magnetic clasp through the band lug to open fully.
- Older models: Lift the magnet upward to release.
To adjust:
1. Lift the clamp on the back
2. Slide the buckle to your preferred position
3. Ensure it’s parallel to the band, then press down to lock
Pro tip: A misaligned buckle can snag clothing—always check before wearing.
Link Bracelet
This premium metal band splits into two halves.
Separate and Reattach
- Close the butterfly clasp (if open) by folding both sides until they click
- Press the quick release button on the inside of one link
- While holding, gently pull the links apart
To reinstall: Slide each half into the watch case until they click.
Resize at a Service Center
Use a pin tool to adjust links. Apple recommends professional resizing to avoid scratches or misalignment.
Modern Buckle
Features a secure magnetic closure with multiple fit holes.
Open with Button Press
Press the release buttons on both sides to unlock.
Adjust using the holes in the band.
To close: Align the magnets until they snap securely.
Best for: Daily wear and formal events—secure and easy to adjust.
Ocean Band, Alpine Loop, Trail Loop
Built for extreme conditions on Apple Watch Ultra (49mm).
Use Precision Fit Mechanism
- Ensure the band lug is parallel to the case
- Insert with the metal tooth facing down
- Gently push the lug toward the case to engage
Warning: These bands are optimized for 49mm. Smaller bands (44mm, 45mm) may fit but are not recommended for intense activities.
Check Compatibility First
Using the wrong band can cause poor fit or damage.
Match Case Size to Band Group
Apple bands fall into two families:
– Small sizes: 38mm, 40mm, 41mm → Interchangeable
– Large sizes: 42mm, 44mm, 45mm, 49mm → Interchangeable
Example: A 40mm band fits a 41mm watch. A 45mm band fits Apple Watch Ultra.
Exception: 46mm bands fit Ultra but are only for casual use, not extreme sports.
Verify Third-Party Bands
Look for “Works with Apple Watch” labeling. Non-certified bands may not lock securely.
Troubleshoot Common Issues
Fix problems fast with these quick diagnostics.
Band Won’t Slide Out
Cause: Release button not fully pressed
Fix: Press and hold firmly. Clean around the button with a dry toothbrush.
New Band Won’t Click In
Cause: Wrong orientation or misalignment
Fix: Ensure text faces you. Realign and push straight in.
Band Feels Loose
Cause: Debris in slot or improper seating
Fix: Clean connectors, reattach with full pressure.
Watch Sensors Malfunction
Cause: Band not fully seated—blocks back sensors
Fix: Reattach and test heart rate in the Workout app.
Never wear with a loose band—you risk losing your watch.
Choose the Right Band Size
A proper fit ensures comfort and security.
Find Your Watch Case Size
Check the back of your Apple Watch—engraved size (e.g., “45mm”) tells you which bands to buy.
Measure Your Wrist
Use a soft tape measure:
– S/M: 130–180mm
– M/L: 150–220mm
For Solo Loops, choose from sizes 3–9. If upgrading to Ultra, size down one notch.
Tip: Order multiple sizes if unsure—Apple allows returns on unopened bands.
Maintain Bands for Longevity
Proper care keeps your bands looking new.
Clean After Every Use
- Silicone, Rubber, Trail Loop: Wipe with a damp cloth. Rinse with mild soap if needed.
- Leather, Braided Solo Loop: Use a dry or slightly damp cloth. Never soak.
- Metal (Link, Milanese): Polish with a jewelry cloth to prevent tarnish.
Avoid: Alcohol, solvents, chlorine, and saunas.
Store Properly
Keep bands flat or loosely coiled in a cool, dry place. Avoid sunlight.
Rotate and Protect
Switch bands regularly. Remove during swimming, hot yoga, or intense workouts when possible.
Best Practices Summary
- Always work face down on a soft surface
- Press and hold the release button—don’t tap
- Confirm text faces you before installing
- Test security by tugging gently
- Use only compatible bands
- Inspect connectors monthly for lint or damage
Recommended Band: Snap Duo Watch Band
For frequent changers, the Snap Duo Watch Band stands out.
Features at a Glance
- Reversible design: Two colors in one
- Magnetic snap attachment: Change bands in seconds
- Soft pebbled silicone: Comfortable for all-day wear
- Sport buckle: Adjustable and secure
- Colors: Five vibrant duo combinations
Why It Stands Out
- Works with all Apple Watch models and sizes
- Durable, stylish, and easy to clean
- Perfect for fashion, function, and fast swaps
Final Note: Changing your Apple Watch band is a simple, satisfying way to personalize your device. With the right technique and compatible band, you can switch from gym to gala in under a minute. Just remember: align, click, and test. Follow these steps, and your watch will stay secure, stylish, and ready for anything.
Leave a Reply