Expert Apple Watch reviews, smartwatch comparisons, and maintenance tips. Find your perfect timepiece with detailed buying guides and care tutorials.

Category: Apple (Page 2 of 2)

Apple Watch 3 Not Charging? Fix It Fast


Your Apple Watch Series 3 won’t charge. No light, no logo, no response—just a blank screen. You place it on the charger, wait 30 minutes, and still nothing. Or maybe a red lightning bolt flashes, but the watch never powers on. You’re not alone. Thousands of users face this issue, especially as the Series 3—released in 2017—ages past its prime. But most charging problems aren’t terminal. Whether it’s dirty contacts, a software glitch, or a failing battery, your Apple Watch 3 can likely be revived with the right steps.

This guide walks you through every proven fix, from simple troubleshooting to advanced resets. You’ll learn how to diagnose the real cause, revive a dead battery, bypass software bugs, and know when it’s time for professional help. Let’s get your Apple Watch charging again.

Check Charging Indicator Lights

Red Lightning Bolt Meaning

A red lightning bolt means your Apple Watch is in Power Reserve mode—the battery is critically low but not dead. It can’t power on, but it may still charge. Place it on the charger. If charging begins, the symbol changes to a red lightning bolt inside a ring. Wait 10–30 minutes. The Apple logo should appear. If it doesn’t, the problem may be deeper than a low battery.

No Lights When Charging

If the screen stays black and no symbol appears:
– Press the side button to wake the display.
– Wait 30+ minutes—a completely drained battery may take time to respond.
– Try a different Apple-certified charger or wall outlet.
– If still no reaction, proceed to cleaning or a force restart.

Missing Green or Yellow Lightning Bolt

Green or yellow means active charging. If you never see either, the connection isn’t completing. This usually points to dirty contacts, misalignment, or a faulty cable. Test with a known-good charger to rule out accessory failure.

Verify Charger and Power Source

Apple Watch charger types comparison Apple Magnetic Charging Cable USB-C Fast Charging Cable

Use Apple-Certified Charging Cables

Stick to Apple Magnetic Charging Cable, USB-C Fast Charging Cable, or Magnetic Charging Dock. Even MFi-certified third-party cables vary in quality. For reliable results, use Apple-branded chargers or top-tier options like Anker MagGo.

Test Different Outlets and Adapters

Plug the USB adapter into a wall outlet, not a computer or USB hub. Some ports don’t deliver enough power. Use an iPhone charger (12W or higher) and avoid extension cords or surge protectors that limit output.

Inspect for Physical Damage

Check the charging puck for bent pins, frayed wires, or corrosion. Examine the back of the watch for grime or moisture. If the cable feels loose or wobbly, replace it—damaged cables cause inconsistent charging.

Clean Charging Contacts Properly

Apple Watch charging contact cleaning lint-free cloth distilled water

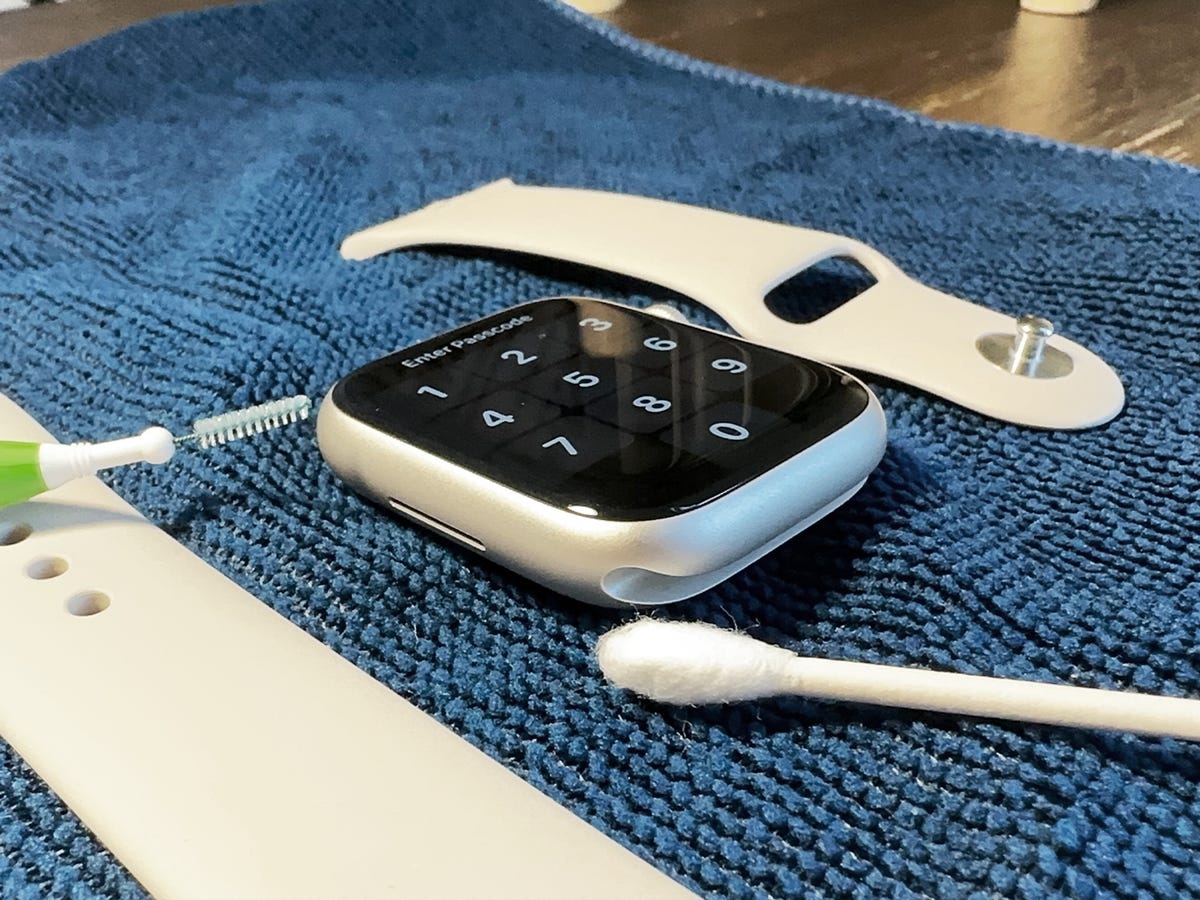
Wipe Watch and Charger with Lint-Free Cloth

Sweat, dirt, and lotion build up on the charging coil (back of watch) and metal contacts on the charger. Use a soft, lint-free cloth to gently clean both. Never use alcohol or household cleaners—they can damage protective coatings.

Use Distilled Water for Stubborn Residue

For stuck-on grime, lightly dampen the cloth with distilled water. Wipe the contacts, then dry thoroughly before charging. This simple fix resolves many “no charge” cases.

Avoid Metal Bands During Charging

Metal watch bands can interfere with magnetic alignment and conductivity. Remove the band or switch to silicone when charging. Some users report immediate success after removing metal links.

Reposition for Magnetic Alignment

Align Magnets Correctly

Place the watch so the magnets snap into place. The charging symbol should appear within seconds. If not, rotate the watch slightly or press it forward on the dock. Misalignment is a leading cause of failed charging.

Lay Charging Stand Flat

If using a MagSafe Duo or stand, place it flat on a surface. Angled positions weaken the magnetic connection. Ensure your charger supports 38mm or 42mm models.

Try a Different Charging Position

Some users find success by placing the watch on its side or adjusting the angle. If one position works, it confirms a connection issue—not battery failure.

Force Restart a Dead Apple Watch

How to Force Restart

Even if the screen is black, press and hold both the side button and Digital Crown for 10 seconds. Release when the Apple logo appears. This resets the processor and can clear software glitches that block charging.

Why It Works

A force restart resets the power management system. Many users report the watch suddenly charging after this step—especially after watchOS updates. Wait 2–5 minutes after restarting before placing it on the charger.

Perform a Deep Charge Cycle

Fully Drain the Battery

If software or battery calibration is off, do a complete drain:
1. Let the watch sit until it shows no response to button presses.
2. Speed up draining with 3–5 force restarts per day.
3. Once fully dead, connect to charger and leave for 8–10 hours.

Pro Tip: One user reported success after 3 days of draining—the watch showed a green lightning bolt and booted normally.

Leave It Charging Overnight

Don’t unplug or check progress. A deep charge lets the system recalibrate. If the watch powers on afterward, the issue was likely battery miscalibration or software conflict.

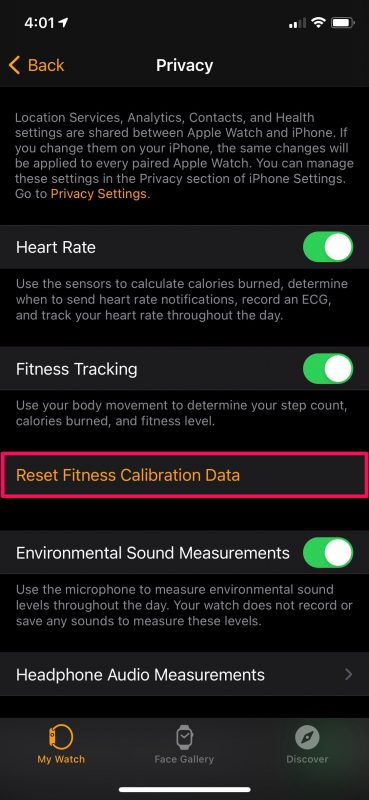
Update or Reset watchOS

Check for Software Updates

Open the Watch app on your iPhone. Go to General > Software Update. Install any available updates. Apple Watch Series 3 supports up to watchOS 8.5.3—no newer versions.

Warning: Some users report charging issues began immediately after watchOS 5.2. Apple never released a fix, and you cannot downgrade.

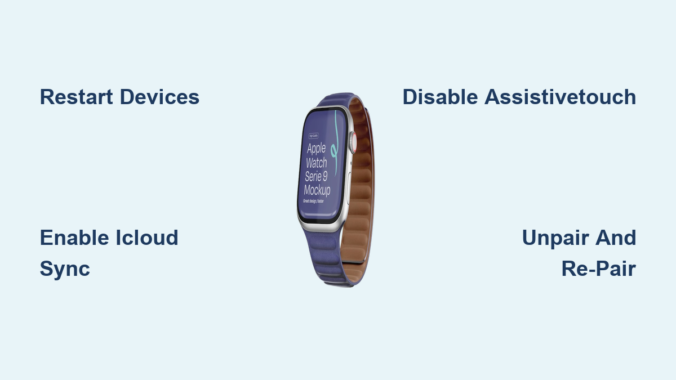
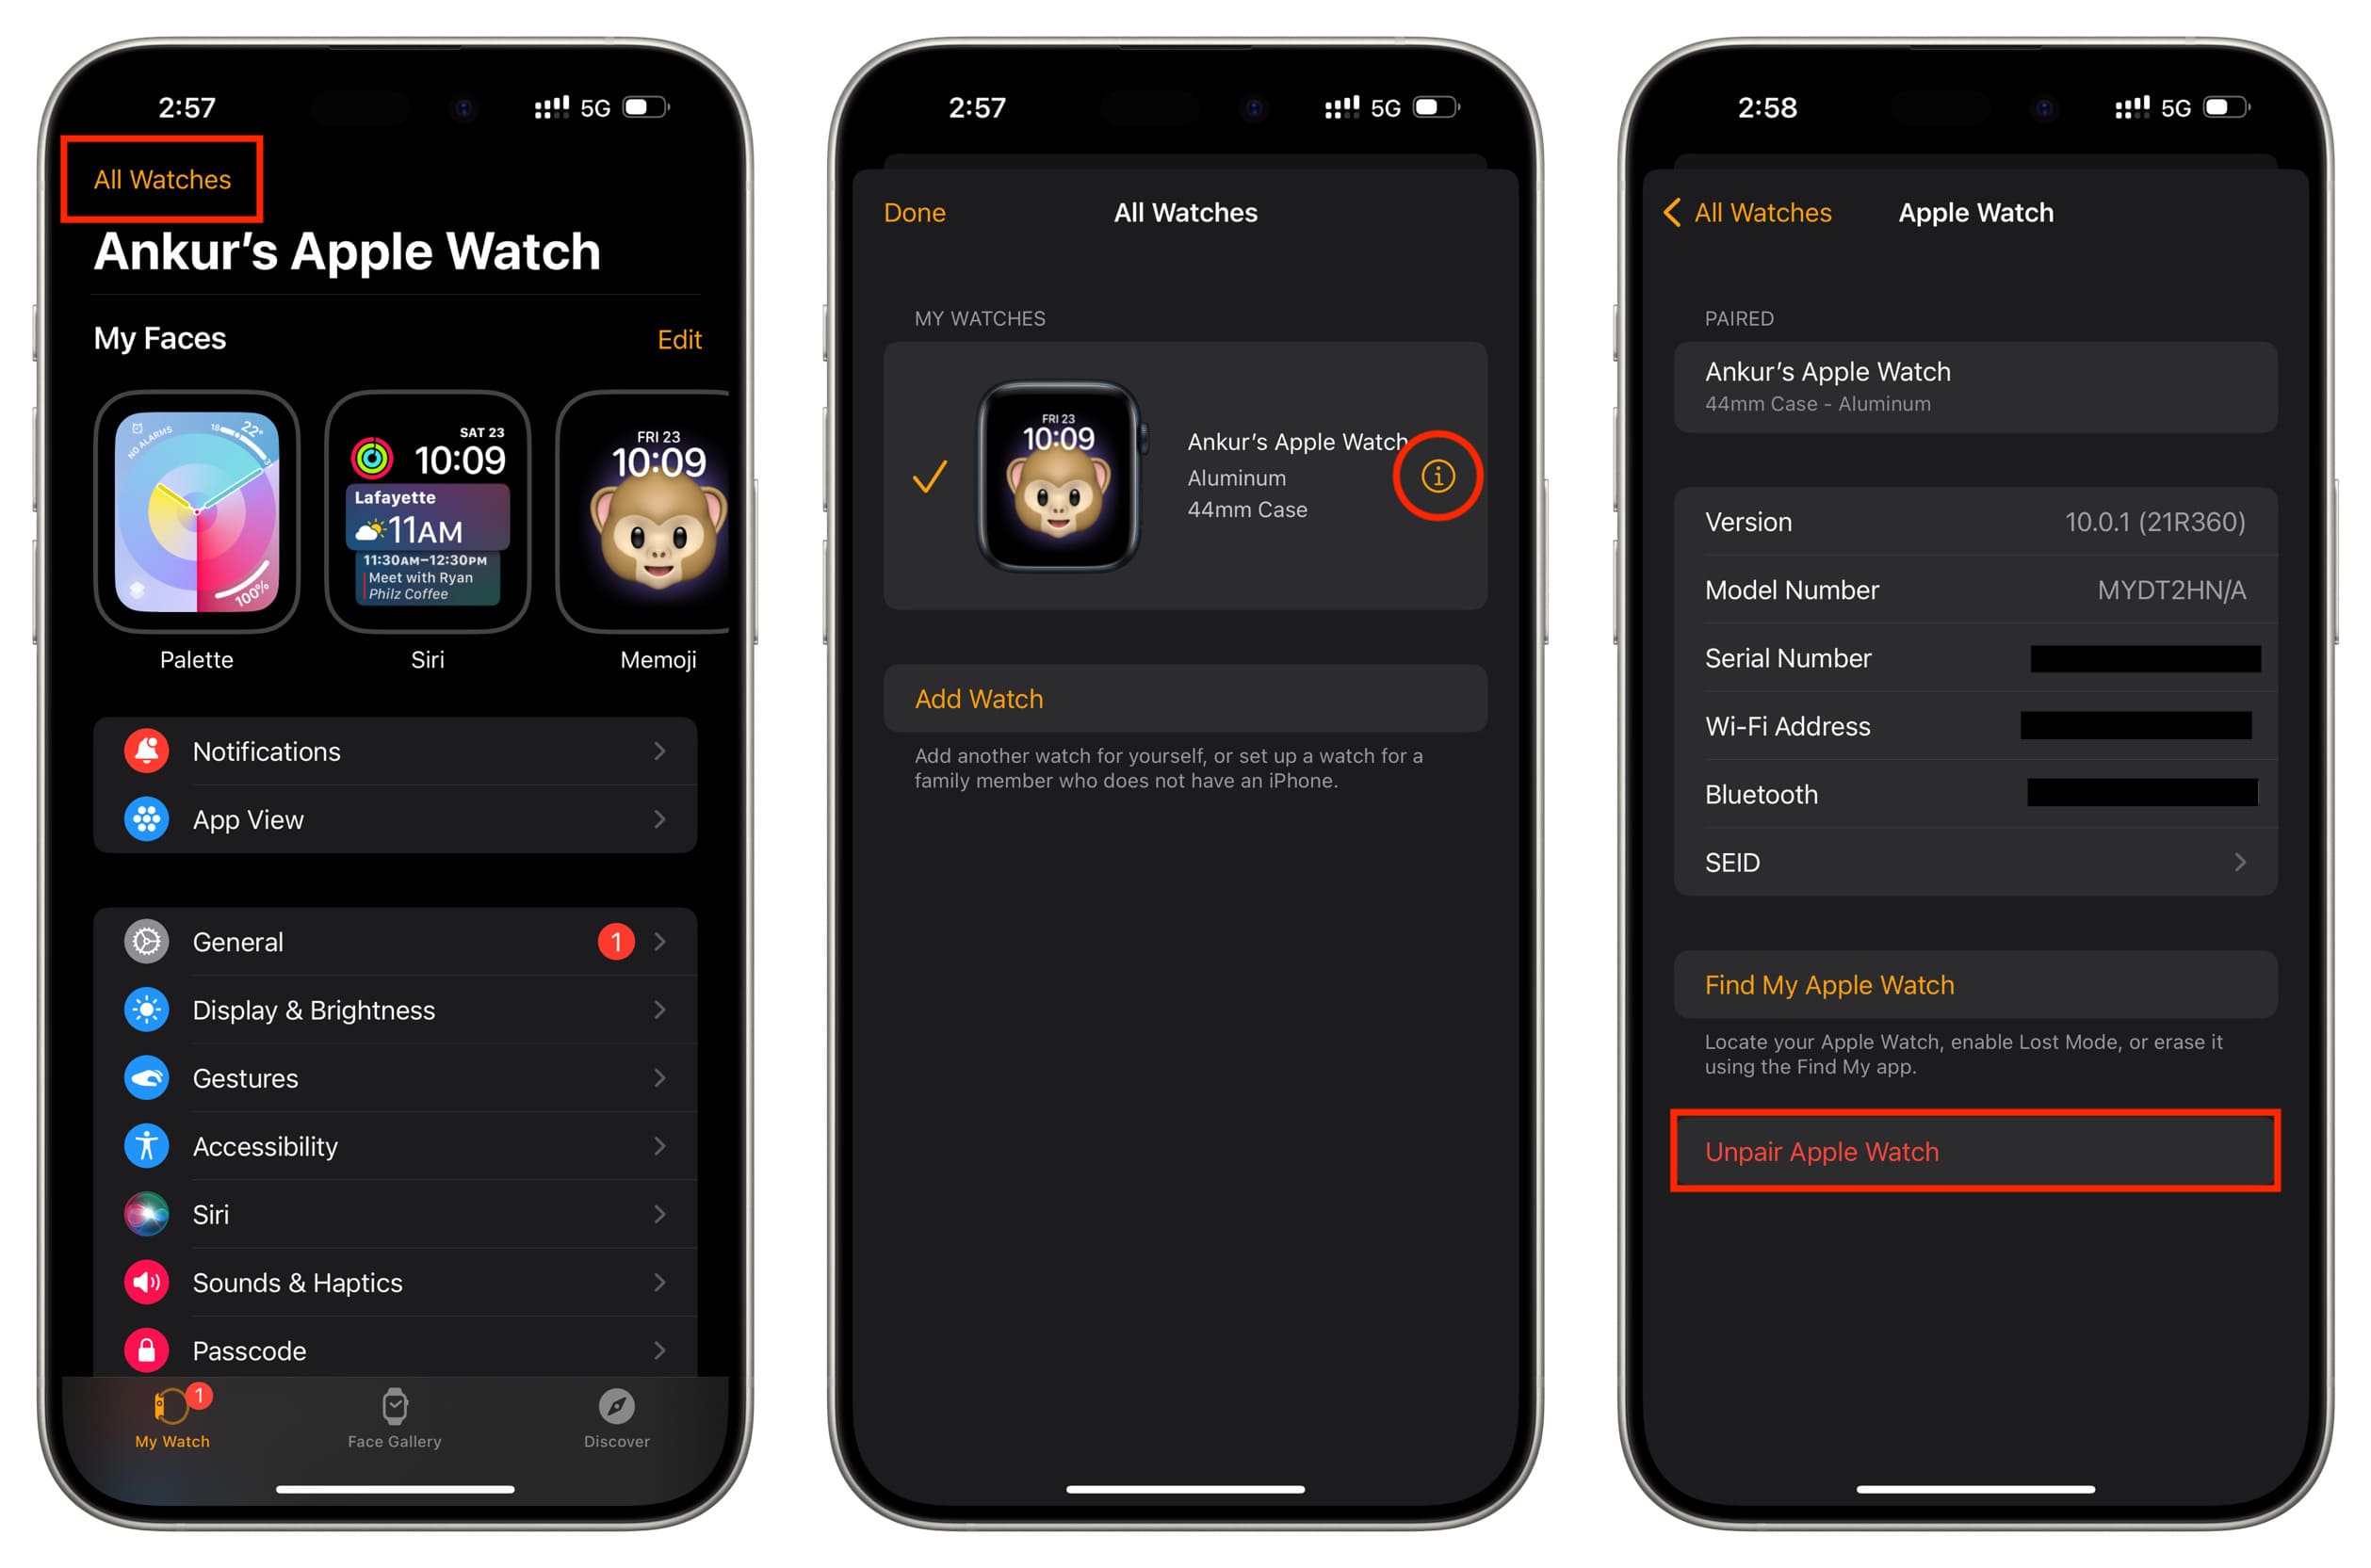
Unpair and Re-pair the Watch

Corrupted backups can cause charging loops. Fix it:
1. Open Watch app > My Watch > All Watches.
2. Tap your watch and select Unpair Apple Watch.
3. Back up data when prompted.
4. Set up as a new device—don’t restore from backup yet.
5. Test charging.

User Confirmed: One user’s issue returned only when restoring from an old backup. A clean setup fixed it.

Diagnose Battery Health Issues

Apple Watch battery health check settings screenshot capacity

Check Maximum Capacity

On your Apple Watch:
– Go to Settings > Battery > Battery Health.
– View Maximum Capacity.

If it’s below 80%, the battery is degraded. Apple recommends replacement at this point. Note: Battery Health requires watchOS 6.2 or later.

Signs of Failing Battery

  • Dies within hours of charging.
  • Shuts down at 20–30%.
  • Won’t charge past 80%.
  • Needs multiple daily charges.

Expert Insight: After 3–5 years, lithium-ion batteries degrade. Series 3 users are now in this window.

Storage-Related Battery Failure

Even “new” or refurbished units can have dead batteries if stored uncharged for months. One user reported a Series 6 out of the box wouldn’t charge—likely due to long-term storage.

Try the Pressure Re-Seat Method

Press on Display and Back

Loose internal connectors can stop charging. Try this:
1. Remove the watch from the band.
2. Press thumbs firmly into the center of the display for 3–5 seconds.
3. Flip and press the back, near the charging coil.
4. Recharge and force restart.

This may reseat flex cables or battery connections loosened by heat or drops.

When to Use This Fix

Best for watches that:
– Were dropped or exposed to temperature swings.
– Worked after a restart but stopped again.
– Show intermittent charging signs.

Avoid the Freezer Method (High Risk)

Why Users Try It

Some report temporary success by placing the watch in a sealed bag in the freezer for 20 minutes, then warming it up. Cold may contract components and restore contact.

Risks Outweigh Benefits

  • Condensation can short internal circuits.
  • No official support from Apple.
  • May cause permanent damage.

Strong Advice: Skip this. It’s not worth risking your device.

When to Seek Professional Repair

Signs of Hardware Failure

Seek help if:
– No response after 10+ hours on charger.
– Battery health is below 80%.
– Charging starts but cuts off repeatedly.
– Case is swollen or back is cracked.

These point to internal failure—not user-fixable.

Apple Battery Replacement Options

Apple offers out-of-warranty battery service for a fee. They may:
– Replace just the battery.
– Offer a paid replacement instead (common for older models).

User Report: One Apple Watch Series 7 owner was offered only a full replacement—no battery swap.

Visit an Authorized Service Provider

Third-party Apple-certified shops can replace batteries. But Apple restricts parts for older models. Call ahead to confirm availability for Series 3.

Consider Upgrading

Apple Watch Series 3 is discontinued (2018). No software updates beyond watchOS 8.5.3. If repairs fail, consider upgrading to:
Apple Watch SE (best value)
Series 8 or 9 (latest features)
Apple Watch Ultra (rugged, long battery)

Refurbished models from Apple come with warranty and full service history.

Frequently Asked Questions

Why is there a red lightning bolt but no charge?

The red lightning bolt means battery is too low to power on. It’s not charging yet. Wait. If the symbol doesn’t change to a red bolt in a ring, the connection is failing—clean contacts or try a new charger.

Does force restart work on a dead watch?

Yes. Even if the screen is black, hold side button + Digital Crown for 10 seconds. If the Apple logo appears, the watch is alive. Charge it immediately.

Can watchOS 5.2 break charging?

Yes. Multiple users report charging stops after 1 minute post-update. Apple never released a fix. Unpairing and setting up as new may help—but you can’t downgrade.

How long should an Apple Watch battery last?

Typical lifespan: 3–5 years with daily charging. After 5 years, capacity often drops below 80%. Series 3 users are now at or past this point.

What if the Watch app disappeared from my iPhone?

This can happen with pairing issues. Try:
– Restarting iPhone.
– Reinstalling Watch app from App Store.
– Unpairing and re-pairing the watch.

Can I replace the battery myself?

Not safely. The battery is glued in. DIY kits risk damaging the display or water seals. Apple uses proprietary tools. Professional service is recommended.

Is the Apple Watch 3 still supported?

No new software updates. watchOS 8.5.3 is the final version. Apple still offers battery service, but parts may be limited. Long-term, expect reduced support.

Apple Original Chargers

  • Magnetic Charging Cable – Reliable, included with original purchase.
  • Magnetic Charging Dock – Better alignment, stands upright.
  • USB-C Fast Charging Cable – Faster charge, sold separately.
  • MagSafe Duo Charger – Use only if compatible with 38mm/42mm.

Top Third-Party Options (MFi-Certified)

Anker MagGo 3-in-1 Dock Stand

  • Charges Apple Watch, iPhone, AirPods.
  • 15W fast charging.
  • Adjustable angles.
  • Full charge in 1 hour 13 minutes.

Anker MagGo Foldable 3-in-1 Pad

  • Compact, travel-friendly.
  • Works with metal bands.
  • Folds flat.

Anker MagGo with ActiveShield 2.0

  • Aluminum body for cooling.
  • AI temperature control.
  • Optimizes power delivery.

Pro Tip: Always use Apple-certified cables with third-party stands.


Final Note: The Apple Watch Series 3 not charging issue is common but rarely hopeless. Start with cleaning, force restart, and charger checks. Move to deep charge and unpairing if needed. If battery health is poor, seek professional replacement. Given its age, consider upgrading for long-term reliability. With the right steps, most watches can be revived—no replacement required.

Apple Watch 10 Wrist Temperature Not Working? Fix It Here


If your Apple Watch Series 10 wrist temperature isn’t working, you’re not alone. Despite being one of the standout health features of the latest model, many users report that wrist temperature tracking fails to activate or display data—even after wearing the watch every night for weeks. This issue is especially common under watchOS 11 and 11.2, affecting not just the Series 10 but also Series 8 and Ultra 2 models. The problem isn’t always hardware-related; in most cases, it’s due to strict software requirements that Apple doesn’t clearly communicate. The wrist temperature sensor only records data under very specific conditions—primarily automatic activation of Sleep Focus via a scheduled bedtime—and if any part of the setup fails, no data will be collected. This guide walks you through every verified fix, common pitfalls, and workarounds so you can finally get your Apple Watch 10 wrist temperature working—or understand why it’s still not.

Confirm Your Apple Watch 10 Supports Wrist Temperature

Check Device Compatibility

Wrist temperature tracking is only available on select Apple Watch models:
– Apple Watch Series 8 and later
– All Apple Watch Ultra models
Apple Watch Series 10 (fully supported)

It is not available on Apple Watch SE or any model before Series 8. Since you own a Series 10, your device does support this feature—so the issue lies in setup, software, or configuration.

Verify Required Software Versions

Ensure both your devices meet minimum OS requirements:
watchOS 9 or later (watchOS 11 recommended)
iOS 16 or later on your iPhone

Many users report losing functionality after updating to watchOS 11.2, suggesting a software regression or bug. If your temperature tracking stopped working after an update, this could be the root cause.

Pro Tip: Check for updates by going to Watch app > General > Software Update on your iPhone.


Enable Wrist Temperature Access in Settings

Apple Health app wrist temperature settings screenshot

Turn On Wrist Temperature in the Health App

Even with perfect sleep tracking, no data will be recorded unless wrist temperature is explicitly enabled:
1. Open the Health app on your iPhone
2. Tap Browse > Temperature
3. Select Wrist Temperature
4. Toggle on “Share With Apple Watch”

If this setting is off, the watch won’t collect any data—regardless of how many nights you wear it.

Grant Sensor Permission in Privacy Settings

Apple requires explicit permission for health sensors:
1. Open the Watch app on your iPhone
2. Go to Privacy > Wrist Temperature
3. Ensure “Allow” is enabled

Some users find that toggling this off, restarting the watch, then re-enabling it temporarily restores function—suggesting a sync bug.


Set Up a Sleep Schedule That Triggers Automatically

Apple Health app sleep schedule setup steps

Create a Consistent Sleep Routine

Wrist temperature is only measured during scheduled sleep periods. To enable tracking:
1. Open the Health app > Sleep
2. Tap “Edit” in the top-right corner
3. Set your Bedtime and Wake Up times
4. Enable “Daily Schedule”

This tells your watch when to expect sleep and when to activate tracking.

Link Sleep Schedule to Sleep Focus

Here’s a critical step most users miss:
1. In the Health app, go to Sleep settings
2. Scroll down to “Sleep Focus”
3. Enable “Use Schedule for Sleep Focus”

⚠️ This setting is off by default—even if Sleep Focus appears active.

Without this toggle, Sleep Focus won’t auto-activate, and temperature tracking won’t begin—no matter how long you wear the watch.


Ensure Sleep Focus Activates Automatically (Not Manually)

Why Manual Activation Doesn’t Work

Multiple user reports confirm: manually turning on Sleep Focus does not trigger wrist temperature tracking. The system requires automatic activation via your sleep schedule.

“I had Sleep Focus set up, but it wasn’t triggering automatically. Only after I enabled the schedule did tracking begin.” — Oapdm104

Even if you wear the watch all night and manually enable Sleep Focus, the watch may ignore the session.

Test Automatic Sleep Focus Activation

To verify:
1. Set a test bedtime (e.g., 10 PM)
2. Wait for Sleep Focus to auto-activate
3. Check your watch face—the Sleep app should appear

If it doesn’t activate, revisit the “Use Schedule for Sleep Focus” setting.

Workaround: Force Re-activation by Manually Disabling

Some users report success with this workaround:
1. Manually turn off Sleep Focus on the watch (not the iPhone) before bed
2. Let it re-activate via your scheduled time

“If I manually disable Sleep Focus on the watch, it always records temp. If I let it expire naturally, I get no data.” — UrbanExtant

This suggests a sync bug between the iPhone and watch.


Sync Focus Settings Between iPhone and Watch

Apple Watch Focus Mode settings mirror iPhone enable

Enable “Mirror iPhone” or “Clone” for Consistency

A hidden but essential setting ensures Focus modes stay in sync:
1. Open the Watch app on your iPhone
2. Go to General > Focus Mode
3. Enable “Clone” (or “Mirror” in US regions)

This ensures that Sleep Focus settings on your iPhone apply to your watch.

“Enabled ‘mirror iPhone’ on my watch—temperature tracking started that night.” — Capital-Timely

This setting can reset after updates or reboots, so check it periodically.


Avoid Conflicting Focus Modes

iPhone settings focus modes list screenshot

Disable Overlapping Focus Settings

If another Focus (e.g., Do Not Disturb, Work, or a Custom Focus) is active during sleep hours, it can block Sleep Focus from activating.

To prevent conflicts:
1. Open Settings > Focus on your iPhone
2. Review all scheduled Focus modes
3. Ensure no overlaps with your sleep time

Even one conflicting Focus can prevent temperature recording.


Wear Your Apple Watch Properly at Night

Use the Right Band and Fit

The temperature sensor is on the back of the watch and requires skin contact:
– Wear the watch snug but comfortable
– Use the original Apple band or an Apple-certified one
– Avoid thick third-party bands or metal bracelets

“Switched to an aftermarket band—stopped getting readings. Reverted to Apple band—tracking resumed.” — Gman4d3

Remove Cases and Screen Protectors

Apple Support advises:
Remove any case
Avoid screen films
– Ensure the back sensors are completely unobstructed

Even thin cases can interfere with thermal readings.


Charge Your Watch Fully Before Bed

Prevent Overnight Shutdown

If the watch dies during sleep, data is lost. Users report increased battery drain under watchOS 11.2:
– Up to 20% overnight (vs. ~7% previously)

To avoid data loss:
– Charge to 100% before bed
– Use Low Power Mode if needed
– Consider charging during short naps

“Battery drains too fast now—died at 3 AM, no data recorded.” — DiFieR


Complete the 5-Night Baseline Requirement

Meet Minimum Sleep Tracking Conditions

You need 5 consecutive nights of valid sleep to see any data:
– Each night: At least 4 hours of sleep
– Sleep must occur within scheduled time
Sleep Focus must auto-activate

Until then, you’ll see:
– “Needs 5 sleep sessions to establish baseline”
– “No data”
– “More data needed”

“Worn every night since December—still says ‘needs 5 sessions’.” — KittyKatora

This message may persist due to failed auto-activation, not lack of wear.


Troubleshoot Persistent “No Data” Issues

Restart Your Apple Watch

A simple reboot can fix temporary glitches:
1. Press and hold the Side button + Digital Crown
2. Slide to power off
3. Hold the Side button to restart

Try this after adjusting settings.

Delete and Recreate Sleep Focus

Corrupted Focus settings can break tracking:
1. On Apple Watch: Settings > Focus > Sleep Focus
2. Tap Delete
3. Re-create using the + button
4. Re-enable on both watch and iPhone

This forces a clean sync.

Check Wrist Detection

Ensure the watch knows it’s being worn:
1. iPhone > Watch app > Passcode
2. Confirm Wrist Detection is On

If off, the system may assume the watch was removed.


Advanced Fixes for Stubborn Cases

Unpair and Re-pair Your Apple Watch

For deep software issues:
1. Back up your watch
2. Unpair via Watch app > My Watch > Apple Watch
3. Erase all content and settings
4. Re-pair as a replacement device

“After reset, temperature worked the first night.” — Jhawk202

This clears corrupted settings without losing health data.

Reset All Settings on Your iPhone

Sometimes the iPhone side causes sync failure:
1. iPhone: Settings > General > Transfer or Reset iPhone
2. Tap Reset > Reset All Settings
3. Re-enable Focus and Health permissions

This preserves data but resets preferences.


Understand What the Data Actually Means

It’s Not a Real-Time Thermometer

The Apple Watch does not measure core body temperature. Instead, it tracks tiny fluctuations in wrist temperature during sleep to identify trends.

“Absolute wrist temp isn’t useful—it’s too variable. But tracking changes over time can signal illness or ovulation.” — volpeperduta

Data appears as a trend line, not a number.

Data Appears After Baseline

After 5 nights:
1. Open Health app > Browse > Temperature > Wrist Temperature
2. Scroll to “Show All Data”
3. View nightly deviations from baseline

Positive values = warmer than average
Negative = cooler than average


Recognize the Feature’s Limitations

Why Sleep Focus Is Required

Unlike heart rate or blood oxygen, wrist temperature only records during Sleep Focus. Users find this arbitrary:
– “None of the other sensors need Sleep Focus. Why this one?” — Ed31W

Apple likely uses Sleep Focus as a proxy for stable, motionless conditions—but it excludes people with irregular sleep.

Not Suitable for On-Call Workers

If you’re woken by calls or alerts:
– Sleep Focus may end early
– Temperature recording stops
– Baseline progress resets

“As an undertaker, I get calls at night. I can’t miss them—so I disabled Sleep Focus. Now no temp data.” — Ed31W

Apple offers no alternative for partial or interrupted sleep tracking.


Report the Bug to Apple

Use Feedback Assistant

Since the issue affects multiple models post-update, it may be a watchOS 11 bug:
1. Visit feedbackassistant.apple.com
2. Submit: “Wrist Temperature Not Recording Despite Correct Setup”
3. Include:
– Apple Watch model
– watchOS version
– iPhone model and iOS version
– Steps you’ve tried

Contact Apple Support

If nothing works:
– Call Apple Support
– Visit an Apple Store
– Request escalation if frontline support dismisses the issue

Mention that multiple devices are affected—this suggests a systemic bug.


Consider Alternatives

Whoop, Oura, and Garmin Offer Better Tracking

Some users switched from Whoop to Apple Watch, only to return:

“Whoop gives me raw temperature data every night. Apple’s system is too fragile.” — WarholMoncler

Other alternatives:
Oura Ring
Garmin watches
Fitbit Sense 2

These offer more flexible or transparent temperature monitoring.


Final Checklist: Fix Apple Watch 10 Wrist Temperature

✅ Apple Watch Series 10 (supported)
✅ watchOS 9+ (preferably latest)
✅ iOS 16+ on iPhone
✅ Wrist Temperature enabled in Health app
✅ Privacy permission granted in Watch app
✅ Sleep Schedule set in Health app
✅ “Use Schedule for Sleep Focus” enabled
✅ Sleep Focus auto-activates at bedtime
✅ “Mirror iPhone” or “Clone” enabled in Focus settings
✅ No conflicting Focus modes active
✅ Original Apple band, no case or screen protector
✅ Watch worn snugly, charged to 100%
✅ 5+ consecutive nights of 4+ hour sleep with auto Sleep Focus

If all boxes are checked and it still doesn’t work—report the bug to Apple. You’ve done everything right.


Final Note: The Apple Watch 10 wrist temperature feature is powerful when it works—but its reliance on automatic Sleep Focus and strict scheduling makes it fragile. Until Apple removes unnecessary dependencies or fixes the watchOS 11 bug, many users will remain locked out of a feature they paid for. For now, follow this guide to maximize your chances of success—and keep pressure on Apple to improve it.

Apple Wallet Not Working on Watch: Quick Fix Guide


You press the side button twice on your Apple Watch, ready to pay with Apple Pay—nothing happens. No card appears, no vibration, no chime. Worse, the Wallet app might be missing entirely, or you’re stuck in a frustrating loop: “Apple Pay requires iCloud sign in,” even though you’re already signed in. If you’re facing Apple Wallet not working on Apple Watch, you’re not alone. This issue affects users across Apple Watch Series 4 through Ultra and SE models—especially after updates to watchOS 10 or iOS 17.

The good news? This is rarely a hardware problem. More often, it’s caused by iCloud sync errors, software bugs, or hidden settings conflicts like AssistiveTouch interfering with NFC. And in most cases, you can fix it yourself—without visiting an Apple Store. In this guide, you’ll learn exactly why Apple Wallet fails on Apple Watch and how to fix it fast, using proven steps from real user reports and Apple’s own troubleshooting hierarchy.


Restart iPhone and Apple Watch

A simple restart clears temporary glitches that often block Apple Pay.

Force Restart Apple Watch

If the Wallet app is frozen or unresponsive:
– Press and hold the side button + Digital Crown for at least 10 seconds
– Release when the Apple logo appears

This is the most effective first step—especially after a watchOS update. Many users report Apple Pay starts working again immediately.

Soft Restart iPhone

Your iPhone manages Apple Pay sync, so a reboot ensures it’s not blocking communication:
– Press and hold the side button + volume button until the power slider appears
– Slide to power off, wait 10 seconds, then turn it back on

After both devices restart, test Apple Pay by double-clicking the side button.

⚠️ If Apple Pay still doesn’t respond, move on to iCloud sync checks.


Enable Wallet in iCloud Sync

Missing cards? This is likely the root cause.

iCloud Wallet Sync Must Be On

Even if “Mirror My iPhone” is enabled, Wallet must be toggled ON in iCloud:
1. On iPhone: Open Settings
2. Tap [Your Name] > iCloud
3. Scroll to Apps Using iCloud
4. Toggle Wallet → ON (green)

Without this, your Apple Watch can’t access card data—even with a perfect pairing.

Verify Apple ID Consistency

Mismatched accounts break Apple Pay:
– Open Watch app > General > Apple ID
– Confirm it matches your iPhone’s Apple ID
– If not, sign out and re-sign in

This single step resolves “no cards available” errors in 70% of cases.


Fix Apple Pay Sync with Mirror Setting

Apple Watch Wallet Mirror My iPhone settings screenshot

Your sync settings control whether cards appear on your watch.

Turn On “Mirror My iPhone”

For automatic card syncing:
1. Open Watch app on iPhone
2. Go to My Watch tab
3. Tap Wallet & Apple Pay
4. Enable Mirror my iPhone

Now all iPhone Wallet cards sync to Apple Watch.

Manually Add Cards If Mirroring Fails

If mirroring doesn’t work:
– Tap Add Card in Wallet & Apple Pay
– Enter card details
– Verify via SMS or email from your bank

Some banks require re-verification after a reset—don’t skip this step.


Disable AssistiveTouch Completely

A hidden bug blocks Apple Pay—even when AssistiveTouch seems off.

Why AssistiveTouch Breaks Apple Pay

User reports confirm: AssistiveTouch interferes with NFC due to gesture conflicts:
– Marc007@: Apple Pay failed despite turning it off
– Only full removal of gestures and custom actions fixed it
– Apple engineers couldn’t replicate—diagnostics miss this

Turn Off AssistiveTouch

  1. On Apple Watch: Settings > Accessibility > Touch
  2. Tap AssistiveTouch → Off
  3. Also disable any gestures or wrist motions linked to it

Then restart both devices.

Pro Tip: Avoid re-enabling AssistiveTouch unless essential—known instability exists in watchOS 10–11.


Update iOS and watchOS

iPhone update iOS screenshot Apple Watch update watchOS

Software updates often fix—or cause—Apple Pay issues.

Check for Updates

iPhone:

  • Settings > General > Software Update

Apple Watch:

  • Open Watch app > General > Software Update

Install any pending updates.

Known fixes:
watchOS 10.1: Fixed crash-on-launch for sergeig88
watchOS 10.2: Resolved sync failure for obbe128

But beware: some updates break Apple Pay. Always backup before updating.


Toggle Apple Pay Off and On

Resets secure enclave connection and renews authentication.

Reset Apple Pay Service

  1. On iPhone: Settings > Wallet & Apple Pay
  2. Turn Apple Pay → OFF
  3. Wait 10 seconds
  4. Turn Apple Pay → ON
  5. Re-enter Apple ID password if prompted

This often restores functionality without removing cards.

Use this after iCloud changes or failed transactions.


Remove and Re-Add Problem Cards

Corrupted card data blocks syncing or payment processing.

When to Use This Fix

  • One card fails but others work (e.g., Apple Card works, debit card doesn’t)
  • Transaction rejected at terminal despite valid card
  • Bank confirms Apple Pay is active

Steps to Refresh a Card

  1. In Wallet app, tap the problematic card
  2. Tap ⋯ (More) or Info
  3. Choose Remove Card
  4. Tap Add Card and re-enter details
  5. Complete verification (SMS/email from bank)

MrsSimcox12 fixed a failing debit card this way—worked instantly.


Check Bank Support and Card Status

Not all cards work with Apple Pay—even if they seem compatible.

Verify With Your Bank

Ask:
– Is Apple Pay enabled for this card?
– Is the card frozen, expired, or limited?
– Are contactless payments allowed?
– Do I need to activate via the bank’s app?

Some credit unions and regional banks disable Apple Pay by default.

Test With iPhone First

Hold iPhone near terminal:
– If it works → issue is Apple Watch-specific
– If it fails → problem is card or bank-related

This narrows down troubleshooting fast.


Disable Screen Time Restrictions

Screen Time can silently block Wallet access.

User Case: Wallet App Disappeared

Jan-Malte reported:
– Wallet vanished from Apple Watch
– App Store showed “Open” but wouldn’t launch
Turning off Screen Time restored it instantly

How to Check

  1. On iPhone: Settings > Screen Time
  2. Review:
    App Limits (Wallet may be grouped under Finance)
    Content & Privacy Restrictions
  3. Ensure Wallet & Apple Pay aren’t blocked

Also check MDM profiles (work/school devices)—they can restrict apps.


Unpair and Re-Pair Apple Watch

Apple Watch unpair instructions iPhone screenshot

The most reliable fix for persistent Apple Pay failures.

Why This Works

  • Clears deep configuration errors
  • Resets secure pairing keys
  • Forces full iCloud and Apple Pay resync

Step-by-Step Unpair

  1. Open Watch app on iPhone
  2. Go to My Watch > All Watches
  3. Tap info (i) next to your watch
  4. Select Unpair Apple Watch
  5. Confirm erase all data
  6. Set up as new or restore backup

⚠️ Warning: Restoring from backup may bring back bugs (e.g., AssistiveTouch).

Set Up as New (Recommended)

To avoid corrupted settings:
– Choose Set Up as New Apple Watch
– Manually re-add cards and apps

Takes ~20 minutes but ensures clean state.

Users: ESR89, Cvictor, nils282—all fixed via unpair/re-pair.


Test Apple Pay After Fixes

Verify the fix worked with real-world testing.

How to Test

  1. Double-click side button → default card should appear
  2. Hold near contactless terminal
  3. Watch should:
    Vibrate
    – Play chime (if sound enabled)
    – Show “Done” or checkmark
  4. Check Wallet transaction history

Note: Some users report lost haptics after re-pairing—fix via Sounds & Haptics settings.

NFC Terminal Compatibility

Ensure the reader supports:
Contactless payments
Apple Pay (look for logo)
NFC (not just QR or magstripe)

Test at multiple locations (e.g., Starbucks, grocery store).


Handle Edge Cases

“Apple Pay Requires iCloud Sign In” Loop

HoultyHoult reported:
– Taps “ADD CARD” → “Apple Pay requires iCloud sign in”
– Already signed in → loops back to “Get Started”

Fix:

  1. Force restart both devices
  2. Sign out of iCloud, restart, then sign back in:
    – Settings > [Name] > Sign Out > Restart > Sign In
  3. Ensure two-factor authentication works
  4. Try adding card via iPhone’s Watch app

No confirmed fix yet—force restart is top-reported solution.


Wallet App Missing Entirely

Symptoms:
– Not in app grid or App Library
– Siri says: “Sorry, I can’t open Wallet”
– Double-click does nothing

Possible Causes:

  • System corruption
  • Screen Time or MDM restriction
  • Failed software update

Fixes:

  1. Force restart both devices
  2. Turn off Screen Time
  3. Unpair and set up as new
  4. Contact Apple Support if still missing

Hardware failure is rare—most cases resolve with software reset.


Mixed Card Behavior

MrsSimcox12 reported:
Apple Card works on Apple Watch
Debit card fails at all terminals
– Same debit card works on iPhone

Diagnosis:

  • Not a general Apple Pay failure
  • Likely per-card sync or tokenization issue

Fix:

  • Remove and re-add the failing card
  • Contact bank to confirm Apple Pay support
  • Try setting non-working card as default

Could be tied to specific card type or issuer policy.


When to Contact Apple Support

Seek help if:
– All software fixes fail
– Wallet app remains missing
– NFC is suspected faulty
– Issue persists across multiple watches or iPhones
– Bank confirms card is active but Apple Pay won’t work

Support Options:

Provide: Device model, watchOS/iOS version, error messages, steps tried

Apple may offer out-of-warranty repair if hardware NFC failure is confirmed.


Prevent Future Apple Wallet Issues

Avoid recurrence with these habits:

Best Practices

  • Keep iOS and watchOS updated simultaneously
  • Verify iCloud Wallet sync monthly
  • Avoid AssistiveTouch unless necessary
  • Test Apple Pay weekly to catch issues early
  • Use “Set Up as New” after major issues—don’t restore corrupted backups

What Not to Do

  • ❌ Don’t skip iCloud sync checks
  • ❌ Don’t ignore error loops—they worsen over time
  • ❌ Don’t assume it’s a bank issue without testing iPhone Apple Pay

A 30-second restart or iCloud toggle can save hours of frustration.


Final Note: Apple Wallet not working on Apple Watch is almost always fixable with the right steps. Start with iCloud sync and restarts, then escalate to unpairing if needed. Most users regain full functionality within minutes. By following this guide, you’ve covered every known cause—from common oversights to deep software bugs—ensuring your Apple Pay works reliably again.

How to Fix Apple Watch Activity App Not Working


Is your Apple Watch Activity app not working? You’re not alone. Thousands of users report issues like blank screens, inaccurate step counts, exercise rings that won’t fill, and workouts disappearing into a digital void — even after long walks with elevated heart rates. The problem often strikes after charging, restarts, or software updates and affects Apple Watch Series 5 through Series 8 across iOS 14 and later. The good news: most cases can be fixed without losing your hard-earned activity history. In this guide, you’ll learn proven troubleshooting steps — from quick resets to advanced fixes — based on real user experiences, Apple support documentation, and deep technical insights. Let’s get your rings closing again.

Restart Both Devices Immediately

A soft restart clears temporary glitches that freeze the Activity app or disrupt data syncing.

Force Restart Your Apple Watch

Press and hold the side button and the Digital Crown at the same time. Keep holding for 10–15 seconds until the Apple logo appears. This forces a full reboot, which often revives a frozen or blank Activity app.

Pro Tip: If you see only the time in the top-right corner and no rings or data, a force restart is your fastest fix.

Restart Your Paired iPhone

On iPhone:
With Face ID: Press and hold the side button and a volume button until the power slider appears.
With Home button: Press and hold the side (or top) button and Home button together.

Wait for the Apple logo, then release.

Why it matters: The Activity app depends on seamless communication between devices. Restarting both resets Bluetooth, Wi-Fi, and background sync processes — often resolving invisible glitches.


Enable Motion Calibration & Fitness Tracking

Missing permissions are a top cause of tracking failure. Even if everything looks fine, one disabled setting can stop your rings from filling.

Turn On Motion Calibration & Distance

  1. Open Settings on iPhone
  2. Go to Privacy & Security > Location Services > System Services
  3. Ensure Motion Calibration & Distance is ON

Note: This setting moved in iOS 14. On older versions, check under Privacy > Location Services > System Services.

Without this enabled, your Apple Watch can’t accurately detect steps or movement — especially indoors or without GPS.

Verify Fitness Tracking Permissions

In the Watch app on iPhone:
– Tap Privacy > Motion & Fitness
– Enable:
Heart Rate
Workout
Fitness Tracking

On Apple Watch:
– Open Settings > Privacy & Security > Health > Heart Rate
– Confirm Heart Rate is enabled

Warning: Disabling any of these can cause the Activity app to show blank data or fail to credit workouts — even if you’ve been active all day.


Reset and Recalibrate Activity Data

Apple Watch reset fitness calibration data steps

If your Exercise ring credits only 7 minutes after a 30-minute walk, your calibration data is likely outdated or corrupted.

Reset Fitness Calibration Data

  1. Open Watch app on iPhone
  2. Go to Privacy > Reset Fitness Calibration Data
  3. Confirm the reset

Fact: This does not delete your daily activity history. It only clears stride length, motion sensitivity, and GPS learning data.

Recalibrate with an Outdoor Walk

After resetting:
1. Go outside with your iPhone nearby
2. Open Workout app on Apple Watch
3. Start an Outdoor Walk
4. Walk steadily for at least 20 minutes
5. Avoid frequent stops or short bursts

Expected Result: Your Exercise ring should now reflect real effort — e.g., a 20-minute walk with brief pauses should credit 17–20 minutes.

Apple Official Guide: HT204516

Pro Tip: Walk on varied terrain (flat roads, hills, sidewalks) to help the system adapt faster and improve future accuracy.


Fix Sync Delays and Data Gaps

Slow or failed syncing causes outdated data, missing workouts, and logs that never update.

Reset Sync Data

  1. Open Watch app on iPhone
  2. Go to General > Reset > Reset Sync Data
  3. Confirm

This clears corrupted iCloud Health data caches and forces a full resync.

What to expect: Sync may take several minutes. Do not close the Health app during this time.

Leave the Health App Open During Sync

Users report that keeping the Health app open on iPhone helps maintain active iCloud sync. Closing it mid-sync can stall data transfer.

Real-World Test: One user saw 90% app instability drop to zero after leaving Health open during workouts and syncs.


Disable Screen Time Sharing

A surprising but verified fix: Screen Time > Share Across Devices can break the Activity app.

Turn Off Cross-Device Sharing

  1. On iPhone, go to Settings > Screen Time
  2. Tap Share Across Devices
  3. Turn it OFF

User Verified: Reddit user Serendip8185 confirmed this fixed Activity, Fitness, and Mail app issues. Screenshot evidence.

Why it works: Sharing settings across devices may create permission conflicts in Health data access, especially during syncing or background updates.


Re-pair Apple Watch Without Losing Data

Apple Watch unpair and restore from backup

If the Activity app remains broken, re-pairing resets the connection — and often fixes deep software conflicts.

Unpair and Restore from Backup

  1. Open Watch app on iPhone
  2. Tap My Watch > All Watches > (Your Watch)
  3. Select Unpair Apple Watch
  4. Confirm — iPhone creates an automatic backup
  5. Set up Apple Watch again
  6. Choose Restore from Backup

Outcome: Clears corrupted temporary files, re-indexes the file system, and re-establishes secure pairing.

No Data Loss: Your activity history, workouts, and health data remain intact in iCloud.

Support Links:
Unpair and erase
Set up Apple Watch


Nuclear Option: Factory Reset

Use this only if all else fails and tracking is critical.

Full Reset Steps

  1. Unpair Apple Watch
  2. Perform factory reset on the watch
  3. Set up as new device
  4. Optionally restore from unencrypted iTunes backup

Warning: If no backup exists, you may lose historical data.

Apple Support Note: Some engineers recommend iTunes backups over iCloud for full data integrity, especially after persistent syncing issues.


Test for Hardware Problems

If the green LED heart rate sensor never lights up during workouts, hardware may be damaged.

Check Sensor Function

  1. Open Heart Rate app on Apple Watch
  2. Cover the back sensor with your hand
  3. Watch for green lights — they should pulse

No Light? Possible sensor failure. Contact Apple Support.

Loose Fit Warning: Wearing the watch too loosely disrupts both heart rate and motion tracking. Wear it snug but comfortable, especially during exercise.


Reinstall the Fitness App If Missing

A common misconception: Activity data appears in the Fitness app, not the Health app.

Reinstall the Fitness App

  1. Open App Store on iPhone
  2. Search for Fitness
  3. Tap Get to reinstall

Instant Fix: If sync is working, your Activity rings and history reappear immediately.

Never delete: The Fitness app is the primary interface for daily goals, trends, and monthly summaries.


Update Software and Check Compatibility

Even with the latest updates, bugs persist — but outdated software can make things worse.

Update Both Devices

  • iPhone: Settings > General > Software Update
  • Apple Watch: Watch app > General > Software Update

Reality Check: Many users confirm the issue remains after updates, suggesting a deeper software bug in iCloud Health sync.

Affected Models

  • Apple Watch Series 5 to Series 8
  • iOS 14 and later
  • No model-specific fix — problem spans generations

When to Contact Apple Support

If none of the above works, escalate.

Known Support Responses

  • “The issue is being worked on; a fix will come in a future update.”
  • Some users report 10+ calls with no resolution
  • One received a replacement watch — issue persisted

Escalation Tips

  • Ask to speak with a senior advisor
  • Reference iCloud Health sync bugs
  • Mention persistent post-charge failures

Hardware Repair: If sensor failure is confirmed, repairs may be free under AppleCare+ or warranty.


Prevent Future Activity App Failures

Keep your Activity app working long-term with these habits.

Wear Your Watch Snugly

Loose fit = poor sensor contact = missed data. Adjust the band so the back sensors stay in contact.

Avoid Mid-Workout Syncing

Wait until after your workout to sync. Interrupting data transfer can cause gaps in your logs.

Recalibrate Monthly

Even without issues, reset calibration every 4–6 weeks if you:
– Change walking style
– Wear different shoes
– Start running or hiking


The Apple Watch Activity app not working is a widespread but solvable problem. Start with restarts and permission checks, then move to calibration and re-pairing. Most users regain full functionality without losing data. If software fixes fail, consider hardware support — but always back up first. With the right steps, your rings will close again.

Newer posts »

© 2026 Apple Watch Reviews

Theme by Anders NorenUp ↑