You’ve just unboxed your new Apple Watch—whether it’s an Apple Watch Series 9, Ultra 2, or SE—and you’re ready to make the switch. Replacing your old Apple Watch with a new one is designed to be seamless, but skipping even one step can lead to lost data, Apple Pay issues, or pairing failures. The good news? If you follow the right process, your apps, health stats, watch faces, and settings will transfer smoothly—just like magic. In this guide, you’ll learn exactly how to replace your Apple Watch with a new model, avoid common pitfalls, and get everything up and running fast—usually in under 30 minutes.
The key is starting with your old device: unpairing it properly triggers a full backup, removes Activation Lock, and clears the way for your new watch. Then, during setup, restoring from that backup brings your digital life across. Just remember: Apple Pay won’t transfer automatically—you’ll need to re-add your cards. Let’s walk through every step to ensure your upgrade goes perfectly.
Prepare Devices Before Replacement
Before touching your new Apple Watch, make sure both devices are ready for the transition.
Confirm iPhone and Watch Readiness
Your iPhone acts as the control center for the entire process. First, ensure it’s running the latest version of iOS—older versions may cause compatibility issues with newer watchOS versions. Go to Settings > General > Software Update to check.
Next, verify your old Apple Watch is charged (at least 50%) and still paired to your iPhone. It must stay connected throughout the unpairing and backup phase. Also, plug in your new Apple Watch and let it charge for at least 15 minutes before setup.
Pro Tip: Restart your iPhone before beginning. This clears temporary files and improves connection stability.
Check Connectivity and Storage
Both devices need Wi-Fi and Bluetooth enabled—don’t rely on cellular alone. Also, ensure your iPhone has at least 1–2 GB of free storage. The backup created during unpairing is stored locally on your iPhone, and low space can cause it to fail.
Finally, sign in to your Apple ID on the iPhone and confirm two-factor authentication is working. You’ll need to enter your Apple ID password during unpairing.
Unpair Old Apple Watch Correctly

Unpairing isn’t just disconnecting—it’s the critical step that backs up your data and disables Activation Lock.
Start Unpairing via Watch App
- Open the Watch app on your iPhone.
- Tap the “My Watch” tab.
- Tap your current watch’s name at the top.
- Tap the (i) information icon.
- Select “Unpair Apple Watch”.
- Confirm and enter your Apple ID password.
Warning: Never skip this step. If you simply erase the watch manually, no backup is created.
Wait for Backup to Complete
The unpairing process takes 5–15 minutes, depending on how much data is stored. During this time:
– A full backup is saved to your iPhone.
– Activation Lock is removed.
– Your Apple ID is disassociated from the device.
You’ll see a progress bar. Do not close the app or move the devices apart. Once done, your old watch will reset to factory settings.
Note: After unpairing, the watch can be sold, given away, or recycled—without triggering Activation Lock.
Pair Your New Apple Watch
With the old watch unpaired, it’s time to connect your new one.
Use Quick Pair with iPhone
- Power on the new Apple Watch by pressing and holding the side button.
- Bring it close to your iPhone.
- A pairing animation will appear on your iPhone screen—tap “Continue”.
- Use your iPhone’s camera to scan the swirling pattern on the watch face.
If the scan fails:
– Manually open the Watch app on iPhone.
– Tap “Start Pairing”.
– Press and hold the Digital Crown on the watch until the pairing screen appears.
– Align the watch image in the iPhone’s viewfinder.
Visual Cue: When paired, you’ll see “Your Apple Watch is paired” on your iPhone.
Restore Data from Backup
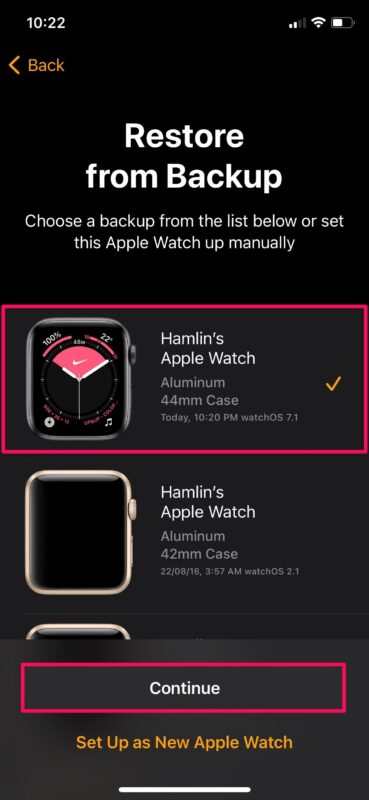
Now’s when your new watch becomes yours—with all your old settings and data.
Choose Restore Over Setup as New
During setup, you’ll be asked:
– Restore from Backup
– Set Up as New Apple Watch
Always choose “Restore from Backup” unless you want a clean start.
Select the Most Recent Backup
The list will show available backups. Pick the one created during unpairing—it should be labeled with your old watch’s name and today’s date.
Key Point: Only one backup is made during unpairing. If multiple appear, choose the latest.
The restoration includes:
– App layout and installed apps
– Watch faces and complications
– Health & fitness history
– Notification, sound, and haptic settings
– Medical ID and emergency features
Time Estimate: 5–10 minutes. Keep both devices close and charged.
Complete Setup and Re-Add Apple Pay
After restore, finish configuring your new watch.
Finalize Basic Settings
You’ll walk through a few final steps:
– Select language
– Accept Apple’s Terms & Conditions
– Choose analytics sharing (opt out for privacy)
– Set a 4- or 6-digit passcode
Security Tip: Enable Wrist Detection and Auto-Lock to protect your data.
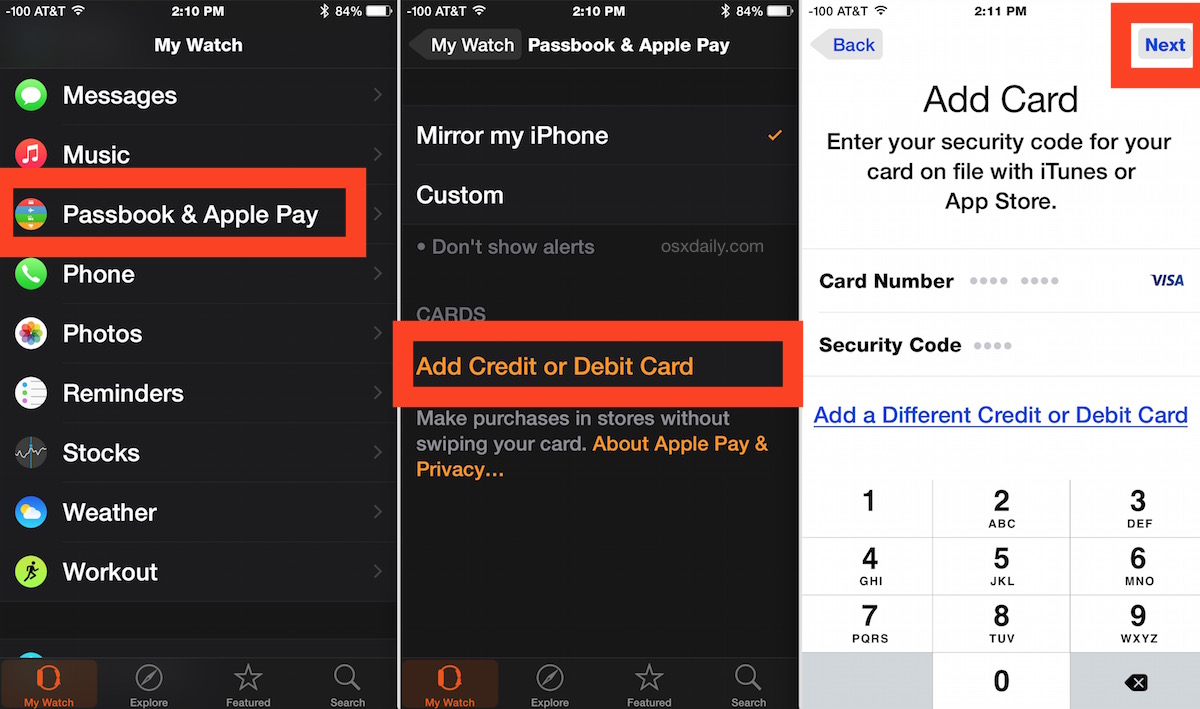
Re-Add Apple Pay Cards
Even if Apple Pay was set up before, cards are not backed up. You must re-add them:
- Open the Watch app on iPhone.
- Go to Wallet & Apple Pay.
- Tap “Add Card”.
- Follow prompts to verify with your bank.
User Feedback: Some banks require re-verification via SMS or app. Do this immediately to avoid payment issues.
Pro Tip: Add your most-used card first—like your transit or grocery card.
Verify Health and Safety Features
Your health data transfers automatically, but safety settings need confirmation.
Confirm Medical ID and Emergency SOS
- Open the Health app on iPhone.
- Tap your profile > Medical ID.
- Ensure your emergency contacts, allergies, and medical conditions are up to date.
On the watch:
– Press and hold the side button to test Emergency SOS.
– Shake to trigger Fall Detection (if enabled).
– On Series 8, Ultra, or later, confirm Crash Detection is active.
Warning: These features save lives. Test them during setup.
Enable Model-Specific Features
If you upgraded to a Series 9, Ultra 2, or Series 8, new features are available:
– Temperature Sensing – For cycle tracking and health insights
– Crash Detection – Auto-calls emergency services after a severe impact
– Depth Sensing – On Ultra models for diving
– Action Button – Customizable for workouts, flashlight, or siren
Customize these in the Watch app > My Watch tab.
Carrier-Specific Setup for Cellular Models
If your Apple Watch has cellular, you’ll need to transfer your plan.
Transfer Verizon or Other Carrier Plans
For Verizon, AT&T, or T-Mobile:
1. During setup, you’ll be prompted to activate cellular.
2. Tap “Continue” to transfer your existing plan.
3. The process takes 1–2 minutes—no SIM needed.
Note: Your phone number stays the same. Calls and texts work independently.
Confirm Plan Status
After activation:
– Open Watch app > My Watch > Cellular.
– Check that your carrier appears and says “Active”.
– If not, contact your carrier or restart both devices.
Troubleshooting Tip: If cellular fails, toggle Airplane Mode on and off on the watch.
Troubleshoot Common Replacement Issues
Even with perfect prep, hiccups happen. Here’s how to fix them fast.
Watch Won’t Pair with iPhone
Causes:
– Bluetooth interference
– Outdated iOS
– Old watch still paired
Fix:
1. Restart both devices.
2. Ensure Bluetooth and Wi-Fi are on.
3. Update iPhone to latest iOS.
4. If the old watch is unresponsive, erase it:
Settings > General > Reset > Erase All Content and Settings
Pro Tip: Disable Bluetooth on nearby devices (like Macs or AirPods) to reduce interference.
Apple Pay Cards Not Working
Cause: Cards weren’t backed up.
Solution:
– Re-add each card manually.
– If a card appears but won’t work, remove and re-add it.
– Contact your bank to confirm Apple Pay is enabled.
User Note: Some banks block re-adding cards for 24 hours after unpairing.
Incomplete Data Transfer
Symptoms:
– Missing apps
– Blank watch faces
– No activity history
Causes:
– Low iPhone storage
– Interrupted backup
– Unstable Wi-Fi
Fix:
1. Free up space on iPhone.
2. Reboot both devices.
3. Repeat unpairing and restore process.
Warning: Never interrupt the backup. Let it finish fully.
Use Two Apple Watches (Optional)
You don’t have to choose—Apple lets you pair two watches to one iPhone.
How Dual Pairing Works
- Pair your second watch normally.
- Enter passcode when switching.
- Only one watch receives notifications at a time.
Use Case: Wear a sport band for workouts and a leather band for work—switch seamlessly.
Limitation: Health data syncs to the same Health app, but only the active watch tracks real-time metrics.
Cost Tip: Often cheaper to buy extra bands than a second watch.
Best Practices for a Smooth Upgrade
Follow these tips to avoid issues and ensure a flawless transition.
Pre-Upgrade Checklist
- [ ] Update iPhone to latest iOS
- [ ] Charge both watches
- [ ] Free up iPhone storage
- [ ] Confirm Apple ID access
- [ ] Backup iPhone (optional but recommended)
Post-Upgrade Verification
- [ ] Confirm all apps restored
- [ ] Re-add Apple Pay cards
- [ ] Check activity rings and sleep data
- [ ] Test Emergency SOS
- [ ] Customize Action Button (Ultra models)
- [ ] Enable depth sensing (if diving)
Pro Tip: If restore fails repeatedly, try setting up as new and manually reconfigure. Sometimes it’s faster.
Final Thoughts: Your New Watch, Fully Personalized
Replacing your Apple Watch with a new one should feel effortless—and with the right steps, it is. By unpairing first, you trigger a complete backup that preserves your health data, apps, and preferences. Restoring from that backup makes your new device feel instantly familiar. Just remember: Apple Pay must be re-added, and cellular plans transfer automatically—but double-check them.
Whether you’re upgrading from a Series 3 to a Series 9 or switching from an SE to an Ultra 2, Apple’s ecosystem ensures a smooth handoff. And if problems arise, the troubleshooting steps here will get you back on track.
Now that your new Apple Watch is set up, take a moment to explore its new features—like crash detection, temperature sensing, or the Action Button. Your wrist just got smarter.