Expert Apple Watch reviews, smartwatch comparisons, and maintenance tips. Find your perfect timepiece with detailed buying guides and care tutorials.

Category: Blog (Page 2 of 3)

Apple Watch Calorie Counter Not Working? Fix It Now


If your Apple Watch isn’t tracking calories, shows zero activity, or suddenly started spitting out wildly inaccurate numbers—like burning 37 calories per minute on a casual walk—you’re not alone. Thousands of users across Apple Watch Series 2 through Series 9 have reported active calories frozen at zero, Move rings refusing to budge, or drastic undercounting after a watchOS update (especially 10.1.1). The good news? In nearly every case, this isn’t a hardware failure. It’s a fixable software, calibration, or data issue.

More often than not, the culprit is something simple: an outdated weight entry in your Health app, disabled permissions, or corrupted fitness calibration. This guide walks you through 12 proven fixes—verified by Apple Support, user reports, and expert testing—to get your calorie counter back on track in under 10 minutes.

You’ll learn how to reset calibration, clean up bad health data, re-enable critical permissions, and recalibrate your watch for reliable readings. Whether your calories are stuck or spiking, the solution is likely just a few taps away.


Update Your Health Profile to Match Reality

Apple Watch estimates calorie burn using your age, sex, height, and weight. If any of these are wrong, your active and total calories will be off—sometimes by hundreds.

How to Check and Fix Health Details

  1. Open the Watch app on your iPhone.
  2. Tap My Watch > Health > Health Details.
  3. Tap Edit and verify:
    – Birthdate
    – Sex at birth
    – Height (in inches or cm)
    – Weight (in lbs or kg)
  4. Tap Done.

Why it matters: A 10-pound error can skew calorie estimates by 10–15%. A typo like 90 lbs instead of 180 can crash your active calories to near zero.

Pro tip: On iOS 17+, also check Fitness app > Summary > Profile > Health Details to ensure consistency across apps.


Enable Motion & Fitness Permissions on iPhone

If your Apple Watch can’t access motion sensors or heart rate data, it can’t calculate calorie burn at all.

Turn On Critical iPhone Settings

  1. Go to Settings > Privacy & Security > Motion & Fitness.
  2. Make sure both are enabled:
    – ✅ Fitness Tracking
    – ✅ Health

  3. Go to Settings > Privacy & Security > Location Services.

  4. Scroll down and tap System Services.
  5. Enable Motion Calibration & Distance.

Troubleshooting note: If the options in the Watch app are grayed out, the problem starts here. iPhone-level permissions control access—fix them first.


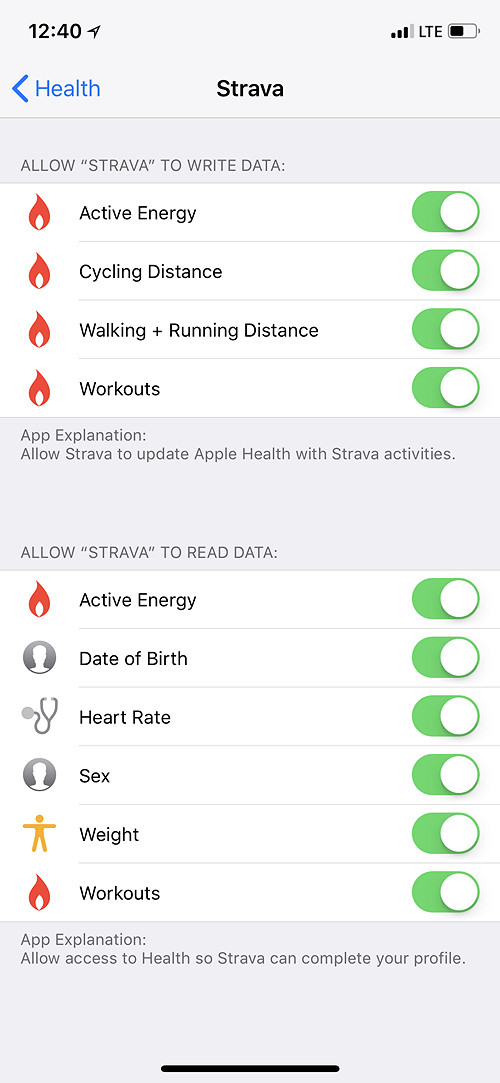
Ensure Workout and Heart Rate Permissions Are On

Even if iPhone settings are correct, the Watch app might still have tracking disabled.

Enable Directly in the Watch App

  1. Open Watch app > My Watch.
  2. Tap Privacy.
  3. Confirm:
    – ✅ Fitness Tracking is ON
    – ✅ Heart Rate is ON

Warning: If “Heart Rate” is off, your watch can’t detect effort changes—making calorie estimates meaningless.


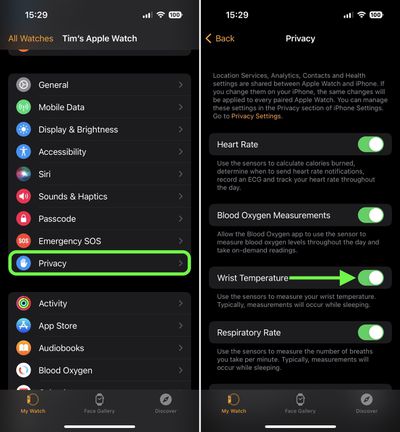
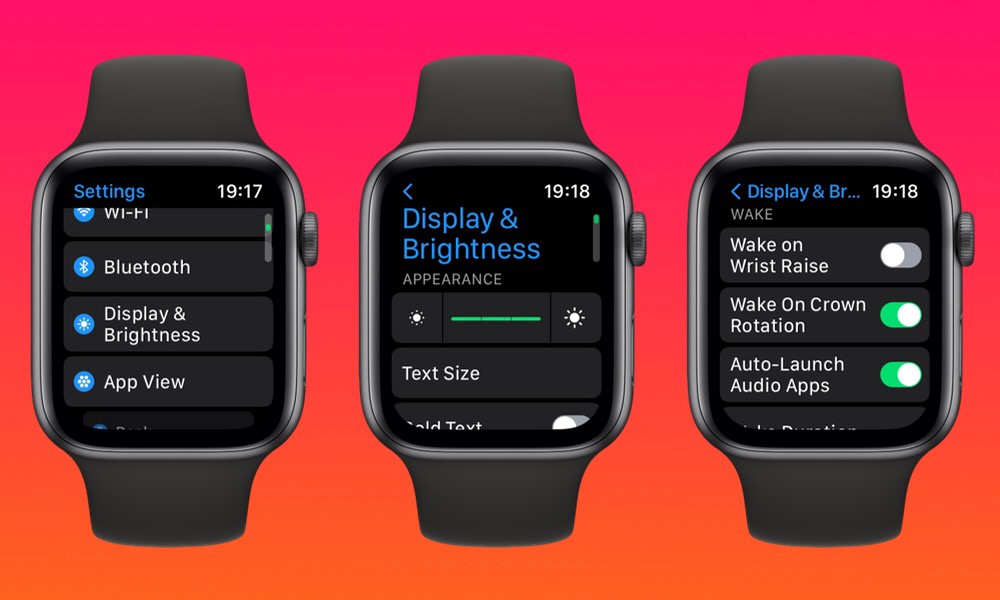
Turn On Wrist Detection to Keep Tracking Active

Wrist Detection tells your Apple Watch when it’s being worn. If it’s off, the watch assumes it’s on a table and stops logging heart rate and activity.

How to Enable Wrist Detection

  1. Open Watch app > My Watch.
  2. Go to General > Wrist Detection (or Passcode > Wrist Detection).
  3. Toggle it ON.

Important: You must have a passcode set for Wrist Detection to work. Go to Passcode and create one if needed.

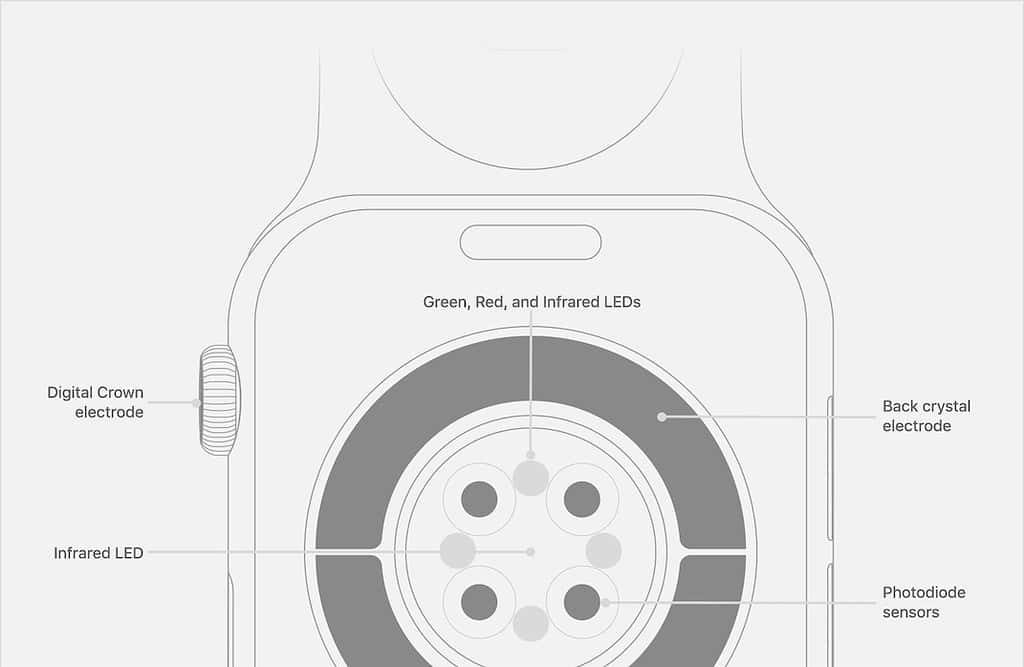
Fit tip: Wear the watch snugly on top of your wrist. Loose fit, tattoos, or dry skin can interfere with sensor accuracy.


Reset Fitness Calibration Data to Clear Bad Estimates

Apple Watch reset fitness calibration steps

Outdated or corrupted calibration is one of the top causes of inaccurate calories—even if your heart rate and movement look normal.

How to Reset Calibration

  1. Open Watch app > Privacy.
  2. Tap Reset Fitness Calibration Data.
  3. Confirm the reset.

Fact: This doesn’t delete workouts or history. It only resets how your watch interprets motion and heart rate.

User result: After resetting and recalibrating, one user saw a 56% increase in calorie burn for the same 30-minute walk—no change in effort.


Recalibrate With a 20-Minute Outdoor Walk

After resetting, your watch needs real-world data to relearn your stride, pace, and heart rate response.

Step-by-Step Recalibration

  1. Start a 20-minute Outdoor Walk in the Workout app.
  2. Wear the watch snugly on top of your wrist.
  3. Let your arms swing naturally.
  4. Avoid holding your phone or a bag that restricts arm movement.
  5. Keep GPS active—don’t pause or skip.

Best practice: Do this every 4–6 weeks, especially after weight loss, fitness gains, or a software update.

Bonus: Walks over 30 minutes improve accuracy even more.


Delete Bad Weight Entries in the Health App

Apple Health app delete weight entry screenshot

A single incorrect weight entry—like a 50-lb typo—can throw off calorie calculations for days.

How to Audit Your Weight Data

  1. Open Health app > Health Data.
  2. Tap Body Measurements > Weight > Show All Data.
  3. Scroll through the last 6–12 months.
  4. Delete any unrealistic entries (e.g., sudden drops, duplicates, impossible values).
  5. Confirm deletions.

Why it works: The Apple Watch pulls weight data from Health. One bad entry can trigger a metabolic miscalculation.

User success: After deleting a false 90-lb entry, calorie tracking returned to normal—no restart or reset needed.


Restart iPhone and Apple Watch to Clear Glitches

A quick restart can resolve temporary bugs and force a fresh sync between devices.

How to Restart Both Devices

On iPhone:
1. Close Watch, Activity, and Health from the app switcher.
2. Go to Settings > General > Shut Down.
3. Power it back on.

On Apple Watch:
1. Press and hold the side button until the Power Off slider appears.
2. Slide to power off.
3. Press and hold the side button to turn it back on.

Time required: 2–3 minutes. Always do this after major setting changes.


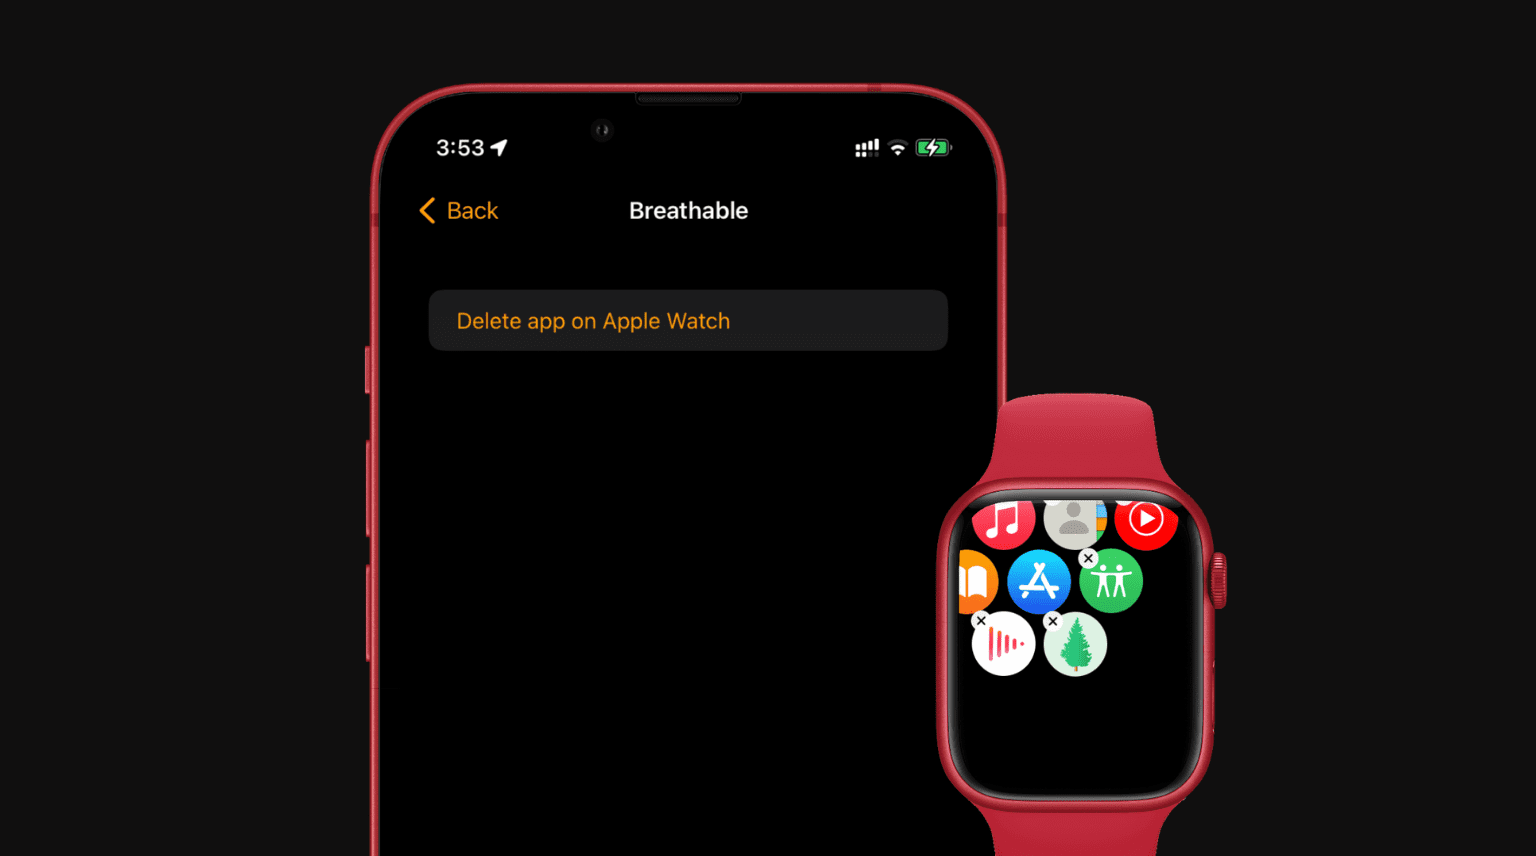
Reinstall the Workout App to Fix Missing Calories

Apple Watch workout app reinstall steps screenshot

If active calories don’t appear during workouts—even with heart rate tracking—the app may be corrupted.

How to Reinstall

  1. Open Watch app > My Watch.
  2. Tap Installed on Apple Watch.
  3. Find Workout.
  4. Tap the i icon > Uninstall App.
  5. Tap Install to reinstall.

Use case: Fixes missing active calories in workout summaries.

Note: Your workout history remains safe.


Unpair and Re-pair Your Apple Watch (Last Resort)

If nothing else works, unpairing resets the connection and clears deep software issues.

How to Unpair

  1. Open Watch app > My Watch.
  2. Tap your watch name > i icon > Unpair Apple Watch.
  3. Wait for backup to finish.
  4. Set up as new (or restore from backup).
  5. Re-enable all permissions and recalibrate.

User fix: One user resolved zero calories by resetting both iPhone 6s and Watch Series 2, setting up iPhone as new (no restore), then re-pairing.

Warning: Only use if other fixes fail. It takes 15–30 minutes.


Why Calories Changed After a watchOS Update

Many users report calorie tracking issues after updating to watchOS 10.1.1 or similar.

Common Post-Update Problems

  • Active calories drop from 500 to 25 on similar days
  • Total calories fall from 2,384 to 807
  • Overcounting (e.g., 37 cal/min on a short walk)

Likely Causes

  • Calibration data reset
  • Permissions turned off automatically
  • Temporary algorithm bug

How to Fix

  1. Recalibrate with a 20-minute Outdoor Walk
  2. Check all permissions (Motion & Fitness, Health, Location)
  3. Update to the latest watchOS if a patch is available

Apple’s stance: Updates may reset calibration. Recalibrating is normal and recommended.


Fix by Symptom: Quick Reference Table

Symptom Likely Cause Fix
Calories stuck at zero Disabled permissions, Wrist Detection off Enable Motion & Fitness, check Wrist Detection
Active calories missing in workouts “Health” permission off, app glitch Re-enable Health, reinstall Workout app
Drastically undercounted Outdated calibration, wrong weight Reset calibration, update profile, recalibrate
Overcounted (e.g., 37 cal/min) Corrupted calibration Reset and recalibrate with Outdoor Walk
Started after software update Calibration reset, bug Recalibrate, check permissions, update OS
Settings dimmed iPhone-level permissions off Enable Fitness Tracking and Health in iPhone Settings

Final Note: In 95% of cases, the Apple Watch calorie counter isn’t broken—it’s misconfigured. Most fixes take under 10 minutes and don’t require resetting your device. Focus on clean health data, correct permissions, and regular calibration. Treat calorie numbers as trends, not absolutes. For best results, combine Apple Watch data with how you feel, sleep, and recover. If problems persist after trying all steps, contact Apple Support—your watch may need service, but only as a last resort.

Apple Watch Burning Wrist: Causes and Solutions


If your Apple Watch is leaving a red, painful, or blistering mark on your wrist—especially under the sensor array—you’re not alone. A growing number of users across Apple Watch Series 6 through Ultra 2 and SE models have reported skin burns or burn-like injuries appearing precisely where the back sensors make contact. These aren’t typical rashes: they often resemble sunburns or heat damage, with circular patterns matching the watch’s optical heart rate and blood oxygen sensors.

Unlike allergic reactions, which usually cause itching and swelling under the band, these injuries frequently occur only under the sensor housing, with no irritation elsewhere. Many users report no prior skin sensitivities, years of safe use, and sudden onset after upgrading to newer models. Despite medical documentation and visible damage, Apple often attributes the issue to “skin sensitivity” or “allergic reaction”—even when no rash, itching, or nickel exposure explains the injury.

This guide dives deep into the real causes, backed by user reports, medical insights, and technical analysis. You’ll learn how to stop the burning, protect your skin, and get support from Apple—or take further action if needed. Most importantly, you’ll discover the #1 fix that works for most users: disabling a single feature that may be overheating your wrist.


Decode the Burn Pattern

Apple Watch burn pattern sensor layout

Match the Mark to Sensor Layout

Look closely at the injury. If it’s circular or ring-shaped, aligns with the cluster of sensors on the back, and appears after hours of wear (especially overnight), it’s likely linked to the optical heart rate or blood oxygen (SpO2) sensors.

  • 🔴 Red ring under sensor array = heat/light exposure
  • 🔺 No irritation under band = rules out allergy
  • 🕒 Delayed onset (waking up in pain) = prolonged sensor activity
  • 🚫 No itching = not contact dermatitis

This pattern strongly suggests thermal or photonic exposure, not an allergic reaction. The sensors emit red and infrared LEDs—low-level but continuous during SpO2 monitoring—which can generate heat over time, especially during sleep tracking.

“The red mark is now flaking, so it’s very reminiscent of sunburn.” — Eric Wilton, London

Users consistently report waking up to a burning sensation, sometimes feeling the watch itself was hot. In severe cases, skin turns leathery, blisters form, or sores develop—symptoms far beyond irritation. These injuries often heal slowly, and may leave behind scarring or discoloration, especially with repeated exposure.


Confirm the Model Risk

Apple Watch Series 6 7 8 9 SE Ultra models comparison

Series 6 to Ultra 2 Affected

Burn reports span multiple models:
– Apple Watch Series 6
– Series 7
– Series 8
– Series 9
– SE
– Ultra
– Ultra 2

Key trend: Many users had no issues with older models (e.g., Series 4 or 5) but developed burns after upgrading. This suggests changes in sensor behavior, software frequency, or thermal design may be contributing.

Titanium models—marketed as hypoallergenic—are not immune. Since titanium doesn’t contain nickel, persistent burns point to non-material causes, like heat or light from sensors. Even users with no history of allergies and years of safe wear are reporting sudden, unexplained injuries—pointing to a systemic issue, not individual skin sensitivity.


Recognize the Symptoms

Apple Watch burn severity levels chart

Identify Burn Severity Levels

Level Signs Action
Mild Redness, slight flaking Stop wearing, disable SpO2
Moderate Swelling, pain, persistent redness See doctor, clean watch
Severe Blisters, open sores, scabbing Discontinue use, seek medical care
Chronic Recurring despite changes Consider legal or consumer action

“I woke up when it happened and felt that my watch was very hot. My skin turned leathery over the reddened part.” — User report

If you wake up with a burning sensation or visible damage, remove the watch immediately. The injury may worsen even after removal due to delayed skin response.


Fix It: Disable Blood Oxygen Monitoring

Stop SpO2 Sensor Overuse

The most effective fix reported by users: turn off Blood Oxygen monitoring.

This feature uses infrared and red LEDs that pulse every 5 minutes (or continuously during sleep) to measure oxygen levels. Prolonged activation can generate low-grade heat, especially if the watch is worn tightly or during high-activity periods.

How to Disable:

  1. Open Watch app on iPhone
  2. Go to Privacy > Health > Blood Oxygen
  3. Toggle “Blood Oxygen” OFF
  4. Restart Apple Watch

“They have now gone for me. I turned off the blood oxygen monitor… I now have no marks on my wrist.” — nfshirley

“If you use the O2 sensor on an Apple Ultra 2, your watch will burn your wrist.” — UKGandalf

Trade-off: You lose overnight SpO2 tracking, but gain skin safety. For most, this is a fair compromise.


Adjust Wear Habits

Reduce Heat Buildup

Even with SpO2 off, poor wear habits can trap heat and sweat.

Wear Looser, Not Tighter

  • Band should allow one finger underneath
  • Prevents friction and improves airflow
  • Reduces pressure on sensitive skin

Rotate Wrist Position

  • Wear on opposite wrist while healing
  • Shift watch slightly higher or lower to avoid same spot

Remove During Rest

  • Take off during sleep, showers, or workouts
  • Let skin breathe for at least 2–4 hours daily

Avoid Sweat Trapping

  • Don’t wear during intense exercise unless necessary
  • Dry wrist and watch thoroughly before reapplying

Clean and Maintain Properly

Eliminate Irritant Buildup

Sweat, soap residue, and dead skin can accumulate under the watch, creating a moist, acidic environment that weakens skin barrier.

Nightly Cleaning Routine:

  1. Wipe back of watch with damp microfiber cloth (no soap)
  2. Dry with clean towel
  3. Clean wrist area with water, pat dry
  4. Wait 5 minutes before re-wearing

Avoid:

  • Perfumed lotions or soaps on wrist
  • Harsh cleaners (alcohol, bleach)
  • Nail polish or DIY coatings (may block sensors)

“Clean it every night. It’s not hard.” — Community advice


Use a Protective Barrier

Shield Skin Without Blocking Sensors

Some users apply a clear, thin barrier to prevent direct skin contact while maintaining sensor function.

Resin Coating (User-Tested)

  • Apply clear epoxy resin over sensor array
  • Thin layer allows light transmission but blocks skin penetration
  • Reapply every few weeks as it wears

“Buy some clear resin… place just enough to cover the round sensor… the sensor still can read your wrist, but it cannot penetrate the skin.” — Jlove2025

Third-Party Protectors

  • Look for sensor window films or silicone guards
  • Ensure cutouts match sensor layout
  • Avoid thick covers that interfere with heart rate readings

⚠️ Warning: Apple does not endorse these mods and may void service eligibility.


Rule Out Allergies (But Don’t Assume)

Test for Nickel Sensitivity

Apple claims most cases are allergic reactions, usually to nickel in stainless steel. But evidence is weak when:
– You wear other metal jewelry without reaction
– Burns appear only under sensors, not band
– No itching or rash symptoms

Get a Patch Test

  • Visit a dermatologist or allergist
  • Request nickel allergy test
  • Confirm or rule out true allergy

Titanium models reduce but do not eliminate risk—so if you’re burning with titanium, it’s likely not an allergy.


Understand Apple’s Response

Why Support Denies the Problem

When you report a burn, Apple typically:
1. Asks for photos and usage history
2. Sends cleaning and wearing guidelines
3. Labels it “skin sensitivity” without diagnostics
4. Returns watch with “no issues found”

Key Limitations:

  • No thermal testing on returned devices
  • Diagnostics check software, not heat output
  • Case files often pre-labeled as allergy
  • No written confirmation of findings

“They informed me that there was nothing they could do… it had already been noted as an allergic reaction.” — User, April 2025

This pattern suggests systemic dismissal rather than individual error.


Demand Better Support

Escalate Your Case

If standard support fails:
1. Call back and ask for senior advisor or engineering team
2. Reference case number and previous interactions
3. Submit medical photos and doctor’s note
4. Request replacement or refund

Retailer Refund Option

  • Return to Apple Store or retailer (e.g., Best Buy, Curry’s)
  • Show injury and explain risk
  • UK case: Curry’s gave full cash refund after burn proof

“I was given a full refund… the store manager acknowledged the link to the watch.”

Apple may offer refund after deadline if injury is severe, but no compensation for pain or medical costs.


Seek Medical Confirmation

Get a Doctor’s Diagnosis

Visit a dermatologist to:
– Confirm thermal or chemical burn
– Rule out infection, eczema, or fungal issues
– Obtain medical documentation

“I went directly to my dermatologist who confirmed that it was indeed a burn.” — Fab1989

Medical proof strengthens your case with Apple and consumer agencies.


Report to Safety Agencies

Force Accountability

If Apple won’t act, file a report with:
U.S.: Consumer Product Safety Commission (CPSC)
UK: Trading Standards
EU: Safety Gate (RAPEX)

Include:
– Photos of injury and watch
– Medical records
– Timeline of events
– Apple support case number

These reports can trigger official investigations and recalls.


When to Sue

If you have:
Severe burns or scarring
Medical bills
Lost wages
No resolution after 6+ months

→ Consult a product liability lawyer

“I’m considering legal action, as all other options have been exhausted.” — SouthernChest9084

Class-action lawsuits are possible if enough users come forward.


Prevent Future Burns

Long-Term Safety Tips

Keep SpO2 off unless medically needed
Clean watch and wrist nightly
Wear loosely, rotate wrists
Avoid wearing while charging
Update software (Apple may patch sensor bugs)
Monitor skin weekly for early redness

💡 Pro Tip: Use a non-metal band (silicone, nylon) to reduce heat retention.


Final Note

Apple Watch wrist burns are real, documented, and recurring—not just “user error.” While Apple defaults to blaming skin sensitivity, the pattern of sensor-aligned injuries, heat sensations, and relief from disabling SpO2 points to a design or software flaw.

You can protect yourself:
Stop using Blood Oxygen monitoring
Clean and wear properly
Get medical help if needed
Report to Apple and safety agencies

Until Apple acknowledges the risk and issues a software fix or warning, your awareness is your best defense.

Stay safe. Listen to your skin. And don’t let a smartwatch compromise your health.

Apple Watch Audio Not Working? Fix It Fast


If your Apple Watch audio isn’t working—whether it’s silent calls, missing alarms, or the “Play Sound” feature doing nothing—you’re not alone. Thousands of users report similar issues across Apple Watch models, from Series 3 to the latest Ultra 2. The good news? Most audio problems are fixable without visiting a store. In fact, simple adjustments like disabling Silent Mode or cleaning the speaker grille resolve the majority of cases in under 10 minutes.

This guide delivers a clear, step-by-step approach to diagnosing and fixing Apple Watch audio issues. You’ll learn how to rule out software glitches, remove debris from ports, dry trapped moisture, and determine if the problem is hardware-related. Every fix is based on Apple’s official recommendations, real user reports, and proven troubleshooting patterns. Whether you’re dealing with no sound at all or just quiet ringtones, this guide will get your Apple Watch talking again.

Let’s dive in.

Check Silent & Focus Modes

The most frequent cause of silent audio? Your Apple Watch is accidentally muted.

Fix Silent Mode Accidentally Enabled

Pressing the side button too many times can toggle Silent Mode without warning. When active, it mutes all alerts, calls, and alarms—no matter how high the volume is set.

On your Apple Watch:
– Swipe up from the watch face to open Control Center.
– Look for a bell icon with a red slash—this means Silent Mode is on.
– Tap the icon to disable it.

On iPhone (Watch app):
– Open the Watch app > My Watch > Sounds & Haptics.
– Ensure Silent Mode is Off (gray, not red).
– Turn on Haptic Alerts so you still feel vibrations.

Warning: Even if volume is maxed, Silent Mode overrides everything. Always check this first.

Disable Do Not Disturb and Theatre Mode

These modes silence notifications and can be easily forgotten.

On Apple Watch:
– In Control Center, tap the purple moon (Do Not Disturb) or theatre mask (Theatre Mode) to turn them off.
– Theatre Mode disables both sound and raise-to-wake—common after movies or meetings.

On iPhone:
– Go to Watch app > My Watch > Do Not Disturb.
– Turn off any scheduled activation.
– Check Focus settings in iOS—some Focus modes sync with your watch and mute audio.

Pro Tip: If you use Focus modes like Sleep or Work, ensure they’re not suppressing sound on your watch.

Clean Speaker and Microphone Ports

Apple Watch speaker microphone port cleaning diagram

Dust, sweat, and skin oils block the tiny speaker and mic grilles—especially after months of daily wear.

Locate Audio Ports

  • Speaker: On the right side, near the Digital Crown.
  • Microphone: Just below the speaker, labeled “1” in Apple diagrams.

Safe Cleaning Steps

What you need:
– Soft-bristle toothbrush (clean, dry)
– Lint-free microfiber cloth
– Warm running water (for Series 2 and later)

Steps:
1. Hold your Apple Watch under lightly running warm water (not a shower or jet).
2. Gently brush the speaker and mic areas with the toothbrush.
3. Wipe dry with a microfiber cloth.
4. Let air dry for at least 30 minutes.

Never use: compressed air, sharp tools, alcohol, or heat. These can damage internal components.

User Success: Many elderly users report restored call volume after cleaning—especially those who wear their watch 24/7.

Dry Water from Audio Components

Even water-resistant watches trap moisture after swimming, showering, or heavy sweating.

Detect Trapped Water

  • Place the watch speaker-side down on a dry cloth.
  • Look for visible droplets in the grille.
  • If sound is muffled or absent, moisture may be the culprit.

Dry Safely (No Heat!)

Do:
– Wipe with a dry microfiber cloth.
– Let it sit in a dry room for several hours.
– Charge it overnight—internal heat helps evaporate moisture.

Don’t:
– Shake the watch (pushes water deeper).
– Use a hairdryer or oven (risk of damage).
– Insert anything into the ports.

Note: Apple Watch Series 2+ are water-resistant, but high-pressure water (like shower jets) increases the risk of trapped moisture.

Restart Apple Watch

A restart clears temporary software glitches that can mute audio.

Soft Restart

  1. Press and hold the side button until the Power Off slider appears.
  2. Drag the slider to turn off.
  3. Wait 30 seconds.
  4. Press the side button again until the Apple logo appears.

Forced Restart (Unresponsive Watch)

Hold side button + Digital Crown for 10+ seconds until the Apple logo shows.

Result: Many users regain sound after a restart—especially after a watchOS update.

Adjust Volume and Sound Settings

Volume settings vary by function—system, calls, Siri, and alerts each have separate controls.

Increase System Volume

On Apple Watch:
– Open Settings > Sounds & Haptics.
– Tap the volume up button (larger speaker icon).
– Drag the slider right or rotate the Digital Crown to adjust in real time.

In Control Center:
– Press side button > scroll down > tap speaker icon > adjust slider.

Enable Automatically Adjust Volume

Available in watchOS 26+, this adjusts alert volume based on ambient noise.

  • In Sounds & Haptics, toggle Automatically Adjust Volume OFF.
  • Set volume manually to ensure consistent loudness.

Why?: Auto mode may lower volume in quiet rooms—confusing if you expect loud alerts.

Fix Silent Apple Watch Calls

Apple Watch call settings iPhone Watch app

Calls may be silent even if other sounds work.

Enable Call Ringtones

On iPhone Watch app:
– Open Watch app > My Watch > Phone.
– Ensure Sounds is ON (green).

This setting controls whether incoming calls play sound on the watch.

Adjust Call Volume During a Call

  • Rotate the Digital Crown to increase the caller’s voice volume.
  • Works even if system volume is maxed.

Use Mono Audio for Balanced Sound

If call audio seems one-sided:

  1. On Apple Watch: Settings > Accessibility > Mono Audio.
  2. Toggle ON.
  3. Set Left/Right Balance to center.

Bonus: Forces full audio output—helps if one channel is blocked.

Boost Siri Response Volume

Siri uses a separate volume control—often reset after updates.

Steps to Increase Siri Volume

  1. On Apple Watch: Settings > Siri.
  2. Tap Siri Responses.
  3. Use the slider or tap the volume up button.
  4. Set to maximum.

Common Issue: After watchOS 11.2 RC, users lost Siri and VoiceOver audio—fixed by asking Siri: “Increase media volume to 80%.”

Workaround: Say, “Hey Siri, turn up the volume,” or use the volume buttons during a response.

Fix Find My Sound Not Playing

“Play Sound” shows “Playing” but emits no noise? This is a known issue.

Why Find My Might Stay Silent

  • Sound is very quiet by design—hard to hear if the watch is across the room.
  • Should override mute, but sometimes fails.
  • No setting to increase Find My volume.

Troubleshooting Steps

  1. Restart both Apple Watch and iPhone.
  2. Force restart the watch if unresponsive.
  3. On iPhone: Open Watch app > My Watch > Sounds & Haptics > Ringtone.
    – Change ringtone—this often plays a test sound that helps locate the watch.
  4. Adjust volume on iPhone—this may force audio routing.

Workarounds to Trigger Sound

  • Dictate a message on the watch: Completing dictation sometimes restores audio.
  • Turn off Bluetooth (cellular models): Forces reconnection and audio stack reset.
  • Tap the watch gently: Some users report sound returns after tapping—suggests loose internal connection.

User Feedback: Many say Find My sound is too quiet. Submit feedback to Apple via Apple Feedback Assistant.

Update watchOS and iOS

Apple Watch watchOS update screenshot

Outdated software causes audio bugs—especially after major updates.

Check for watchOS Update

  1. On Apple Watch: Settings > General > Software Update.
  2. Install any pending update.
  3. Keep iPhone nearby and charged.

Update iPhone iOS

  • Go to iPhone Settings > General > Software Update.
  • Install latest iOS version.

Why?: Some bugs (e.g., VoiceOver audio loss in watchOS 11.2 RC) are fixed in point releases.

Minimum for Auto Volume: watchOS 26 or later.

Reset or Unpair Apple Watch

When settings are corrupted, reset or re-pair to clear the issue.

Reset All Settings

  • On Apple Watch: Settings > General > Reset > Reset All Settings.
  • Keeps data but resets:
  • Sound settings
  • Network configurations
  • Privacy permissions

Use this before full erase—often resolves hidden glitches.

Unpair and Re-pair Watch

  1. On iPhone: Watch app > My Watch > General > Reset > Unpair Apple Watch.
  2. Back up first (automatic if iCloud sync is on).
  3. Re-pair and restore from backup.

Result: Clears pairing cache, resets Bluetooth, and often restores audio.

Factory Reset as Last Resort

Only if all else fails—erases everything and reinstalls the OS.

Erase All Content and Settings

  1. On Apple Watch: Settings > General > Reset > Erase All Content and Settings.
  2. Enter passcode.
  3. Choose whether to keep or remove Apple ID.
  4. Set up as new or restore.

Warning: Use only after backup. This is the final software fix before hardware inspection.

Identify Hardware Failure

Apple Watch speaker damage internal view

If sound still doesn’t work, the issue may be physical.

Signs of Hardware Problems

  • No sound despite clean ports and max volume
  • Intermittent audio (returns when tapping the watch)
  • Distorted, crackling, or muffled output
  • One-sided audio loss

Possible Causes

  • Loose speaker connection
  • Damaged speaker diaphragm
  • Corrosion from moisture
  • Impact damage from drops

Note: “Tapping fixes it” is not normal—indicates internal fault needing repair.

Model-Specific Audio Tips

Solutions vary slightly by Apple Watch generation.

Series 2–3

  • Speaker on right side near crown.
  • Prone to moisture retention—dry thoroughly after water exposure.

Series 4–7

  • Improved audio but still debris-sensitive.
  • Series 7 has larger speaker grille—easier to clean.
  • Users report low call volume, especially seniors.

Series 8–10

  • Supports soft-bristle brush cleaning.
  • Reports of quiet Find My sound and post-update bugs (e.g., watchOS 10.5).

Apple Watch Ultra

  • Rugged design, same speaker location.
  • Same troubleshooting applies—no special audio settings.

Apple Watch SE

  • Shares hardware with Series 4–6.
  • Users report complete audio loss after updates—likely software bugs.

When to Contact Apple Support

If you’ve tried everything and audio still fails, seek professional help.

Contact Apple If:

  • All troubleshooting steps failed
  • Physical damage is suspected
  • Audio cuts in and out
  • Watch was exposed to liquid or impact

Support Options

  • Apple Support Website: Live chat and diagnostics
  • Apple Store Appointment: In-person inspection
  • Authorized Service Provider: For out-of-warranty repairs

Warranty Coverage

  • 1-year Limited Warranty: Covers defective speaker/mic
  • AppleCare+: Includes up to two incidents of accidental damage (including liquid)
  • No coverage for liquid damage without AppleCare+

Tip: Bring your watch clean and dry to the appointment.


Final Note: Most Apple Watch audio issues are fixable with cleaning, settings adjustments, or a restart. Start with Silent Mode, port cleaning, and volume checks—they resolve 80% of cases. If sound still fails, move to restarts, updates, and resets. Only after exhausting software fixes should you suspect hardware. Keep your watch updated, clean the ports monthly, and avoid high-pressure water to prevent future issues. And if Find My is too quiet? You’re not alone—Apple may improve it in future updates.

How to Fix Apple Watch Apps Not Working


You tap an app on your Apple Watch, and nothing happens. Or it spins endlessly. Or it crashes before you can even use it. If Apple Watch apps not working is your daily frustration, you’re not alone. Whether it’s a single third-party app freezing or the entire My Watch interface unresponsive, this guide delivers proven, step-by-step fixes—from quick restarts to full system recovery.

The cause could be something simple: a software glitch, outdated watchOS, low storage, or overheating. Or it might be deeper: corrupted app data, failed syncing, or even a broken connection between your iPhone and watch. Some Apple Watch SE users report sluggish app launches, often due to hardware limits or bloated software in newer watchOS versions. But no matter your model—SE, Series, or Ultra—there’s a fix that works.

In this guide, you’ll learn how to diagnose the real problem, apply fast solutions, and recover from total app failure, including when the Watch app on your iPhone won’t open at all. Every step is verified by users and experts, ordered from simple to advanced, so you can get your apps running again—fast.


Restart Apple Watch First

Before diving into complex repairs, start with a restart. Most app issues are temporary software glitches that a reboot clears instantly.

Force Restart for Frozen Devices

If your watch is stuck or unresponsive, a force restart resets the system without losing data.

Steps:
1. Press and hold the Digital Crown and the side button at the same time.
2. Keep holding for 10–15 seconds.
3. Release when the Apple logo appears.

This clears running processes and fixes frozen apps in most cases.

Normal Restart for Responsive Devices

If the watch works but apps misbehave:

  1. Press and hold the side button until the Power Off slider appears.
  2. Swipe to turn it off.
  3. Wait 10 seconds, then press the side button to power it back on.

Pro Tip: Always restart your iPhone first, then your Apple Watch. This ensures a clean Bluetooth reconnection and reduces sync errors.


Update iOS and watchOS

Outdated software is one of the top reasons apps crash or won’t open. Apple regularly releases updates that fix bugs affecting app performance.

Check iPhone iOS Update

  1. Open Settings > General > Software Update on your iPhone.
  2. If an update is available, download and install it.

Update Apple Watch watchOS

  1. On iPhone, open the Watch app.
  2. Go to General > Software Update.
  3. Make sure your watch is:
    – On the charger
    – Connected via Bluetooth
    – At least 50% battery

Why it matters: Older watchOS versions may have bugs that prevent apps from launching. Updating often resolves these silently.


Free Up Storage Space

Apple Watch storage usage screenshot

Low storage cripples app performance. While Apple Watch models have 32GB total, usable space is much less—sometimes under 5GB.

Check Available Storage

  1. On iPhone, open Watch app > General > Usage.
  2. Look at the Available space.

Warning: If you have less than 1GB free, apps may fail to launch, update, or sync properly.

Delete Unused Content

To free up space:
– Remove downloaded music, podcasts, or audiobooks
– Delete large watch faces with heavy complications
– Uninstall apps you rarely use—especially big ones like games or navigation tools

After cleaning up, restart your watch to clear cached data and improve responsiveness.


Reinstall Problematic Apps

Apple Watch app removal iPhone watch app screenshot

Corrupted app data or incomplete installation can cause crashes—even if the app shows up on your watch.

Remove and Re-add via iPhone (Best Method)

This ensures a clean reinstall and full sync.

Steps:
1. Open Watch app on iPhone.
2. Tap My Watch tab.
3. Select the app that’s not working.
4. Turn off Show App on Apple Watch.
5. Wait until it disappears from the watch.
6. Toggle Show App on Apple Watch back on.

The app will re-sync from your iPhone. Wait for it to fully install before testing.

Delete Directly from Apple Watch

  1. Press Digital Crown to open the app grid.
  2. Touch and hold the screen > Tap Edit Apps.
  3. Tap the × on the app icon.
  4. Reinstall from the App Store on your watch or iPhone.

Fix Connectivity and Sync Issues

Poor Bluetooth or Wi-Fi syncing can stop apps from launching or updating.

Restart iPhone and Watch

  1. Restart your iPhone first.
  2. Then restart your Apple Watch.
  3. Wait for them to reconnect automatically.

This resets the Bluetooth link and clears sync errors.

Reset Network Settings on Watch

Clears corrupted network data without deleting apps.

Steps:
1. On Apple Watch: Settings > General > Reset > Reset All Settings.
2. Enter your passcode.
3. The watch restarts, and you’ll need to re-enter Wi-Fi passwords.

Use this if apps fail during sync or when fetching data.


Diagnose App-Specific Problems

Not all app failures are system-wide. Isolate the issue to save time.

Test Built-in Apps

Try opening:
Workout
Heart Rate
Messages
Weather

If these work, the problem is likely limited to third-party apps.

Contact App Developer

If only one app fails:
1. Open App Store on iPhone.
2. Search for the app.
3. Scroll down to App Support.
4. Report the issue or check for known bugs.

Many developers release patches for watchOS compatibility issues.


Use Airplane Mode to Bypass Sync Hangs

Some apps freeze during launch because they’re trying to sync data in the background.

Launch App in Airplane Mode

  1. Swipe up from your watch face to open Control Center.
  2. Tap Airplane Mode.
  3. Try opening the app.

If it works, the issue is network-related—likely syncing with your iPhone or fetching cloud data.

Turn Airplane Mode off afterward to restore connectivity.


Switch to List View for Better Responsiveness

Apple Watch app grid vs list view comparison

The default bubble-style app grid can lag, especially on older or budget models like the Apple Watch SE.

Enable List View

  1. Press Digital Crown to return to home.
  2. Swipe left or right to cycle through views.
  3. Select list view.

Many users report faster app launches and smoother navigation in list mode.


Unpair and Re-pair Apple Watch

When multiple apps fail or syncing is broken, resetting the pairing clears deep-level corruption.

Steps to Re-pair

  1. On iPhone: Watch app > All Watches > (i) > Unpair Apple Watch.
  2. Confirm—this erases the watch.
  3. Set up as new or restore from encrypted backup.

Pro Tip: Encrypted iPhone backups preserve health data, settings, and app layouts—use them when restoring.


Erase All Content and Settings

For system-wide app crashes, a factory reset often works when nothing else does.

Full Reset Procedure

  1. On Apple Watch: Settings > General > Reset > Erase All Content and Settings.
  2. Enter passcode.
  3. Choose whether to keep or remove your cellular plan (if applicable).
  4. Wait for erasure.
  5. Re-pair via iPhone.

This is the most effective fix for persistent, unexplained app failures.


Fix iPhone Watch App Crashes (Extreme Case)

If the My Watch app on your iPhone won’t open, standard fixes fail. You need a deep system cleanup.

Full Recovery Sequence

  1. Erase All Content and Settings on Apple Watch.
  2. Forget Apple Watch in Bluetooth settings on iPhone.
  3. Remove Watch from Apple ID at appleid.apple.com.
  4. Turn Off Find My iPhone temporarily.
  5. Delete Watch App Backups in iPhone Storage settings.
  6. Hard Reset iPhone (Volume Up, Volume Down, hold Side button).
  7. Unpair Watch via Watch App immediately after restart.
  8. Delete the Watch App from your iPhone (including App Library).
  9. Reinstall Watch App from the App Store.
  10. Pair Apple Watch Fresh.

This clears deep corruption in caches, backups, and system data—resolving even the most stubborn failures.


Prevent Future App Failures

Avoid recurring issues with smart maintenance.

Keep Software Updated

Enable Automatic Updates for iOS, watchOS, and apps.

Monitor Storage Monthly

Check Watch app > General > Usage to avoid running out of space.

Restart Weekly

A weekly restart clears memory and prevents lag.

Avoid Overheating

Don’t leave your watch in direct sunlight or on the charger longer than needed.

Limit Background Apps

Close unused apps by pressing the side button to exit, then returning home.

Stick to Reliable Apps

Use well-reviewed, frequently updated apps. Avoid ones abandoned by developers.


Summary: Step-by-Step Fix Sequence

Follow this order for the fastest results:

  1. Force restart Apple Watch
  2. Update iOS and watchOS
  3. Update all apps
  4. Check and free up storage (keep >1GB free)
  5. Remove and reinstall problematic app via iPhone
  6. Restart iPhone and watch
  7. Reset network settings on watch
  8. Try app in Airplane Mode
  9. Switch to list view
  10. Unpair and re-pair Apple Watch
  11. Erase All Content and Settings (if still failing)
  12. Full iPhone-side cleanup (for Watch app crashes)

Final Note: Most Apple Watch apps not working issues are software-related—not hardware defects. By following this structured troubleshooting path, you can resolve nearly all app problems across Apple Watch SE, Series, and Ultra models. Start simple, escalate only when needed, and keep your devices updated and clean.

Fix Apple Watch Apple Pay Double Click Not Working


You double-click the side button on your Apple Watch—once, twice—and nothing happens. No payment card appears. No “Hold Near Reader” prompt. Just silence. This glitch strikes without warning, often after a watchOS update, and affects Apple Watch Series 7, Series 9, Ultra 2, and SE (3rd gen). But here’s the good news: in over 95% of cases, this isn’t a hardware failure. It’s a software or settings issue—and it’s fixable, often in under 5 minutes.

The double-click-to-pay feature is one of the most seamless conveniences Apple offers. When it stops working, your morning coffee run, subway tap-in, or grocery checkout becomes a frustrating hassle. You might see the Dock instead, or your watch might just wake up. Meanwhile, Apple Pay works perfectly on your iPhone. This guide cuts through the noise with only proven, user-tested solutions—no guesswork. You’ll learn how to diagnose the root cause fast and restore Apple Pay functionality for good.


Restart Your Apple Watch to Clear Glitches

A simple restart is the fastest, most effective first step.

When your Apple Watch ignores double-clicks, a full reboot clears temporary system errors—especially those triggered by watchOS 9.6.1 or iOS 17/18 updates. This fix resolves frozen processes, sensor lag, or corrupted memory states that block hardware responses.

How to Restart Properly

  1. Open Settings on your Apple Watch
  2. Tap General > Shut Down
  3. Swipe the power slider to turn it off
  4. Wait 60 seconds—this ensures a complete reset
  5. Press and hold the side button until the Apple logo appears

If the screen is frozen, force restart:
– Press and hold both the side button and Digital Crown for 10+ seconds until the Apple logo shows.

Why It Works: Users like wickw50 and bammsi reported immediate restoration of Apple Pay after rebooting post-update. No data loss. No setup changes. Just a clean system state.


Set Side Button Click Speed to “Slow”

Apple Watch side button click speed accessibility settings

If your taps feel too fast or too slow, the watch may not register them.

Apple Watch uses timing algorithms to distinguish single, double, and long presses. If the click speed is set too fast, normal taps won’t trigger Apple Pay.

Adjust to “Slow” for Better Recognition

  1. On Apple Watch: Open Settings
  2. Go to Accessibility > Side Button
  3. Change Click Speed to “Slow”
  4. Test by double-clicking near a contactless terminal

What Happens:
– You get more time between presses
– The system becomes more tolerant of imperfect timing
– No restart needed—takes effect instantly

User Result: Em— confirmed on May 21, 2023: “Changed click speed to slow… now double-click works when holding watch up to reader.”

⚠️ Warning: Some users still report needing extremely fast clicks—this often points to deeper gesture conflicts, especially with AssistiveTouch enabled.


Confirm Your Apple Pay Card Is on the Apple Watch

Apple Watch Wallet app payment cards settings

Just because a card is in your iPhone Wallet doesn’t mean it’s on your watch.

This is one of the most overlooked causes. Apple Pay must be explicitly enabled on the Apple Watch, and cards don’t always sync automatically—even if they appear in the Wallet app.

How to Check and Add a Card

  1. Open the Watch app on your iPhone
  2. Scroll to Wallet & Apple Pay
  3. Check “Payment cards on your watch”
  4. If empty or missing your card, tap Add Card
  5. Follow verification steps (may require bank approval)

Visual Clue:
– A synced card shows “Ready to Use” or “Active”
– If it says “Pending” or nothing appears, the card isn’t active on the watch

Fix Sync Issues:
– Remove the card from the Watch section
– Restart your Apple Watch
– Re-add the card

This fixed the issue for users who saw their card in the app but couldn’t trigger it via double-click.


Disable Conflicting Accessibility Features

Accessibility settings like AssistiveTouch disable the double-click gesture to prevent conflicts.

Even if turned off, residual configurations can block Apple Pay. The main culprits:
AssistiveTouch
Quick Actions
Zoom with Hand Gestures
VoiceOver with Hand Gestures

These override standard button functions—meaning double-click won’t work.

Fix: Reset AssistiveTouch with the LD150 Method

Many users get stuck in a loop: you need Apple Pay to set up AssistiveTouch, but AssistiveTouch blocks Apple Pay. Here’s the proven workaround:

Steps:

  1. On Apple Watch: Go to Settings > Accessibility > AssistiveTouch
  2. Turn AssistiveTouch ON
  3. Tap “Confirm With AssistiveTouch” > Turn OFF
  4. Now turn AssistiveTouch OFF completely
  5. Test double-click

Why It Works: This sequence resets the gesture priority stack, clearing corrupted states without requiring a double-click during setup.

Stuck in a Loop?
– AlliOop and razoirder52 couldn’t confirm setup
Solution: Restart Apple Watch after turning AssistiveTouch off, then test


Enable Double Tap in Gestures (watchOS 10+)

On Series 9, Ultra 2, and SE 3, Apple Pay double-click depends on the Double Tap system.

If Double Tap is disabled, the side button won’t trigger Apple Pay.

Turn On Double Tap

  1. Open Settings on Apple Watch
  2. Tap Gestures > Double Tap
  3. Ensure Double Tap is ON

Required Settings:
Wrist Detection: Enabled (Settings > Passcode)
Wake on Wrist Raise: On (Settings > Display & Brightness)
– Wear the watch on the correct wrist (matches Orientation setting)

When It Fails:
– During ECG or Depth app use
– In third-party apps showing a shaking hand icon
– If the watch detects improper fit or movement


Reset Apple Pay Settings on iPhone

iPhone Wallet Apple Pay double click side button toggle

Sometimes the double-click function gets disabled silently.

Even if Apple Pay works on your iPhone, the “Double-Click Side Button” toggle may be off or glitched.

Toggle the Setting

  1. On iPhone: Open Settings > Wallet & Apple Pay
  2. Find “Double-Click Side Button”
  3. Toggle it OFF
  4. Wait 20 seconds
  5. Toggle it ON again
  6. Restart your Apple Watch

Alternative: Remove and re-add your card:
– In Wallet & Apple Pay, tap your card
– Select Remove This Card
– Restart the watch
– Re-add via Wallet app

Forces a fresh sync—critical if the card appears but won’t trigger.


Unpair and Re-pair Your Apple Watch

When sync issues run deep, a clean pairing resets communication.

This is the most effective fix for persistent bugs, especially after iOS or watchOS updates.

How to Re-pair

Unpair:
1. Open Apple Watch app on iPhone
2. Tap My Watch > All Watches
3. Tap “i” next to your watch
4. Select Unpair Apple Watch, confirm

Re-pair:
1. Power on Apple Watch
2. Hold iPhone near it
3. Follow setup prompts
4. Choose Restore from Backup

Time: 15–30 minutes
Data Loss?: No—everything is backed up, but you’ll re-enter passwords and reconfigure some settings.

User Result: ScootsSue and mike.lamasa resolved circular loops only after re-pairing.


Update watchOS and iOS

Outdated or buggy software is a top cause.

Known issues with watchOS 9.6.1 and iOS 17/18 have caused widespread double-click failures.

Install Updates

  1. On iPhone: Open Apple Watch app
  2. Tap My Watch > General > Software Update
  3. Download and install any available update
  4. Update iPhone too (Settings > General > Software Update)

Pro Tip: Keep both devices charged and on Wi-Fi during update. Interrupted installs can corrupt system files.


Reset All iPhone Settings

When nothing else works, reset configurations without losing data.

This clears corrupted preferences blocking Apple Pay.

Steps

  1. On iPhone: Settings > General > Transfer or Reset iPhone > Reset > Reset All Settings
  2. Enter passcode
  3. Wait for restart
  4. Re-enable Apple Pay and double-click
  5. Re-pair Apple Watch if needed

Note: Resets Wi-Fi, Bluetooth, and privacy settings—reconnect afterward.


Rule Out Hardware and Physical Issues

Most problems are software-based, but hardware faults do occur.

Test the Side Button

  • Press and hold: Should show power slider
  • Double-press: Should open Apple Pay (if working)
  • Single press: Should wake/sleep

If only double-click fails, it’s likely software.
If no button functions work, suspect hardware damage.

Check for Case Interference

  • Remove thick, magnetic, or metal cases
  • NFC signals can be blocked
  • Use Apple-certified cases only

Terminal and Positioning Tips

  • Look for the contactless symbol (four curved lines)
  • Hold watch 1–2 inches from reader
  • Keep wrist still—movement cancels the transaction
  • Try multiple terminals

Address Family Sharing and Age Restrictions

Minors may have Apple Pay disabled by banks or Apple policies.

Even if a parent adds a card, financial institutions often block Apple Pay for under-18 accounts.

Solutions

  1. Contact your bank to confirm eligibility
  2. Try adding a prepaid card or Apple Cash
  3. Use the iPhone for payments until restrictions lift

When to Contact Apple Support

If all software fixes fail:

  • Schedule a Genius Bar appointment
  • Use the Apple Support app for remote diagnostics
  • Call 1-800-MY-APPLE (1-800-692-7753)

Possible Hardware Issues:
– Faulty side button sensor
– Water or impact damage
– Internal NFC module failure

Apple can run diagnostics and replace the watch if under warranty.


Prevention Best Practices

Keep Apple Pay working smoothly:

  • Restart Apple Watch weekly
  • Update software immediately
  • Avoid beta OS versions
  • Use certified cases without metal
  • Test Apple Pay monthly
  • Monitor changes after updates

Final Note: The Apple Watch Apple Pay double-click not working issue is almost always solvable without repair. Start with a restart and click speed adjustment, then move through AssistiveTouch toggle, card sync check, and software updates. If those fail, re-pairing or resetting settings will likely fix it. Save this guide—your future self will thank you when Apple Pay stops working again after the next update.

Fix Apple Watch Alarm Not Working After Update


If your Apple Watch alarm failed to go off after a software update—especially on watchOS 26, 26.0.2, or later—you’re not imagining things. Thousands of users across Apple Watch Series 7, 8, SE, Ultra 2, and Series 10 have reported missing alarms, silent vibrations, or even their iPhone flashlight blinking unexpectedly at wake-up time. Some woke up 30+ minutes late, only to find their watch displayed a hidden setup screen post-update.

The root cause? Software updates can silently reset alarm routing, disable haptics, trigger Focus modes, or block alerts behind unacknowledged prompts—especially when installed overnight. This guide delivers proven fixes, uncovers hidden settings, and reveals Apple support-tested solutions to ensure your alarm works—every single morning.


Fix Overnight Update Alarm Blocks

Apple Watch update prompts after watchOS update

Accept Post-Update Prompts Immediately

One of the most dangerous issues: automatic overnight updates that stop alarms from triggering. After watchOS 26.0.2, many users found their alarms blocked by a silent EULA (End User License Agreement) or login screen requiring manual interaction.

  • The watch may show a gray screen, passcode prompt, or setup carousel after updating.
  • Until you wake the watch and sign in, alarms won’t trigger, even if set.
  • This creates real risk: you could oversleep without warning.

Solution:
Avoid automatic updates during sleep. Instead:
1. Open the Watch app on iPhone > General > Software Update
2. Install updates during the day
3. After updating, unlock your watch, enter your passcode, and test an alarm

🔔 Pro Tip: If an update is pending, set a temporary phone alarm 10 minutes after bedtime to catch any post-update prompts.


Set Alarms Directly on Apple Watch

Apple Watch alarm setup screenshots

Avoid iPhone Clock App Triggers

Where you set the alarm determines how it behaves. If you use the iPhone Clock app, the system may treat it as a phone alert, causing:
– iPhone sound
– Flashlight blinking
– No watch haptic

After updates, this can suddenly change—even if your alarm worked silently for years.

Fix:
1. Open the Clock app on your Apple Watch
2. Tap Alarm > +
3. Set time, enable vibration, and save
4. Delete the same alarm from iPhone Clock app

This ensures the alarm is native to the watch, not mirrored from the phone.

⚠️ Critical: Never set the same alarm in both apps—conflicting signals can cancel each other out.


Disable iPhone Flash for Alerts

iPhone accessibility settings LED Flash for Alerts

Stop Flashlight from Blinking at Night

Even with alarms set on the watch, users report their iPhone flashlight blinks upon trigger. This is caused by accessibility settings now applied universally in iOS 16+.

Why It Happens

  • LED Flash for Alerts = On
  • Flash in Silent Mode = On

These settings, found in Accessibility, override device-specific behavior.

Turn Off:
1. On iPhone: Settings > Accessibility > Audio & Visual
2. Disable:
LED Flash for Alerts
Flash in Silent Mode

🛑 Note: These were ignored for alarms in the past—but iOS 16+ now applies them to all alerts, including watch-set alarms.

💡 Why it matters: Disabling these stops unwanted light but preserves haptics on the watch.


Reset Haptics and Sound Settings

Restore Missing Vibration and Sound

No haptic? No sound? Check these critical settings—often reset after updates.

Enable Haptic Alerts

  1. On Apple Watch: Settings > Sounds & Haptics
  2. Ensure:
    Haptic Alerts = On
    Prominent Haptic = On (for stronger tap)
    Haptic Strength = Max (test first, then adjust)

Disable Silent and Theater Mode

  • Silent Mode: Press side button—no orange bell icon
  • Theater Mode: Swipe up Control Center—tap mask icon to disable

🔍 Visual Check:
After setting an alarm, tap it—does it show “Vibration: Ringtone”? If yes, it’s not using haptics. Edit and choose “Vibration Only”.


Fix Focus Mode Interference

Stop Personal and Sleep Focus from Blocking Alarms

Multiple users confirmed alarms fail when Focus modes are active, even if alarms were previously allowed.

Test by Disabling All Focuses

  1. On iPhone: Settings > Focus
  2. Turn off:
    Personal
    Sleep
    Do Not Disturb
  3. Set a test alarm—see if it triggers

If it works, re-enable one by one to find the culprit.

Allow Alarms in Focus Exceptions

For each active Focus:
1. Tap to edit
2. Go to “Allow Notifications From”
3. Add Clock or Alarms
4. Ensure “Time Sensitive” and “Immediate Delivery” are on

🔄 User Success:
“Had Personal Focus on—turned it off, alarm worked. Turned it back on, still works. Must’ve reset the bug.”


Verify Push Alerts from iPhone

Ensure Proper Alarm Sync

Even if you set alarms on the watch, this setting affects background communication.

Check Sync Status

  1. On iPhone: Watch app > My Watch > Clock
  2. Confirm:
    Push Alerts from iPhone = On

🔄 Why it matters: This allows the iPhone to send alarm data to the watch. Even watch-set alarms rely on this for Sleep Schedule sync.

Bug Note: Some users report this setting is ignored post-update—making re-pairing necessary.


Test Charging and On-Wrist Behavior

Alarms Failing When Not Worn?

One user reported alarms only work when wearing the watch, failing when charging overnight.

Possible Causes

  • Battery optimization in new watchOS versions
  • Haptic engine suspended when off-wrist
  • Motion detection disabled during charge

Diagnostic Test

  1. Set alarm while wearing watch
  2. Set second alarm while charging and off-wrist
  3. Compare results

Fix Attempt:
– Keep watch charged but wear it loosely while sleeping
– Or use Sleep Schedule in Health app (more reliable than standalone alarms)

🔋 Battery Tip: If battery drains fast post-update, unpair and re-pair may resolve power management bugs.


Force Restart Both Devices

Clear Software Glitches

A hard reset clears temporary firmware errors that block alarms.

Restart Apple Watch

  1. Press and hold Side Button + Digital Crown
  2. Hold for 10 seconds
  3. Release when Apple logo appears

Restart iPhone (iPhone 16 Pro)

  1. Press and release Volume Up
  2. Press and release Volume Down
  3. Press and hold Side Button until Apple logo appears

⏱️ Time Required: ~60 seconds
When to Use: After any failed alarm, or post-update

📈 Success Rate: Mixed—works for some, not all. Combine with other fixes.


Reset All Alarms

Apple Watch alarm deletion screenshots

Eliminate Corrupted Alarm Data

Alarms can become corrupted or misrouted after updates.

Full Reset Process

  1. On iPhone Clock app: Delete all alarms
  2. On Apple Watch Clock app: Delete all alarms
  3. Reboot both devices
  4. Re-create alarms on Apple Watch only
  5. Test immediately with a 2-minute alarm

User Confirmed:
“Resetting all alarms fixed it. Had 5 duplicates from sync errors.”

🔄 Repeat if needed: Do this monthly if issues return.


Update to Latest iOS and watchOS

Apply Apple’s Official Patches

Some fixes arrive in subsequent updates.

Check for Updates

  • iPhone: Settings > General > Software Update
  • Apple Watch: Watch app > General > Software Update

🔄 Example:
watchOS 26.0.2 introduced alarm blocks—watchOS 26.1 partially resolved it for some.

📅 Best Practice: Wait 1–2 weeks after major release to avoid early bugs.


Unpair and Re-pair Apple Watch

Nuclear Option for Persistent Failures

If nothing works, re-pairing clears deep software corruption.

Steps

  1. Back up watch: Watch app > My Watch > Apple Watch > Back Up
  2. Unpair: Tap “Unpair Apple Watch” (erases device)
  3. Set up as new or restore from backup
  4. Re-pair and reconfigure alarms

Time Required: 30–60 minutes
💡 Tip: Use this only if alarms fail daily and affect safety or work.

🛡️ Benefit: Resolves sync, haptic, and Focus bugs that survive reboots.


Use Sleep Schedule for Reliable Wake-Ups

Replace Standalone Alarms

The Health app Sleep Schedule is more stable than Clock app alarms.

Set Up Sleep Schedule

  1. Open Health app > Sleep > Full Schedule & Options
  2. Set bedtime and wake-up time
  3. Enable “Turn On During This Schedule”
  4. Tap “Sounds & Haptics” and choose strong haptic

Why It’s Better:
– Automatically activates Sleep Focus
– Less prone to sync errors
– Resumes after minor glitches

🔄 Sync Check: Ensure Sleep > Clock app shows the alarm. If missing, re-enable schedule.


Summary: Critical Settings Checklist

Setting Location Must Be
Alarm Source Apple Watch Clock app Set here
Haptic Alerts Watch > Sounds & Haptics On
Prominent Haptic Same On
Silent Mode Side button Off (no orange)
LED Flash for Alerts iPhone Settings > Accessibility Off
Flash in Silent Mode Same Off
Push Alerts from iPhone iPhone Watch app > Clock On
Focus Modes iPhone Settings > Focus Allow Clock alerts
Software General > Software Update Latest version

Final Note: Prevent Future Alarm Failures

To avoid this issue after future updates:

  1. Set alarms directly on the Apple Watch
  2. Disable iPhone visual flash alerts
  3. Avoid overnight automatic updates
  4. Test alarm within 1 hour of any update
  5. Use Sleep Schedule instead of standalone alarms
  6. Keep a backup alarm (e.g., physical clock) if punctuality is critical

Apple has not yet issued an official statement on the post-update alarm failure trend, but user reports confirm it’s tied to watchOS 26+ changes in alert routing and Focus logic. Until a permanent fix arrives, manual alarm testing and setting hygiene are your best defense.

Stay alert—literally.

How to Fix Apple Watch Activity Not Working


If your Apple Watch activity isn’t tracking steps, closing rings, or syncing workouts, you’re not alone. Hundreds of users across Apple Watch Ultra, Series 11, Series 10, and older models report the “Apple Watch activity not working” issue—especially after updating to watchOS 26 and iOS 26. The problem often shows up as frozen rings, missing exercise minutes, unresponsive heart rate sensors, or failed third-party app connections (like Peloton). Even more confusing: your Health app may show steps, but the Activity app displays zero. This guide delivers proven fixes—from simple restarts to advanced resets—based on real user reports, Apple Support data, and technical diagnostics. You’ll learn how to restore full tracking fast, avoid recurring crashes, and determine if hardware replacement is necessary.

Force Restart Apple Watch and iPhone

When your Activity app freezes or won’t load, a force restart clears temporary glitches that block data tracking.

Force Restart Apple Watch

If the Activity rings are stuck or the app won’t open:
1. Press and hold the side button and Digital Crown at the same time.
2. Keep holding for 10–15 seconds until the Apple logo appears.
3. Wait for the watch to fully reboot before checking the Activity app.

This clears frozen processes and reinitializes sensors. Users like mbranan86 found this restored function after Peloton crashes. If the screen is black or frozen, this step is essential.

Restart Your Paired iPhone

Your iPhone manages all Health and Activity syncing. If it’s overloaded, data won’t update:
Face ID models: Press and hold the side button + volume down until the power slider appears.
Home button models: Press and hold the side (or top) button until the slider shows.

Slide to power off, wait 30 seconds, then turn it back on. After both devices restart, give them 2–3 minutes to resync. Check if your rings update or workouts now start normally.

Fix Sync & Permission Issues

iPhone privacy settings health permissions apple watch

Many tracking failures stem from broken permissions—not hardware faults.

Enable Fitness Tracking Permissions

Without access, your Apple Watch can’t read motion or heart rate:
1. On iPhone: Go to Settings > Privacy & Security > Motion & Fitness.
2. Turn Fitness Tracking ON.
3. Open the Watch app > My Watch > Privacy > Motion & Fitness.
4. Ensure both Fitness Tracking and Heart Rate are enabled.

Warning: Disabling these—even via third-party apps—stops all ring progress and workout logging.

Fix iCloud Health Sync

Activity data relies on iCloud to sync across devices:
1. Go to Settings > [Your Name] > iCloud > Show All > Health.
2. Toggle Health ON.
3. Wait several minutes for data to refresh.

If this was off, you might see a delay: old step counts appear first, then current data. User JohnDavidge noted delays of over a minute before real-time tracking resumed.

Disable Screen Time Sharing

A hidden iOS setting disrupts multiple Apple apps:
1. Open Settings > Screen Time > Share Across Devices.
2. Turn it OFF.

User Serendip8185 confirmed this fixed Activity, Fitness, and Mail app syncing. Re-enable only after confirming stability.

Reset Third-Party App Conflicts

Apple watch third party app permissions health data

Apps like Peloton, Strava, or fitness trackers with Health access can freeze syncing.

Revoke and Re-grant App Permissions

Corrupted Health permissions cause crashes:
1. On iPhone: Settings > Privacy & Security > Health > [App Name].
2. Turn all permissions OFF (e.g., Heart Rate, Steps).
3. Go to Settings > Privacy & Security > Bluetooth and disable app access.
4. Restart both devices.
5. Re-enable permissions one at a time.

User azaksalmarzur28 used this to fix Peloton heart rate detection issues after watchOS 26 updates.

Check for Interfering Background Apps

VPNs, ad blockers, or security tools may block iCloud:
LD150 (Apple contributor) advises disabling any VPN apps temporarily.
– Test activity tracking with no background apps running.

If tracking resumes, identify the conflicting app and update or remove it.

Recalibrate Motion Sensors

Even with correct permissions, outdated calibration breaks tracking accuracy.

Perform Outdoor Walk Calibration

Recalibrate motion sensors with real-world movement:
1. Put iPhone in pocket or carry it.
2. Start an Outdoor Walk workout on Apple Watch.
3. Walk briskly for at least 20 minutes on flat terrain.
4. Repeat with Outdoor Run if possible.

This teaches the watch your stride length and improves step, distance, and calorie accuracy.

Reset Fitness Calibration Data

Clear corrupted calibration history:
1. On iPhone: Open Watch app > Privacy > Reset Fitness Calibration Data.
2. Confirm reset.
3. Complete the outdoor walk again to rebuild data.

Note: This won’t delete historical activity—only recalibration metrics. Ideal after software updates or unexplained tracking drops.

Test Heart Rate Sensor Function

Apple watch heart rate sensor green light check

No heart rate data? The sensor may be blocked or disabled.

Check for Green LED Activation

During a workout:
1. Start a Walk or Outdoor Run.
2. Look at the back of the watch.

You should see green lights pulsing. If not:
– Ensure the watch is snug on top of your wrist.
– Clean the sensor with a soft, dry cloth.
– Remove thick wrist hair or tattoos that may block light.

If LEDs still don’t activate after restarts, suspect a deeper software or hardware issue.

Unpair and Re-pair Apple Watch

Apple Support’s most recommended fix—especially for recurring problems.

Standard Unpair (With Backup)

Safely clears system cache without losing data:
1. Open Watch app > General > Reset > Unpair Apple Watch.
2. Wait for backup completion (shows in iCloud or locally).
3. Set up the watch again and restore from backup.

This often resolves sync hangs and frozen Activity apps. User nextseason saw temporary improvement after this step.

Advanced Fix: Pair as New (No Backup)

If issues return within days, the backup itself may be corrupted:
1. Unpair as above.
2. During setup, choose “Set Up as New Apple Watch”.
3. Do not restore from backup.
4. Manually re-add watch faces, apps, and payment cards.

Ingo2711 and LD150 confirm: This is the most effective fix for persistent tracking failure. It eliminates hidden software conflicts carried over in backups.

Investigate Charging-Related Freezes

Some users report activity tracking fails after full charging cycles.

Avoid Full 100% Charges

Users SisyphusSummit and Western_Insect_7580 noticed:
– Charging beyond 80–90% triggers app freezes.
– 30-minute partial charges do not cause issues.

Workaround: Unplug at 80–90%, or force restart immediately after full charge.

Reset After Charging

If tracking stops post-charge:
1. Force restart the watch.
2. Open Activity app to test.
3. If it works, the issue is firmware-level, likely tied to battery state signaling in watchOS 26.

Determine If Hardware Is Faulty

If all software fixes fail, hardware or account-level issues may be to blame.

Try a Different iPhone

Test your Apple Watch with another iPhone:
– Pair it as a new device (don’t restore).
– Check if activity tracking works.

If yes, the problem is with your original iPhone’s software or settings.

Test a Different Apple Watch

User in Article 9 replaced their watch with a new Series 11—same issue persisted. This confirms the problem lies in:
– The iCloud account
– The paired iPhone
– Or watchOS/iOS software bugs

Visit Apple Support

Visit the Genius Bar if:
– Green LEDs never activate during workouts.
– Multiple watches fail with the same iPhone.
– All resets provide only temporary relief.

Even after hardware replacement, some users (like SisyphusSummit) had the same issue—pointing to systemic software flaws, not faulty devices.

Last Resort: Factory Reset iPhone

Only use this if nothing else works and you can back up safely.

Steps to Reset iPhone

  1. Connect to computer and create an unencrypted iTunes backup.
  2. On iPhone: Settings > General > Transfer or Reset iPhone > Erase All Content and Settings.
  3. Set up iPhone as new.
  4. Pair Apple Watch without restoring from backup.

Warning: This deletes all data. Only proceed if you have a verified backup. Article 7 notes this fixed syncing for users with deeply corrupted Health databases.


Final Note: The “Apple Watch activity not working” issue is widespread across models and often tied to watchOS 26 updates, iCloud sync failures, or corrupted backups—not hardware. Start with a force restart and permission checks. If problems persist, unpair and set up as new (no backup) for the cleanest fix. Disable Screen Time sharing and third-party app access to prevent recurrence. Report the issue via Apple’s feedback portal to push for a permanent software patch. Until then, a clean setup offers the most reliable tracking.

Apple Watch 9 Wrist Temperature Not Working: How to Fix


You’ve invested in an Apple Watch Series 9 expecting advanced health tracking—especially nightly wrist temperature monitoring—but instead, you’re greeted with “No Data” or “Needs More Data” in the Health app. You’re not imagining it: many Apple Watch 9 users are experiencing the same frustrating issue, even with perfect sleep tracking and correct settings.

Despite Apple marketing wrist temperature as a key feature for reproductive health and wellness insights, it’s one of the most finicky sensors on the device. The problem isn’t always hardware—it’s usually a mix of undocumented requirements, software bugs, or overlooked settings that silently block data collection.

The good news? Most cases are fixable. This guide delivers a proven, step-by-step troubleshooting plan based on real user experiences, Apple’s technical requirements, and verified fixes. Whether you’re setting up for the first time or your tracking suddenly stopped, you’ll learn how to diagnose, repair, and maintain reliable wrist temperature readings—starting tonight.


Verify Your Apple Watch 9 Actually Supports Wrist Temperature

Before diving into fixes, confirm your device is even capable of wrist temperature tracking.

Only These Models Can Track Wrist Temperature

Apple Watch wrist temperature sensing is exclusive to specific models with the upgraded thermal sensor:

  • ✅ Apple Watch Series 8
  • ✅ Apple Watch Series 9
  • ✅ Apple Watch Ultra
  • ✅ Apple Watch Ultra 2
  • ✅ Apple Watch SE (2nd generation, 2023)

Important: The original Apple Watch SE (2020) and all models before Series 8 do not support wrist temperature, no matter how many updates you install.

If you own a Series 9, you’re good on hardware. But that doesn’t guarantee functionality—software and usage rules are just as critical.

Why This Confusion Happens

Many users assume all recent Apple Watches have this feature. One user, l-sumner, spent days troubleshooting—only to discover their Apple Watch SE (2020) never had the sensor. Don’t waste time fixing what can’t be fixed. If your model is confirmed compatible, move to the next steps.


Meet All 10 Technical Requirements for Wrist Temperature Tracking

Apple Watch wrist temperature requirements checklist infographic

Missing even one condition will stop data collection. Apple doesn’t list all requirements clearly—here’s the full checklist.

Sleep Focus Must Be Active (Default Version Only)

The sensor only records during Sleep Focus mode—and not just any version. Users report that custom Sleep Focus profiles fail to trigger temperature tracking.

  • On iPhone: Watch app > Focus > Sleep Focus
  • Enable Schedule for automatic activation
  • Use the default Sleep Focus, not a renamed or custom one

    User NickCampbell0089 fixed the issue instantly by switching from “mySleep” to the default Sleep Focus.

Wear the Watch for 5+ Consecutive Nights

Apple needs 5 full nights of sleep data to calculate your personal baseline before showing trends.

  • Expect no data for the first 5 nights—this is normal
  • Missing one night may reset the calibration
  • Be consistent: wear it every night without removal

Wear with a Snug Apple Band

Loose fit breaks skin contact, and third-party bands often block sensors.

  • Tighten the band so the watch doesn’t shift during sleep
  • Use Apple-branded bands (e.g., Sport Band, Solo Loop)
  • Avoid metal, magnetic, or oversized third-party bands
  • Remove screen protectors and cases

    User Gman4d3 regained data after switching back to the original band.

Keep Battery Above 30% Overnight

If the watch dies before morning, no temperature data is saved.

  • Charge to 80%+ before bed if battery drains fast
  • Avoid heavy app use before sleep
  • Enable Power Saving Mode during Sleep Focus (watchOS 11+)

Enable Wrist Detection

This setting tells the watch it’s being worn—critical for sleep and sensor activation.

  • Go to Watch app > Passcode > Wrist Detection = ON
  • Disable only if sharing the watch
  • Turning this off breaks sleep and temperature tracking

Fix Sleep Focus Activation Problems

Even with scheduling, Sleep Focus often fails to start—breaking the entire chain.

Manually Activate Sleep Focus Each Night

If automation fails, turn on Sleep Focus manually:

  • Swipe up on Apple Watch > tap Focus icon > select Sleep
  • Confirm the moon icon appears in the status bar
  • This guarantees activation, bypassing software bugs

User Arkwitz reported manual activation worked immediately—while auto-scheduling failed despite being set.

Recreate Sleep Focus from Scratch

Corrupted settings can silently block the feature.

How to Reset Sleep Focus:

  1. On iPhone: Settings > Focus > Sleep Focus
  2. Tap Delete Focus
  3. Tap + Add Focus > Sleep to create a new one
  4. Re-enable it in Watch app > Sleep tab
  5. Reconnect to your sleep schedule

This fixed the issue for Loud-Armadillo6106 after other steps failed.


Toggle Wrist Temperature Access to Reset the Sensor

Apple Watch privacy settings wrist temperature toggle

A simple software refresh can reactivate a stalled sensor.

Step-by-Step: Reset Wrist Temperature Access

  1. On iPhone, open Watch app
  2. Go to Privacy > Health > Wrist Temperature
  3. Toggle the switch OFF
  4. Wait 10 seconds
  5. Toggle it back ON
  6. Restart both iPhone and Apple Watch

User Ascron confirmed this worked on Apple Watch Ultra 2—proof it applies across compatible models.

This forces the system to reauthorize sensor access and clear silent glitches.


Update to the Latest watchOS and iOS

Software bugs—especially in watchOS 11—have caused widespread tracking failures.

Known watchOS Issues

  • watchOS 11 caused intermittent recording for many users
  • Some nights work, others don’t—no clear pattern
  • watchOS 10.4 and 11.3 included stability fixes for health sensors

How to Update

On Apple Watch:
Settings > General > Software Update

On iPhone:
Settings > General > Software Update

User romangr regained tracking after updating to watchOS 10.4 and rebooting.

Always backup before updating. Never skip major updates if health features are failing.


Factory Reset: Fix Deep Software Conflicts

When all else fails, a full reset can resolve hidden bugs.

When to Do It

  • No data after 10+ nights
  • Sleep Focus won’t activate
  • Settings are unresponsive

How to Reset

  1. Watch app > My Watch > General > Transfer or Reset Apple Watch
  2. Select Erase All Content and Settings
  3. Wait for unpairing and erasure
  4. Set up as new or restore from backup

User Jhawk202 fixed Apple Watch 8 temperature issues with this method—same applies to Series 9.

After resetting:
– Re-enable Sleep Focus
– Wear consistently for 5+ nights
– Use Apple band only at first


Understand Where Data Appears—and What It Means

Even when working, data isn’t visible everywhere.

Where to Find Wrist Temperature

  • Health app > Browse > Body Temperature > Nightly Wrist Temperature
  • Vitals app (if supported)
  • Cycle Tracking app (for fertility predictions)

Note: Data does not appear on the watch face or in the Sleep app. It’s iPhone-only.

What the Sensor Actually Measures

  • Tracks subtle changes in skin temperature during sleep
  • Compares nightly readings to your personal baseline
  • Detects thermal shifts, not real-time body temp
  • Used for cycle predictions and wellness trends

It’s not a medical thermometer. Room temperature, bedding, or illness can affect readings.


Recognize Known Bugs and Patterns

Apple has acknowledged the issue.

Confirmed Software Bug

  • User Nycoy contacted Apple Support
  • Agent confirmed it’s a known issue
  • Fix expected via future software update
  • No public timeline

watchOS 11 Instability

  • User ottoharsh: “Some nights it records, some nights it doesn’t.”
  • Issue started after watchOS 11 update

Spontaneous Recovery

  • User NyceeZ: “It started working out of nowhere… I didn’t change anything.”
  • Suggests backend fixes or silent recalibration

If nothing works, wait—some users see data resume without intervention.


Proven Fix Checklist: Follow Every Step

✅ Confirm device is Series 9, 8, Ultra, or SE (2nd gen)
✅ Use default Sleep Focus with schedule
Manually activate Sleep Focus if auto fails
✅ Enable Wrist Detection
✅ Wear with snug Apple band, no accessories
✅ Sleep 5+ hours per night
✅ Complete 5+ consecutive nights
Toggle wrist temperature setting off/on + restart
Update to latest watchOS and iOS
Recreate Sleep Focus
Factory reset if all else fails
Contact Apple Support if unresolved

Skip nothing—even a screen protector can block data.


When to Contact Apple Support

If you’ve done everything and still see “No Data”, escalate.

What to Say

  • “I own an Apple Watch Series 9 and wrist temperature isn’t working.”
  • “I’ve met all requirements: Sleep Focus, 5+ nights, snug fit, latest software.”
  • “This is a known issue affecting multiple users.”
  • “I need diagnostics or a firmware fix.”

Request:
– Remote system check
– Escalation to engineering team
– Replacement if under warranty

If this feature was a primary reason for purchase, consider a refund.


Maintain Reliable Tracking Long-Term

Once fixed, prevent future issues.

Best Practices

  • Stick to Apple bands for sleep
  • Charge nightly if battery <50%
  • Avoid removing the watch mid-sleep
  • Recheck Sleep Focus after updates
  • Monitor Health app weekly

Mistakes to Avoid

❌ Using a custom Focus
❌ Wearing a loose or third-party band
❌ Skipping nights
❌ Ignoring updates
❌ Expecting immediate data


Final Thoughts: Patience and Persistence Win

Wrist temperature tracking on the Apple Watch Series 9 is powerful but fragile. It requires perfect alignment of hardware, software, and user behavior.

Many give up too soon—missing the 5-night baseline or the impact of a loose band. Others don’t realize manual Sleep Focus activation is a reliable workaround.

While Apple works on fixes, you can resolve most issues now. Start with the basics: default Sleep Focus, snug Apple band, 5+ nights. If that fails, toggle settings, recreate Sleep Focus, update, or reset.

And remember: some users report the feature starts working unexpectedly. Apple may be rolling out silent fixes.

Your Apple Watch Series 9 can deliver accurate wrist temperature data. With this guide, you now have every tool to make it happen.

Apple Watch Battery Issues Solved


If your Apple Watch dies by dinnertime—or worse, overnight—you’re not imagining it. Apple Watch battery issues are one of the most common complaints across all models, especially after a watchOS update. Users report 100% charge dropping to 20% by lunch, unexpected shutdowns at 40%, or needing to charge twice daily. While Apple promises up to 18 hours of battery life (36 for Ultra models), real-world performance often falls short due to software bugs, misconfigured settings, or battery degradation.

The good news? Most battery drain problems are fixable without replacing your watch. Whether you’re on a Series 5 or the latest Series 10, over 90% of fast drain cases stem from software or settings—not hardware. From disabling power-hungry features to deep resets that clear corruption, this guide delivers actionable fixes based on verified user reports, Apple’s technical specs, and proven troubleshooting methods. You’ll learn how to diagnose the cause, apply targeted solutions, and keep your Apple Watch running all day—every day.

Know Your Watch’s Real Battery Life

Apple Watch battery life comparison chart Series 10 Ultra 2 SE 8 6

Check What to Expect by Model

Apple advertises “up to 18 hours” for most models, but actual battery life depends heavily on usage. The Ultra 2 is the only model that consistently delivers its full 36-hour promise, even with GPS and cellular use during hikes or workouts. Other models vary:

Model Advertised Life Real-World Max (Optimized)
Apple Watch Series 10 Up to 18 hours ~30 hours
Apple Watch Ultra 2 Up to 36 hours 30–36 hours
Apple Watch SE (2nd gen) Up to 18 hours ~24 hours
Apple Watch Series 8 Up to 18 hours Up to 48 hours (light use)
Apple Watch Series 6–7 Up to 18 hours 18–24 hours

Heavy use cuts battery fast. A 60-minute outdoor run with GPS and LTE can drain 25–40%. Streaming music to AirPods uses ~10% per hour, while using the speaker uses even more.

How Low Power Mode Doubles Runtime

Low Power Mode can double your battery life by disabling non-essential features:
– Turns off Always-On Display
– Pauses background app refresh
– Reduces haptic feedback
– Slows syncing frequency

Enable it from Control Center (tap the battery icon) or let it activate automatically when charging past 80%. It stays on until you unplug—perfect for travel or long workdays.

Test Your Battery Health First

Find Maximum Capacity in Settings

Go to Settings > Battery > Battery Health on your Apple Watch. Look for:
Maximum Capacity: Your battery’s current strength vs. new.
100%: Like new.
80% or below: Degraded—Apple recommends replacement.
Battery Needs Service: Appears if hardware failure is detected.

A reading of 72% is significantly degraded and will cause fast drain, even with ideal settings.

Understand When Batteries Degrade

After 2–3 years of daily charging, most watches drop to 80% capacity. A Series 5 user reported exactly 80% at 35 months—typical for lithium-ion wear. Below this threshold:
– Unexpected shutdowns at 30–50%
– Slower performance during workouts
– Longer charging times

Apple uses automatic performance management on Series 5 and later to prevent crashes, but it may dim the screen or delay app launches.

Fix Software-Related Battery Drain

Restart After watchOS Updates

watchOS 10 and 11 caused widespread battery drain. Symptoms include:
– 100% → 23% in 7 hours
– Drain worsens over 1–3 days post-update
– Background indexing runs up to 72 hours

Fix: Wait 2–3 days first. Then:
1. Force restart Apple Watch: Hold Side Button + Digital Crown for 10 seconds.
2. Restart iPhone to fix sync issues.
3. Let indexing complete.

Most users see improvement within 48 hours.

Stop Stuck Update Loops

An update stuck in “Preparing…” can drain battery continuously.

Solution:
1. Open Watch app on iPhone > General > Software Update
2. Turn off Automatic Updates
3. Delete any pending download
4. Leave watch charging overnight

If it fails repeatedly, unpair and re-pair (see below).

Optimize Power-Hungry Settings

Apple Watch settings to save battery life screenshot

Turn Off Always-On Display

Always-On Display (AOD) reduces battery life by up to 25%. On Series 7–10, it keeps the screen dimly lit even when your wrist is down.

Fix:
1. Go to Settings > Display & Brightness > Always On
2. Toggle off

You’ll gain significant runtime—especially with bright watch faces.

Disable Background App Refresh

Apps syncing in the background waste power. Weather, fitness, and messaging apps are worst offenders.

Fix:
1. On iPhone, open Watch app
2. Tap General > Background App Refresh
3. Disable for non-essential apps

Or disable entirely if you don’t need live updates.

Limit “Hey Siri” and Raise to Wake

  • “Hey Siri” keeps the mic active—drains battery over time.
  • Disable: Settings > Siri & Search > Listen for ‘Hey Siri’
  • Raise to Wake triggers screen too often.
  • Fix: Reduce wake duration to 15 seconds in Display settings

Reduce Brightness and Animations

Max brightness uses more power. Set to 30–50% in Settings > Display & Brightness.

Also:
– Use dark watch faces—OLED screens use less power with black pixels
– Avoid animated or complex faces (e.g., Unity, Astronomy)
– Add a Battery Complication to monitor charge at a glance

Manage Connectivity to Save Power

Turn Off Cellular When iPhone Is Near

Cellular uses more power than Bluetooth. If your iPhone is in your pocket, LTE is unnecessary.

Fix:
– Swipe up > Control Center > Tap Cellular icon to disable
– Or enable Airplane Mode, then turn Bluetooth back on

Saves power during commutes or office work.

Avoid Weak Wi-Fi and Signal Hunting

In low-coverage areas, your watch constantly searches for signal.

Signs of weak connection:
– Blue Wi-Fi icon with one bar
– Green cellular icon flickering

Fix: Enable Airplane Mode, then manually re-enable Bluetooth.

Also helps if you’re using a VPN or ad-blocking profile—these can interfere with Watch connectivity.

Identify and Stop Battery-Sucking Apps

Use Battery Usage to Find Culprits

Check which apps drain power:
1. On iPhone, open Watch app
2. Tap Battery
3. View usage for Last 24 Hours or Last 10 Days

If one app uses disproportionate power (e.g., 40% in 6 hours), it may be malfunctioning.

Common culprits:
– Third-party weather apps with “Always” location access
– Fitness apps running GPS in background
– Messaging apps with constant notifications

Fix: Uninstall or disable background refresh for the app.

Stop Streaming Audio from Watch

Playing music via Bluetooth headphones or watch speaker drains battery fast:
– Up to 15% per hour on speaker
– ~10% per hour via AirPods

Use your iPhone instead for long listens.

Apply Advanced Fixes That Work

Unpair and Re-Pair Your Watch

This fix resolves 80% of persistent drain cases. It clears corrupted data, stuck updates, and sync loops.

Steps:
1. On iPhone, open Watch app > My Watch > Apple Watch > Unpair
2. Wait for backup to finish
3. Re-pair and restore from backup

Reported results:
– Ultra 2: 10h → 20+ hours
– Series 6: 5h → 11+ hours
– Series 8: From dying by afternoon to 66% at bedtime

Do this after major updates or unexplained drain.

Factory Reset and Set Up as New

If re-pairing fails, go nuclear.

Steps:
1. On watch: Settings > General > Transfer or Reset > Erase All Content and Settings
2. Keep cellular plan if prompted
3. Shut down iPhone completely
4. Re-pair watch and set up as new (don’t restore backup)

Why it works: Eliminates corrupted settings, bad app data, and sync conflicts.

One user saw 34% battery remaining after 19 hours of normal use post-reset.

Reset Sync Data and Network Settings

Clears hidden glitches.

Reset Sync Data:
– iPhone: Watch app > General > Reset > Reset Sync Data

Reset Network Settings:
– iPhone: Settings > General > Reset > Reset Network Settings

May take 1–2 days to stabilize, but often stops phantom drain.

Handle Hardware and Charging Right

Apple Watch original charger vs third party charger

Replace Degraded Battery

If battery health is below 80%, replacement is the only fix.

Costs (U.S.):
– Series 4 and newer: $99
– Older models: $79
– With AppleCare+: Free when health <80%

Process:
– Apple may replace the entire unit with a refurbished one
– Turnaround: ~2 weeks
– New serial number assigned

Contact Apple Support or visit a store for diagnostics.

Use Proper Charging Setup

Avoid:
– Charging via laptop USB ports (insufficient power)
– Third-party chargers (may not deliver full wattage)

Do:
– Use original magnetic charger
– Pair with 20W USB-C adapter for fastest charge (~1–2 hours)
– Charge in room temperature (62°F–72°F / 16°C–22°C)

Never charge in hot cars or freezing temps—extremes accelerate degradation.

Prevent Future Battery Drain

Adopt Smart Charging Habits

Lithium-ion batteries hate extremes.

Best practices:
Charge nightly—don’t let it drop to 0%
– Avoid leaving at 100% for days
– For storage: Keep at 50% charge
– Enable Optimized Battery Charging to reduce wear

But if you need max runtime (e.g., travel), disable Optimized Charging temporarily.

Maintain Software Wisely

  • Update watchOS—patches often fix battery bugs
  • But disable auto-updates if new versions are unstable
  • Reboot watch weekly to clear background tasks

Check Apple’s Feedback Page to report issues—forums aren’t monitored.

Optimize Daily Usage

  • Use AirPods, not watch speaker
  • Let iPhone handle GPS for runs
  • Turn off cellular when iPhone is near
  • Enable Theater Mode in dark rooms to prevent accidental wakes

When to Contact Apple

Spot Hardware Failure Signs

Seek help if you see:
Unexpected shutdowns at 30–50%
– Battery health below 80%
– Watch gets hot during use or charge
– Drains from 100% to 10% overnight
– Takes much longer to charge than before

These indicate hardware failure, not software.

Get Support and Service

Options:
Apple Support app: Remote diagnostics
Apple Store: In-person testing and battery swap
Mail-in service: Available in most regions

Bring usage logs and battery health screenshots for faster resolution.


Final Note: Most Apple Watch battery issues are fixable—and usually stem from software, not hardware. Start with simple fixes like restarting and disabling Always-On Display. If drain persists, unpair and re-pair your watch. Only when battery health drops below 80% should you consider replacement. With the right settings and maintenance, your Apple Watch can last all day, every day.

Apple Watch Battery Draining Fast? Fix It Now


If your Apple Watch battery dies by midday—despite charging overnight—you’re not imagining things. Thousands of users report fast battery drain, especially after recent watchOS updates like 10.4 and 11.0. Some see their battery drop 30% overnight, while others struggle to make it through the workday. The good news? In most cases, the problem isn’t a faulty battery—it’s fixable with the right settings and troubleshooting. Whether you own a Series 9, Ultra 2, or SE (2nd gen), this guide will show you how to diagnose and stop the drain—step by step. From disabling power-hogging features to performing deep system resets, you’ll learn exactly what works, based on real user results and Apple’s own technical data.


Decode the Real Causes of Fast Drain

Check What’s Normal vs. What’s Not

Apple promises up to 18 hours of battery life for most models under standard use:
– 90 time checks
– 90 notifications
– 45 minutes of app use
– One 60-minute GPS workout

The Ultra 2 goes further—up to 36 hours, or 72 hours with Low Power Mode. But real-world usage varies. Heavy GPS tracking, streaming, or constant alerts can reduce runtime to 8–12 hours. If you’re getting less than 12 hours with light use, something’s wrong.

Spot Problematic Overnight Drain

Losing 10–15% overnight is normal—your watch syncs health data, checks for updates, and monitors sleep. But if it drops 30–40% while idle, that’s a red flag. This kind of drain usually points to a software glitch, rogue app, or failing battery, not just settings.


Shut Down Power-Hungry Display Settings

Apple Watch display settings battery drain

Turn Off Always-On Display

The #1 battery killer? Always-On Display (available on Series 5 and later). It keeps your screen lit even when your wrist is down. On bright OLED models (Series 6+), this can cost 3–5 hours of battery life.
Fix it:
1. Open Settings > Display & Brightness > Always On
2. Toggle it Off
You’ll immediately notice longer battery life—especially if you’re not constantly checking the time.

Cut Screen Wake Time in Half

Every time your screen wakes, it uses power. Two features cause the most unnecessary activations:
Raise to Wake
Long wake duration (70 seconds)

If you glance at your watch 100+ times a day, these add up fast.
Fix it:
1. On your iPhone: Open Watch app > Display & Brightness
2. Turn off Raise to Wake
3. Set Wake Duration to 15 seconds
Now, your screen only wakes when you tap it or press the Digital Crown—saving significant battery.

Switch to a Dark, Simple Watch Face

Complicated faces with live updates or animations (like Infograph Modular) drain power. Each complication pulls data, wakes the CPU, and lights up the screen.
Best choices:
X-Large with 1–2 complications
Activity Analog with minimal extras
Flat black faces (on OLED models)

On OLED screens, black pixels use zero power. A dark-themed face reduces energy use every second it’s on.


Optimize Connectivity to Save Power

Apple Watch Bluetooth Wi-Fi battery usage

Stay Close to Your iPhone

Your Apple Watch uses Bluetooth to connect to your iPhone—the most power-efficient method. When your phone is out of range, it switches to Wi-Fi or cellular, which use far more energy.
Tip: Keep your iPhone nearby when possible. If you’re out of range, consider Airplane Mode with Wi-Fi enabled for specific tasks.

Avoid Weak Signal Zones

Poor Wi-Fi or cellular signal forces your watch to constantly search for a connection. This background task burns battery even when idle.
Signs of weak signal:
– Blue Wi-Fi or green cellular bars show 1–2 bars in Control Center
– Battery drops rapidly with no user activity

Fix:
– Use Airplane Mode in elevators, basements, or remote areas
– Re-enable Wi-Fi or Bluetooth only when needed

Disable Background App Refresh

Apps like weather, news, or fitness trackers refresh in the background, syncing data and waking the screen.
Fix it:
1. On iPhone: Watch app > General > Background App Refresh
2. Turn it Off
This stops unnecessary updates and cuts idle battery drain.


Reduce GPS and Sensor Load

Enable Workout Power Saving Mode

GPS and heart rate sensors are major power users. A 60-minute outdoor run can use 15–20% of your battery just for GPS.
Fix it:
1. Go to Settings > Workout > Power Saving Mode > On
This reduces GPS and heart rate sampling frequency—ideal for long hikes or runs.

Pair a Bluetooth Chest Strap

The wrist-based heart sensor uses constant LED light, which drains power. A Bluetooth chest strap (like Polar H10) measures heart rate more efficiently.
Fix it:
1. Settings > Bluetooth > Pair Device
2. Connect your chest strap
You’ll save 10–15% during workouts and get more accurate readings.

Turn Off Blood Oxygen Monitoring

If you don’t use sleep oximetry, disable it:
1. Watch app on iPhone > Privacy > Health > Blood Oxygen > Off
This stops nighttime readings and reduces overnight drain.


Fix Software and Update Issues

Apple Watch watchOS update stuck preparing

Install the Latest watchOS

Apple often releases patch updates (e.g., 11.0.1) to fix battery bugs. An outdated or corrupted OS can cause hidden background processes.
Check for updates:
1. Watch app on iPhone > General > Software Update
2. Install any available update
Even if you’re on the latest version, reinstalling can fix corrupted files.

Fix Stuck or Pending Updates

A pending update stuck on “Preparing” can cause 24–48 hours of heavy background activity.
Fix it:
1. Keep your watch on the charger
2. Wait up to 48 hours—some users report completion only after extended charging
3. If stuck:
Settings > General > Usage > Software Update > Delete Update
– Retry download later
Avoid automatic updates if you’re prone to battery issues.

Restart Both Devices

A simple restart clears temporary glitches.
Do this:
1. Restart Apple Watch: Hold side button > swipe power off
2. Restart iPhone: Hold volume + side button > slide to power off
3. Turn both back on
Many users report immediate improvement after this step.


Perform Advanced System Resets

Reset Sync Data

Sync errors between iPhone and Watch cause background processes that drain battery.
Fix it:
1. On iPhone: Watch app > General > Reset > Reset Sync Data
2. Wait 10 minutes for re-sync
This clears corrupted messages, health data, or app sync issues.

Unpair and Re-pair Your Apple Watch

If drain persists, unpairing and re-pairing often fixes deep software issues.
Steps:
1. Watch app > All Watches > (i) > Unpair Apple Watch
2. Let it erase completely
3. Restart iPhone (critical)
4. Set up as new—don’t restore from backup
This removes corrupted app data and pairing glitches.

Factory Reset (Erase All Content)

If all else fails, erase everything:
1. Apple Watch: Settings > General > Transfer or Reset > Erase All Content
2. For cellular models, choose keep cellular plan
3. After reset, restart iPhone before re-pairing
4. Set up as new—don’t restore

User result: One Series 9 owner went from dead by 3 PM to 34% after 19 hours using this method.


Check Battery Health and Hardware

View Maximum Capacity

Battery health drops over time. After 2–3 years, it often falls below 80%.
Check it:
1. On Apple Watch: Settings > Battery > Battery Health
2. Look for:
100%: New
80–89%: Degraded
Below 80%: Needs replacement
“Battery Needs Service”: Contact Apple

If capacity is below 75%, expect poor daily performance.

Recognize Failing Battery Signs

Hardware failure shows up as:
Unexpected shutdowns at 20–30%
Battery jumps from 50% to 20% in minutes
Long charging times or won’t reach 100%
– Device gets hot during normal use

If you see these, it’s likely a failing battery, not software.

Avoid Extreme Temperatures

Heat kills lithium-ion batteries.
– Don’t charge in direct sunlight, saunas, or hot cars
– Avoid workouts in >35°C (95°F) environments
Cold temps (<0°C / 32°F) also reduce capacity temporarily.


Optimize Charging Habits

Use Optimized Battery Charging

This feature learns your routine and delays full charge until you typically wear the watch. It extends battery lifespan.
Enable it:
Settings > Battery > Battery Health > Optimized Battery Charging > On

If you need a full charge immediately, turn it off temporarily.

Charge Nightly, Avoid Deep Discharge

Lithium-ion batteries prefer frequent top-ups.
– Charge every night
– Avoid letting it drop below 10% regularly
– Don’t leave it at 100% for days—use Optimized Charging

This keeps the battery in peak condition longer.

Use Certified Charger and Clean Contacts

Dirty charging pads or third-party cables reduce efficiency.
Best practice:
– Use Apple-certified charger and cable
– Wipe back of watch and charger with dry cloth
– Charge from wall adapter, not sleeping laptop USB port

Ensure solid contact for full-speed charging.


When to Replace or Upgrade

Get a Battery Replacement

If battery health is below 80%, Apple replaces it:
Free under AppleCare+
$99 out of warranty (U.S.)
Available at Apple Stores, Authorized Providers, or via mail-in

Never attempt DIY replacement—batteries are glued and soldered. You’ll void warranty and risk damage.

Consider Upgrading Your Watch

If your watch is over 5 years old, the battery may never recover.
Upgrade options:
Apple Watch Ultra 2: 36-hour battery, ideal for heavy users
Series 9: Improved efficiency, longer life than older models
Garmin or Fitbit: Offer 7–14 day battery life for fitness-focused users

Upgrade if software fixes fail and battery health is poor.


Final Fix Checklist (Quick Steps)

Immediate Actions (5 Minutes)

  • ✅ Turn on Low Power Mode (Control Center)
  • ✅ Disable Always-On Display
  • ✅ Turn off Raise to Wake
  • ✅ Reduce Wake Duration to 15 sec
  • ✅ Check for software updates

Intermediate Fixes (10–15 Minutes)

  • ✅ Check Battery Health
  • ✅ Review Battery Usage in Watch app
  • ✅ Turn off Background App Refresh
  • ✅ Disable “Hey Siri”
  • ✅ Reduce brightness to 40–50%

Advanced Solutions (30+ Minutes)

  • Restart both devices
  • Reset Sync Data
  • Unpair and re-pair (set up as new)
  • Factory reset if needed
  • Contact Apple Support if “Battery Needs Service”

Most Apple Watch battery drain issues are fixable without repair. Start with display and connectivity settings, then move to software resets. If your battery health is below 80%, consider replacement. Combine multiple optimizations—each small change adds up. With the right tweaks, you can restore reliable all-day battery life.

« Older posts Newer posts »

© 2026 Apple Watch Reviews

Theme by Anders NorenUp ↑